Netgear RNRX4410 ReadyNAS 2100 User Manual - Page 102
Reassemble the disk tray. Make sure that the hard disk connectors face the interior of the disk
 |
UPC - 606449062137
View all Netgear RNRX4410 manuals
Add to My Manuals
Save this manual to your list of manuals |
Page 102 highlights
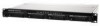
ReadyNAS 2100 User Manual 2. If necessary, unlock the tray lock by moving it to the right, then press the release of the failed disk. The latch pops out. Figure 6-6 3. Pull out the disk tray, remove the screws, and replace the failed disk. Figure 6-7 4. Reassemble the disk tray. Make sure that the hard disk connectors face the interior of the disk bay when you reassemble the disk. 6-6 Managing Levels of Service v1.0, May 2009
-
 1
1 -
2
-
3
-
4
-
5
-
6
-
7
-
8
-
9
-
10
-
11
-
12
-
13
-
14
-
15
-
16
-
17
-
18
-
19
-
20
-
21
-
22
-
23
-
24
-
25
-
26
-
27
-
28
-
29
-
30
-
31
-
32
-
33
-
34
-
35
-
36
-
37
-
38
-
39
-
40
-
41
-
42
-
43
-
44
-
45
-
46
-
47
-
48
-
49
-
50
-
51
-
52
-
53
-
54
-
55
-
56
-
57
-
58
-
59
-
60
-
61
-
62
-
63
-
64
-
65
-
66
-
67
-
68
-
69
-
70
-
71
-
72
-
73
-
74
-
75
-
76
-
77
-
78
-
79
-
80
-
81
-
82
-
83
-
84
-
85
-
86
-
87
-
88
-
89
-
90
-
91
-
92
-
93
-
94
-
95
-
96
-
 97
97 -
 98
98 -
 99
99 -
 100
100 -
 101
101 -
 102
102 -
 103
103 -
 104
104 -
 105
105 -
 106
106 -
 107
107 -
108
-
109
-
110
-
111
-
112
-
113
-
114
-
115
-
116
-
117
-
118
-
119
-
120
-
121
-
122
-
123
-
124
 |
 |

ReadyNAS 2100 User Manual
6-6
Managing Levels of Service
v1.0, May 2009
2.
If necessary, unlock the tray lock by moving it to the right, then press the release of the failed
disk. The latch pops out.
3.
Pull out the disk tray, remove the screws, and replace the failed disk.
4.
Reassemble the disk tray. Make sure that the hard disk connectors face the interior of the disk
bay when you reassemble the disk.
Figure 6-6
Figure 6-7