Netgear RNRX4410 ReadyNAS 2100 User Manual - Page 47
Clock, System Time, and NTP Options, Alerts, Alert Contacts, Alert Settings, SNMP, and SMTP, Contacts
 |
UPC - 606449062137
View all Netgear RNRX4410 manuals
Add to My Manuals
Save this manual to your list of manuals |
Page 47 highlights
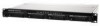
ReadyNAS 2100 User Manual Clock, System Time, and NTP Options An accurate time setting on the Clock screen is required to ensure proper file timestamps. You can access the Clock screen by selecting System > Clock from the main menu. The Select Timezone section and the Select Current Time section of the Clock screen allow you to set the Timezone, and the Date and Time. You can elect to synchronize the system time on the device with a remote NTP (Network Time Protocol) server. You can elect to keep the default servers or enter up to two NTP servers closer to your locale. You can find an available public NTP servers by searching the Web. Alerts, Alert Contacts, Alert Settings, SNMP, and SMTP Figure 2-32 In the event of a device or an enclosure failure, a quota violation, low-disk space warning, and other system events requiring your attention, e-mail alerts are sent. The Alerts screen is accessed by selecting System > Alerts from the main menu. Contacts The Contacts tab allows you to specify up to three e-mail addresses where system alerts will be sent. The ReadyNAS 2100 device has a robust system monitoring feature and sends e-mail alerts if something appears to be wrong or when a device has failed. Make sure to enter a primary e-mail address and a backup one if possible. Some e-mail addresses can be tied to a mobile phone. This is a great way to monitor the device when you are away from your desk. Setting Up and Managing Your ReadyNAS 2100 v1.0, May 2009 2-27
-
 1
1 -
2
-
3
-
4
-
5
-
6
-
7
-
8
-
9
-
10
-
11
-
12
-
13
-
14
-
15
-
16
-
17
-
18
-
19
-
20
-
21
-
22
-
23
-
24
-
25
-
26
-
27
-
28
-
29
-
30
-
31
-
32
-
33
-
34
-
35
-
36
-
37
-
38
-
39
-
40
-
41
-
 42
42 -
 43
43 -
 44
44 -
 45
45 -
 46
46 -
 47
47 -
 48
48 -
 49
49 -
 50
50 -
 51
51 -
 52
52 -
53
-
54
-
55
-
56
-
57
-
58
-
59
-
60
-
61
-
62
-
63
-
64
-
65
-
66
-
67
-
68
-
69
-
70
-
71
-
72
-
73
-
74
-
75
-
76
-
77
-
78
-
79
-
80
-
81
-
82
-
83
-
84
-
85
-
86
-
87
-
88
-
89
-
90
-
91
-
92
-
93
-
94
-
95
-
96
-
97
-
98
-
99
-
100
-
101
-
102
-
103
-
104
-
105
-
106
-
107
-
108
-
109
-
110
-
111
-
112
-
113
-
114
-
115
-
116
-
117
-
118
-
119
-
120
-
121
-
122
-
123
-
124
 |
 |
