Netgear RNRX4410 ReadyNAS 2100 User Manual - Page 39
RAID Settings, Apply, Make hot spare
 |
UPC - 606449062137
View all Netgear RNRX4410 manuals
Add to My Manuals
Save this manual to your list of manuals |
Page 39 highlights
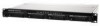
ReadyNAS 2100 User Manual 3. Specify the reserve space for a snapshot. Next, select the percentage of the volume you wish to allocate for snapshots. You can specify 0 if you wish to disable snapshot capability, or you can specify a percentage in 5 percent increments from 5 to 50 percent. The percentage represents the amount of data you think changes while the snapshot is active. This typically depends on how often you schedule your snapshot to occur (see "Snapshots" on page 4-9), and the maximum amount of data (plus padding) you think changes during that time. Make sure to allocate enough space for a worst case as the snapshot becomes unusable when its reserved space runs out. In our example, we selected 10 percent of the volume to be reserved for snapshots. Note: If you do not reserve any space for snapshots, the snapshot tab is not displayed in the Volume tab. 4. Specify the desired volume size. After you specify the volume parameters, enter the appropriate volume size-if you wish to configure a smaller volume size than the maximum displayed. The resulting volume will be approximately the size that is specified. In our example, we kept the maximum size that was calculated. 5. Click Apply, and wait for the instruction to reboot the system. It typically takes about 1 minute before you are notified to reboot. After rebooting, you are notified by e-mail when the volume has been added. Use RAIDar to reconnect to the NAS device. RAID Settings After you have added a volume, you can return to the Volume tab and click the RAID Settings tab to display the current RAID information and configuration options for the volume. Notice that the disk on Channel 4 that we did not configure is listed in the Available Disks section. We can add this disk as a hot spare by clicking Make hot spare. Figure 2-24 Setting Up and Managing Your ReadyNAS 2100 v1.0, May 2009 2-19
-
 1
1 -
2
-
3
-
4
-
5
-
6
-
7
-
8
-
9
-
10
-
11
-
12
-
13
-
14
-
15
-
16
-
17
-
18
-
19
-
20
-
21
-
22
-
23
-
24
-
25
-
26
-
27
-
28
-
29
-
30
-
31
-
32
-
33
-
 34
34 -
 35
35 -
 36
36 -
 37
37 -
 38
38 -
 39
39 -
 40
40 -
 41
41 -
 42
42 -
 43
43 -
 44
44 -
45
-
46
-
47
-
48
-
49
-
50
-
51
-
52
-
53
-
54
-
55
-
56
-
57
-
58
-
59
-
60
-
61
-
62
-
63
-
64
-
65
-
66
-
67
-
68
-
69
-
70
-
71
-
72
-
73
-
74
-
75
-
76
-
77
-
78
-
79
-
80
-
81
-
82
-
83
-
84
-
85
-
86
-
87
-
88
-
89
-
90
-
91
-
92
-
93
-
94
-
95
-
96
-
97
-
98
-
99
-
100
-
101
-
102
-
103
-
104
-
105
-
106
-
107
-
108
-
109
-
110
-
111
-
112
-
113
-
114
-
115
-
116
-
117
-
118
-
119
-
120
-
121
-
122
-
123
-
124
 |
 |
