Netgear RNRX4410 ReadyNAS 2100 User Manual - Page 22
Ethernet Interfaces, Standard Setting
 |
UPC - 606449062137
View all Netgear RNRX4410 manuals
Add to My Manuals
Save this manual to your list of manuals |
Page 22 highlights
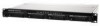
ReadyNAS 2100 User Manual Ethernet Interfaces Select Network > Interfaces > Ethernet 1 /Ethernet 2 tab pages to specify network interfacespecific settings for Standard Settings, Teaming/Failover, VLAN, and Performance Settings. Standard Setting In this section, you can specify the IP address, network mask, speed/duplex mode, and MTU settings. In most networks where a DHCP server is enabled, you can simply specify the Use values from a DHCP server option to automatically set the IP address and network mask. Figure 2-2 • IP Assignment. Select either Use values from a DHCP server or Use values below. - If you elect to assign the IP address using Use values from a DHCP server, NETGEAR advises that you set the lease time on the DHCP server/router to a value of at least a day. Otherwise, you might notice that the IP address of the unit changes even when it has been powered down for only a few minutes. Most DHCP servers allow you to assign a static IP address for specified MAC addresses. If you have this option, this would be a good way to ensure your ReadyNAS 2100 maintains the same IP address even in DHCP mode. Tip: Consider reserving an IP address for the MAC address of this Ethernet interface in your DHCP server (or router). This will give you the stability of a fixed IP address without the effort of maintaining static addresses. - If you assign a static IP address by selecting Use values below, be aware that the browser will lose connection to the ReadyNAS 2100 device after the IP address has been changed. To reconnect after assigning a static IP address, open RAIDar and click Rescan to locate the device, and then reconnect. 2-2 Setting Up and Managing Your ReadyNAS 2100 v1.0, May 2009
-
 1
1 -
2
-
3
-
4
-
5
-
6
-
7
-
8
-
9
-
10
-
11
-
12
-
13
-
14
-
15
-
16
-
 17
17 -
 18
18 -
 19
19 -
 20
20 -
 21
21 -
 22
22 -
 23
23 -
 24
24 -
 25
25 -
 26
26 -
 27
27 -
28
-
29
-
30
-
31
-
32
-
33
-
34
-
35
-
36
-
37
-
38
-
39
-
40
-
41
-
42
-
43
-
44
-
45
-
46
-
47
-
48
-
49
-
50
-
51
-
52
-
53
-
54
-
55
-
56
-
57
-
58
-
59
-
60
-
61
-
62
-
63
-
64
-
65
-
66
-
67
-
68
-
69
-
70
-
71
-
72
-
73
-
74
-
75
-
76
-
77
-
78
-
79
-
80
-
81
-
82
-
83
-
84
-
85
-
86
-
87
-
88
-
89
-
90
-
91
-
92
-
93
-
94
-
95
-
96
-
97
-
98
-
99
-
100
-
101
-
102
-
103
-
104
-
105
-
106
-
107
-
108
-
109
-
110
-
111
-
112
-
113
-
114
-
115
-
116
-
117
-
118
-
119
-
120
-
121
-
122
-
123
-
124
 |
 |
