Netgear RNRX4410 ReadyNAS 2100 User Manual - Page 62
Group, Apply, Import user list, The name and password fields are required.
 |
UPC - 606449062137
View all Netgear RNRX4410 manuals
Add to My Manuals
Save this manual to your list of manuals |
Page 62 highlights
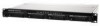
ReadyNAS 2100 User Manual • User ID • Select a group from the Group pull-down menu. • Password • Disk quota. 3. Click Apply to save your settings. Only the user name and password fields are required; however, you should specify a user e-mail address if you intend to set up disk quotas. Without an e-mail address, the user will not be warned when disk usage approaches the specified disk quota limit. If you do not wish to assign a disk quota, enter 0. If you wish to add a large number of users, select Import user list from the pull-down menu. Figure 3-8 Here, you can upload a CSV (Comma Separated Value) formatted file containing the user account information. The format of the file is: name1,password1,group1,email1,uid1,quota1 name2,password2,group2,email2,uid2,quota2 name3,password3,group3,email3,uid3,quota3 : Please note the following: • Spaces around commas are ignored. • The name and password fields are required. • If a listed group account does not exist, it is automatically created. • Group and quota are set to the defaults if not specified. • E-mail notification is not sent to the user if the field is omitted or left blank. • UID is automatically generated if not specified. • Empty fields are replaced with account defaults. Examples of acceptable formats are as follows (note that you can omit follow-on commas and fields if you wish to accept the system defaults for those fields, or you can leave the fields empty): fred,hello123 3-8 Managing User Access v1.0, May 2009
-
 1
1 -
2
-
3
-
4
-
5
-
6
-
7
-
8
-
9
-
10
-
11
-
12
-
13
-
14
-
15
-
16
-
17
-
18
-
19
-
20
-
21
-
22
-
23
-
24
-
25
-
26
-
27
-
28
-
29
-
30
-
31
-
32
-
33
-
34
-
35
-
36
-
37
-
38
-
39
-
40
-
41
-
42
-
43
-
44
-
45
-
46
-
47
-
48
-
49
-
50
-
51
-
52
-
53
-
54
-
55
-
56
-
 57
57 -
 58
58 -
 59
59 -
 60
60 -
 61
61 -
 62
62 -
 63
63 -
 64
64 -
 65
65 -
 66
66 -
 67
67 -
68
-
69
-
70
-
71
-
72
-
73
-
74
-
75
-
76
-
77
-
78
-
79
-
80
-
81
-
82
-
83
-
84
-
85
-
86
-
87
-
88
-
89
-
90
-
91
-
92
-
93
-
94
-
95
-
96
-
97
-
98
-
99
-
100
-
101
-
102
-
103
-
104
-
105
-
106
-
107
-
108
-
109
-
110
-
111
-
112
-
113
-
114
-
115
-
116
-
117
-
118
-
119
-
120
-
121
-
122
-
123
-
124
 |
 |
