Netgear RNRX4410 ReadyNAS 2100 User Manual - Page 65
Managing Shares, Appendix A, Share Access from MAC and Linux, Systems
 |
UPC - 606449062137
View all Netgear RNRX4410 manuals
Add to My Manuals
Save this manual to your list of manuals |
Page 65 highlights
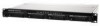
ReadyNAS 2100 User Manual 1. From the main menu, select Volumes > Volume Settings. If more than one volume is configured, click on the volume you wish to add the share. 2. Select Add Shares. Enter the share name and description. Figure 3-12 Note: Enabling Public Access means the Guest account has access to the share. Once you finish adding the shares, refer to Appendix A, "Share Access from MAC and Linux Systems"" for instructions on how to access them from different client interfaces. Managing Shares Once you have added shares, you can manually fine-tune share access by selecting Share List. Figure 3-13 If you want to delete a share, select the check box on the far right of the share listing and click Delete. The columns to the left of the Delete check box represent the services that are currently available. The access icons in those columns summarize the status of the service and the access rights to the Managing User Access v1.0, May 2009 3-11
-
 1
1 -
2
-
3
-
4
-
5
-
6
-
7
-
8
-
9
-
10
-
11
-
12
-
13
-
14
-
15
-
16
-
17
-
18
-
19
-
20
-
21
-
22
-
23
-
24
-
25
-
26
-
27
-
28
-
29
-
30
-
31
-
32
-
33
-
34
-
35
-
36
-
37
-
38
-
39
-
40
-
41
-
42
-
43
-
44
-
45
-
46
-
47
-
48
-
49
-
50
-
51
-
52
-
53
-
54
-
55
-
56
-
57
-
58
-
59
-
 60
60 -
 61
61 -
 62
62 -
 63
63 -
 64
64 -
 65
65 -
 66
66 -
 67
67 -
 68
68 -
 69
69 -
 70
70 -
71
-
72
-
73
-
74
-
75
-
76
-
77
-
78
-
79
-
80
-
81
-
82
-
83
-
84
-
85
-
86
-
87
-
88
-
89
-
90
-
91
-
92
-
93
-
94
-
95
-
96
-
97
-
98
-
99
-
100
-
101
-
102
-
103
-
104
-
105
-
106
-
107
-
108
-
109
-
110
-
111
-
112
-
113
-
114
-
115
-
116
-
117
-
118
-
119
-
120
-
121
-
122
-
123
-
124
 |
 |
