Nikon COOLPIX L110  L110 User's Manual - Page 94
Connecting to a Computer, Before Connecting the Camera - eh 67
 |
View all Nikon COOLPIX L110 manuals
Add to My Manuals
Save this manual to your list of manuals |
Page 94 highlights
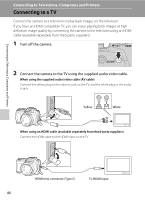
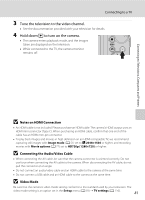
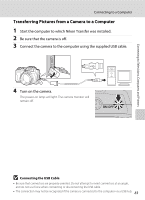
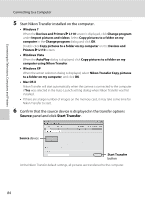
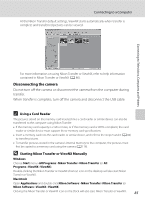
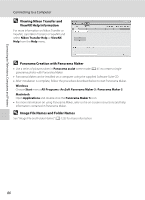
Connecting to Televisions, Computers and Printers Connecting to a Computer Use the supplied USB cable to connect the camera to a computer, and copy (transfer) pictures to a computer with the supplied Nikon Transfer software. Before Connecting the Camera Install the Software Before connecting the camera to a computer, software, including Nikon Transfer, ViewNX for displaying transferred pictures, and Panorama Maker for creating panorama photos, must be installed using the supplied Software Suite CD. For more information on installing the software, refer to the Quick Start Guide. Compatible Operating Systems Windows • Windows 7 (Home Basic/Home Premium/Professional/Enterprise/Ultimate editions) • Windows Vista Service Pack 2 (Home Basic/Home Premium/Business/ Enterprise/Ultimate editions) • 32-bit versions of Windows XP Service Pack 3 (Home Edition/Professional) Macintosh Mac OS X (version 10.4.11, 10.5.8, 10.6) For information on the requirements for playing back high-definition and full-HD movies, refer to the ViewNX help information (System Requirements>H.264 HighDefinition (HD) movie playback) (A 86). Refer to the Nikon website for the latest information on operating system compatibility. B Note on Power Source When connecting the camera to a computer, use fully charged batteries to prevent the camera from turning off unexpectedly. If the AC Adapter EH-67 (A 122) (available separately) is used, COOLPIX L110 can be powered from an electrical outlet. Do not use any other make or model of AC adapter as they may cause the 82 camera to overheat or malfunction.
-
 1
1 -
2
-
3
-
4
-
5
-
6
-
7
-
8
-
9
-
10
-
11
-
12
-
13
-
14
-
15
-
16
-
17
-
18
-
19
-
20
-
21
-
22
-
23
-
24
-
25
-
26
-
27
-
28
-
29
-
30
-
31
-
32
-
33
-
34
-
35
-
36
-
37
-
38
-
39
-
40
-
41
-
42
-
43
-
44
-
45
-
46
-
47
-
48
-
49
-
50
-
51
-
52
-
53
-
54
-
55
-
56
-
57
-
58
-
59
-
60
-
61
-
62
-
63
-
64
-
65
-
66
-
67
-
68
-
69
-
70
-
71
-
72
-
73
-
74
-
75
-
76
-
77
-
78
-
79
-
80
-
81
-
82
-
83
-
84
-
85
-
86
-
87
-
88
-
 89
89 -
 90
90 -
 91
91 -
 92
92 -
 93
93 -
 94
94 -
 95
95 -
 96
96 -
 97
97 -
 98
98 -
 99
99 -
100
-
101
-
102
-
103
-
104
-
105
-
106
-
107
-
108
-
109
-
110
-
111
-
112
-
113
-
114
-
115
-
116
-
117
-
118
-
119
-
120
-
121
-
122
-
123
-
124
-
125
-
126
-
127
-
128
-
129
-
130
-
131
-
132
-
133
-
134
-
135
-
136
-
137
-
138
-
139
-
140
-
141
-
142
-
143
-
144
-
145
-
146
-
147
-
148
-
149
-
150
-
151
-
152
-
153
-
154
-
155
-
156
 |
 |