Nikon S200 S200 User's Manual - Page 94
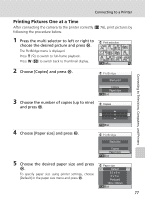
Paper Size, Press the multi selector to left or right to, select pictures
 |
UPC - 182089129190
View all Nikon S200 manuals
Add to My Manuals
Save this manual to your list of manuals |
Page 94 highlights
Connecting to a Printer 5 Press the multi selector to left or right to select pictures Print selection 8 6 Press the multi selector up or down to set the number of copies (up to nine) Pictures selected for printing can be recognized by the check mark (y) and the numeral indicating the number of copies to be printed. A check mark is not displayed with pictures for which 0 copies have been specified and these pictures will not be printed. Repeat steps 5-6 to select additional pictures. Press v (k) to switch to full-frame playback. Press t (j) to switch back to thumbnail display. Press d when setting is complete. 7 Printing starts. Monitor display returns to the print menu (step 2) when printing is complete. To cancel before all copies have been printed, press d. Back Print selection 10 Back Iw Printing 002/010 Cancel Connecting to Televisions, Computers, and Printers j Paper Size The camera supports the following paper sizes: [Default] (the default paper size for the current printer), [3.5 × 5 in.], [5 × 7 in.], [Postcard], [100 × 150 mm], [4 × 6 in.], [8 × 10 in.], [Letter], [A3], and [A4]. Only sizes supported by the current printer will be displayed. To spec- 80 ify paper size using printer settings, choose [Default] in the paper size menu.
-
 1
1 -
2
-
3
-
4
-
5
-
6
-
7
-
8
-
9
-
10
-
11
-
12
-
13
-
14
-
15
-
16
-
17
-
18
-
19
-
20
-
21
-
22
-
23
-
24
-
25
-
26
-
27
-
28
-
29
-
30
-
31
-
32
-
33
-
34
-
35
-
36
-
37
-
38
-
39
-
40
-
41
-
42
-
43
-
44
-
45
-
46
-
47
-
48
-
49
-
50
-
51
-
52
-
53
-
54
-
55
-
56
-
57
-
58
-
59
-
60
-
61
-
62
-
63
-
64
-
65
-
66
-
67
-
68
-
69
-
70
-
71
-
72
-
73
-
74
-
75
-
76
-
77
-
78
-
79
-
80
-
81
-
82
-
83
-
84
-
85
-
86
-
87
-
88
-
 89
89 -
 90
90 -
 91
91 -
 92
92 -
 93
93 -
 94
94 -
 95
95 -
 96
96 -
 97
97 -
 98
98 -
 99
99 -
100
-
101
-
102
-
103
-
104
-
105
-
106
-
107
-
108
-
109
-
110
-
111
-
112
-
113
-
114
-
115
-
116
-
117
-
118
-
119
-
120
-
121
-
122
-
123
-
124
-
125
-
126
-
127
-
128
-
129
-
130
-
131
-
132
-
133
-
134
-
135
-
136
-
137
-
138
-
139
-
140
-
141
-
142
-
143
-
144
-
145
-
146
-
147
-
148
-
149
-
150
-
151
-
152
 |
 |
