Nokia IP2255 Installation Guide - Page 102
To Install the replacement NIC, into the metal tracks on either side of the slot.
 |
View all Nokia IP2255 manuals
Add to My Manuals
Save this manual to your list of manuals |
Page 102 highlights
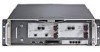
7 Installing and Replacing Other Components If slot 3 or slot 4 is unoccupied, remove the blank plate that covers the slot. 5. Using the Phillips-head screwdriver, remove the two screws located on the front panel of the management NIC. 10/100/1000BaseT 1 2 3 4 Screws 00157 6. Disconnect the NIC from the motherboard by reaching inside slot 4 and gently, but firmly, pressing directly behind the front panel of the management NIC toward the front of the security platform. 7. Remove the existing NIC by sliding it out through the front panel of the security platform. To Install the replacement NIC 1. Insert the replacement NIC into slot 5 and guide both sides of the NIC into the metal tracks on either side of the slot. 2. Press the NIC into the slot until it reconnects to the motherboard and is flush with the front panel of the security platform. Note If the management NIC does not slide easily into the slot or if it extends beyond the front panel, it might not be in the metal guide tracks. Remove the NIC and reinsert it, making sure you align both sides of the NIC inside the metal tracks. 3. Install the two screws into the front panel of the NIC. 4. Reinsert the NICs or blank plates that you removed from slot 3 and slot 4. 5. Resecure the retaining screws on the front of each NIC. 102 Nokia IP2255 Security Platform Installation Guide
-
 1
1 -
2
-
3
-
4
-
5
-
6
-
7
-
8
-
9
-
10
-
11
-
12
-
13
-
14
-
15
-
16
-
17
-
18
-
19
-
20
-
21
-
22
-
23
-
24
-
25
-
26
-
27
-
28
-
29
-
30
-
31
-
32
-
33
-
34
-
35
-
36
-
37
-
38
-
39
-
40
-
41
-
42
-
43
-
44
-
45
-
46
-
47
-
48
-
49
-
50
-
51
-
52
-
53
-
54
-
55
-
56
-
57
-
58
-
59
-
60
-
61
-
62
-
63
-
64
-
65
-
66
-
67
-
68
-
69
-
70
-
71
-
72
-
73
-
74
-
75
-
76
-
77
-
78
-
79
-
80
-
81
-
82
-
83
-
84
-
85
-
86
-
87
-
88
-
89
-
90
-
91
-
92
-
93
-
94
-
95
-
96
-
 97
97 -
 98
98 -
 99
99 -
 100
100 -
 101
101 -
 102
102 -
 103
103 -
 104
104 -
 105
105 -
 106
106 -
 107
107 -
108
-
109
-
110
-
111
-
112
-
113
-
114
-
115
-
116
-
117
-
118
-
119
-
120
-
121
-
122
-
123
-
124
 |
 |
