Nokia IP2255 Installation Guide - Page 42
Caution, Loosen the four chassis tray assembly retaining screws from the front
 |
View all Nokia IP2255 manuals
Add to My Manuals
Save this manual to your list of manuals |
Page 42 highlights
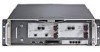
2 Installing Nokia IP2255 Appliances Caution To help guard against electrostatic discharge, follow the instructions on the grounding wrist strap envelope before you open the appliance. a. Loosen the four chassis tray assembly retaining screws from the front panel of the appliance. SLOT 1 10Base-SR X2 A L 10Base-SR X2 A L SLOT 2 RESET CONSOLE AUX PCMCIA SLOT 3 10/100 BaseT 1 3 10/100 BaseT 2 4 1 3 2 4 SLOT 4 10/100/1000BaseT 5 7 6 8 5 7 6 8 SLOT 5 1 3 57 L A L A 2 4 68 1 3 57 L A L A 2 4 68 1 2 3 4 Chassis tray assembly retaining screws IP2255 00010 42 Nokia IP2255 Security Platform Installation Guide
-
 1
1 -
2
-
3
-
4
-
5
-
6
-
7
-
8
-
9
-
10
-
11
-
12
-
13
-
14
-
15
-
16
-
17
-
18
-
19
-
20
-
21
-
22
-
23
-
24
-
25
-
26
-
27
-
28
-
29
-
30
-
31
-
32
-
33
-
34
-
35
-
36
-
 37
37 -
 38
38 -
 39
39 -
 40
40 -
 41
41 -
 42
42 -
 43
43 -
 44
44 -
 45
45 -
 46
46 -
 47
47 -
48
-
49
-
50
-
51
-
52
-
53
-
54
-
55
-
56
-
57
-
58
-
59
-
60
-
61
-
62
-
63
-
64
-
65
-
66
-
67
-
68
-
69
-
70
-
71
-
72
-
73
-
74
-
75
-
76
-
77
-
78
-
79
-
80
-
81
-
82
-
83
-
84
-
85
-
86
-
87
-
88
-
89
-
90
-
91
-
92
-
93
-
94
-
95
-
96
-
97
-
98
-
99
-
100
-
101
-
102
-
103
-
104
-
105
-
106
-
107
-
108
-
109
-
110
-
111
-
112
-
113
-
114
-
115
-
116
-
117
-
118
-
119
-
120
-
121
-
122
-
123
-
124
 |
 |

2
Installing Nokia IP2255 Appliances
42
Nokia IP2255 Security Platform Installation Guide
Caution
To help guard against electrostatic discharge, follow the instructions
on the grounding wrist strap envelope before you open the appliance.
a.
Loosen the four chassis tray assembly retaining screws from the front
panel of the appliance.
00010
1
2
3
4
10/100/1000BaseT
IP2255
10Base-SR X2
10/100 BaseT
10/100 BaseT
10Base-SR X2
A
L
A
L
1
3
5
7
2
4
6
8
1
3
5
7
2
4
6
8
1
3
5
7
2
4
6
8
1
3
5
7
2
4
6
8
L
A
L
A
L
A
L
A
SLOT 3
SLOT 4
SLOT 1
SLOT 2
SLOT 5
CONSOLE
AUX
PCMCIA
RESET
Chassis tray assembly retaining screws