Nokia IP2255 Installation Guide - Page 44
Slide the chassis tray assembly back into the appliance until it clicks into
 |
View all Nokia IP2255 manuals
Add to My Manuals
Save this manual to your list of manuals |
Page 44 highlights
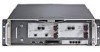
2 Installing Nokia IP2255 Appliances 5. Adjust the mounting brackets on the side of the appliance if necessary . Brackets located for flush with rack IP2255 installation IP2255 Brackets located for forward of rack installation 00553 6. Mount the appliance into a standard 19-inch rack by using the mounting screws located on the mounting brackets. Secure the bottom two screws first. 7. Slide the chassis tray assembly back into the appliance until it clicks into place and resecure the four chassis tray assembly retaining screws. 8. Reinstall the fan unit into the front of the appliance. 9. Reinstall the power supplies. 44 Nokia IP2255 Security Platform Installation Guide
-
 1
1 -
2
-
3
-
4
-
5
-
6
-
7
-
8
-
9
-
10
-
11
-
12
-
13
-
14
-
15
-
16
-
17
-
18
-
19
-
20
-
21
-
22
-
23
-
24
-
25
-
26
-
27
-
28
-
29
-
30
-
31
-
32
-
33
-
34
-
35
-
36
-
37
-
38
-
 39
39 -
 40
40 -
 41
41 -
 42
42 -
 43
43 -
 44
44 -
 45
45 -
 46
46 -
 47
47 -
 48
48 -
 49
49 -
50
-
51
-
52
-
53
-
54
-
55
-
56
-
57
-
58
-
59
-
60
-
61
-
62
-
63
-
64
-
65
-
66
-
67
-
68
-
69
-
70
-
71
-
72
-
73
-
74
-
75
-
76
-
77
-
78
-
79
-
80
-
81
-
82
-
83
-
84
-
85
-
86
-
87
-
88
-
89
-
90
-
91
-
92
-
93
-
94
-
95
-
96
-
97
-
98
-
99
-
100
-
101
-
102
-
103
-
104
-
105
-
106
-
107
-
108
-
109
-
110
-
111
-
112
-
113
-
114
-
115
-
116
-
117
-
118
-
119
-
120
-
121
-
122
-
123
-
124
 |
 |

2
Installing Nokia IP2255 Appliances
44
Nokia IP2255 Security Platform Installation Guide
5.
Adjust the mounting brackets on the side of the appliance if necessary
.
6.
Mount the appliance into a standard 19-inch rack by using the mounting
screws located on the mounting brackets.
Secure the bottom two screws first.
7.
Slide the chassis tray assembly back into the appliance until it clicks into
place and resecure the four chassis tray assembly retaining screws.
8.
Reinstall the fan unit into the front of the appliance.
9.
Reinstall the power supplies.
00553
IP2255
IP2255
Brackets located for
flush with rack
installation
Brackets located
for forward of rack
installation