Nokia IP2255 Installation Guide - Page 39
To rack mount the appliance, Caution
 |
View all Nokia IP2255 manuals
Add to My Manuals
Save this manual to your list of manuals |
Page 39 highlights
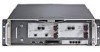
Rack Mounting the Security Platform To rack mount the appliance 1. Remove the IP2255 appliance from the packaging. Caution The appliance is heavy. Use care when you remove it from the packaging. 2. Optionally, remove the fan unit from the appliance. a. Locate the two retaining screws on the front panel that secure the fan unit. SLOT 1 10Base-SR X2 A L 10Base-SR X2 A L SLOT 2 RESET CONSOLE AUX PCMCIA SLOT 3 10/100 BaseT 1 3 10/100 BaseT 2 4 1 3 2 4 SLOT 4 10/100/1000BaseT 5 7 6 8 5 7 6 8 SLOT 5 1 3 57 L A L A 2 4 68 1 3 57 L A L A 2 4 68 1 2 3 4 IP2255 00010 Fan unit Retaining screws b. Loosen the retaining screws by turning them counterclockwise by hand or by using a screwdriver. Nokia IP2255 Security Platform Installation Guide 39
-
 1
1 -
2
-
3
-
4
-
5
-
6
-
7
-
8
-
9
-
10
-
11
-
12
-
13
-
14
-
15
-
16
-
17
-
18
-
19
-
20
-
21
-
22
-
23
-
24
-
25
-
26
-
27
-
28
-
29
-
30
-
31
-
32
-
33
-
 34
34 -
 35
35 -
 36
36 -
 37
37 -
 38
38 -
 39
39 -
 40
40 -
 41
41 -
 42
42 -
 43
43 -
 44
44 -
45
-
46
-
47
-
48
-
49
-
50
-
51
-
52
-
53
-
54
-
55
-
56
-
57
-
58
-
59
-
60
-
61
-
62
-
63
-
64
-
65
-
66
-
67
-
68
-
69
-
70
-
71
-
72
-
73
-
74
-
75
-
76
-
77
-
78
-
79
-
80
-
81
-
82
-
83
-
84
-
85
-
86
-
87
-
88
-
89
-
90
-
91
-
92
-
93
-
94
-
95
-
96
-
97
-
98
-
99
-
100
-
101
-
102
-
103
-
104
-
105
-
106
-
107
-
108
-
109
-
110
-
111
-
112
-
113
-
114
-
115
-
116
-
117
-
118
-
119
-
120
-
121
-
122
-
123
-
124
 |
 |

Rack Mounting the Security Platform
Nokia IP2255 Security Platform Installation Guide
39
To rack mount the appliance
1.
Remove the IP2255 appliance from the packaging.
Caution
The appliance is heavy. Use care when you remove it from the
packaging.
2.
Optionally, remove the fan unit from the appliance.
a.
Locate the two retaining screws on the front panel that secure the fan
unit.
b.
Loosen the retaining screws by turning them counterclockwise by
hand or by using a screwdriver.
00010
1
2
3
4
10/100/1000BaseT
IP2255
10Base-SR X2
10/100 BaseT
10/100 BaseT
10Base-SR X2
A
L
A
L
1
3
5
7
2
4
6
8
1
3
5
7
2
4
6
8
1
3
5
7
2
4
6
8
1
3
5
7
2
4
6
8
L
A
L
A
L
A
L
A
SLOT 3
SLOT 4
SLOT 1
SLOT 2
SLOT 5
CONSOLE
AUX
PCMCIA
RESET
Fan unit
Retaining screws