Nokia MBC 15S User Guide - Page 31
Write and send, Preview/Change/Delete - compatible
 |
UPC - 758478191385
View all Nokia MBC 15S manuals
Add to My Manuals
Save this manual to your list of manuals |
Page 31 highlights
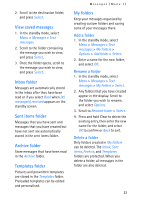
Messages (Menu 1) Note: Picture message function can be used only if it is supported by your network operator or service provider. Only compatible devices that offer picture message feature can receive and display picture message. Copyright protections may prevent some images, ringing tones, and other content from being copied, modified, transferred, or forwarded. Write and send When a picture is added to a text message, the message is converted into a picture message. The message counter in the upper right corner of the display shows the number of characters available for you to type in. 1. In the standby mode, select Menu > Messages > Text messages > Create message > Add number > Select. 2. Enter the recipient's phone number, or select Search to retrieve a number from your contacts list, and select OK. 3. Select Options and scroll to Edit message > Select. After a brief pause, the message entry screen appears in the display. 4. Compose a message using the keypad (or enter nothing if you choose to just send a picture) and select Options. 5. Select Insert picture. 6. Scroll down through the pictures, and select View. 7. Select Insert to insert the picture into your message, otherwise select Back, scroll to another picture, and select View again. 8. To send the picture message, select Options, scroll to Send > Select. Note: Picture images are not saved in Sent items folder. Pictures can only be downloaded via SMS. Preview/Change/Delete 1. After a picture has been inserted into your message, select Options at the message edit screen. 2. Select one of the following options. Preview - Previews the inserted message before sending. Select Back to return to the list of options. Change picture - Takes you back to the picture list. Scroll to highlight a new picture, select View, then Insert to replace the previous picture in your message. Delete picture - Select OK to delete the picture from your message, or select Back to return to the list of options. 31
-
 1
1 -
2
-
3
-
4
-
5
-
6
-
7
-
8
-
9
-
10
-
11
-
12
-
13
-
14
-
15
-
16
-
17
-
18
-
19
-
20
-
21
-
22
-
23
-
24
-
25
-
 26
26 -
 27
27 -
 28
28 -
 29
29 -
 30
30 -
 31
31 -
 32
32 -
 33
33 -
 34
34 -
 35
35 -
 36
36 -
37
-
38
-
39
-
40
-
41
-
42
-
43
-
44
-
45
-
46
-
47
-
48
-
49
-
50
-
51
-
52
-
53
-
54
-
55
-
56
-
57
-
58
-
59
-
60
-
61
-
62
-
63
-
64
-
65
-
66
-
67
-
68
-
69
-
70
-
71
-
72
-
73
 |
 |