Panasonic 72 Service Manual - Page 30
Removing the Each Cover
 |
UPC - 092281808376
View all Panasonic 72 manuals
Add to My Manuals
Save this manual to your list of manuals |
Page 30 highlights
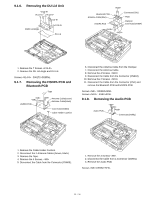
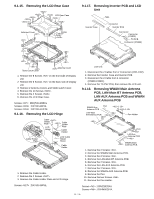
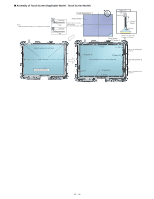
9.1.19. Removing the Each Cover DC IN LID Rubber USB LID Rubber LAN LID Rubber Moden/LAN LID Rubber Battery LID ASS'Y HDD LID ASS'Y Audio LID Rubber USB Back Rubber RGB LID Rubber Serial LID Rubber PCMCIA LID ASS'Y 1. Remove the 14 Screws . 2. Remove the Modem/LAN LID Rubber, LAN LID Rubber, USB LID Rubber, DC IN LID Rubber, Serial LID Rubber, RGB LID Rubber, Audio LID Rubber and USB Back Rubber. 3. Remove the Rear Cabinet. (Refer to 7.1.5 Removing the Rear Cabinet) 4. Remove the 6 Screws . 5. Remove the Battery LID ASS'Y, HDD LID Ass'y and PCMCIA LID Ass'y. Screws : DRQT26+D3FKL Screws : DRHM5025YA
-
 1
1 -
2
-
3
-
4
-
5
-
6
-
7
-
8
-
9
-
10
-
11
-
12
-
13
-
14
-
15
-
16
-
17
-
18
-
19
-
20
-
21
-
22
-
23
-
24
-
 25
25 -
 26
26 -
 27
27 -
 28
28 -
 29
29 -
 30
30 -
 31
31 -
 32
32 -
 33
33 -
 34
34 -
 35
35 -
36
-
37
-
38
-
39
-
40
-
41
-
42
-
43
-
44
-
45
-
46
-
47
-
48
-
49
-
50
-
51
-
52
-
53
-
54
-
55
-
56
-
57
-
58
-
59
-
60
-
61
-
62
-
63
-
64
-
65
-
66
-
67
-
68
-
69
-
70
-
71
-
72
-
73
-
74
-
75
-
76
-
77
-
78
-
79
-
80
-
81
-
82
-
83
-
84
-
85
-
86
-
87
-
88
-
89
-
90
 |
 |
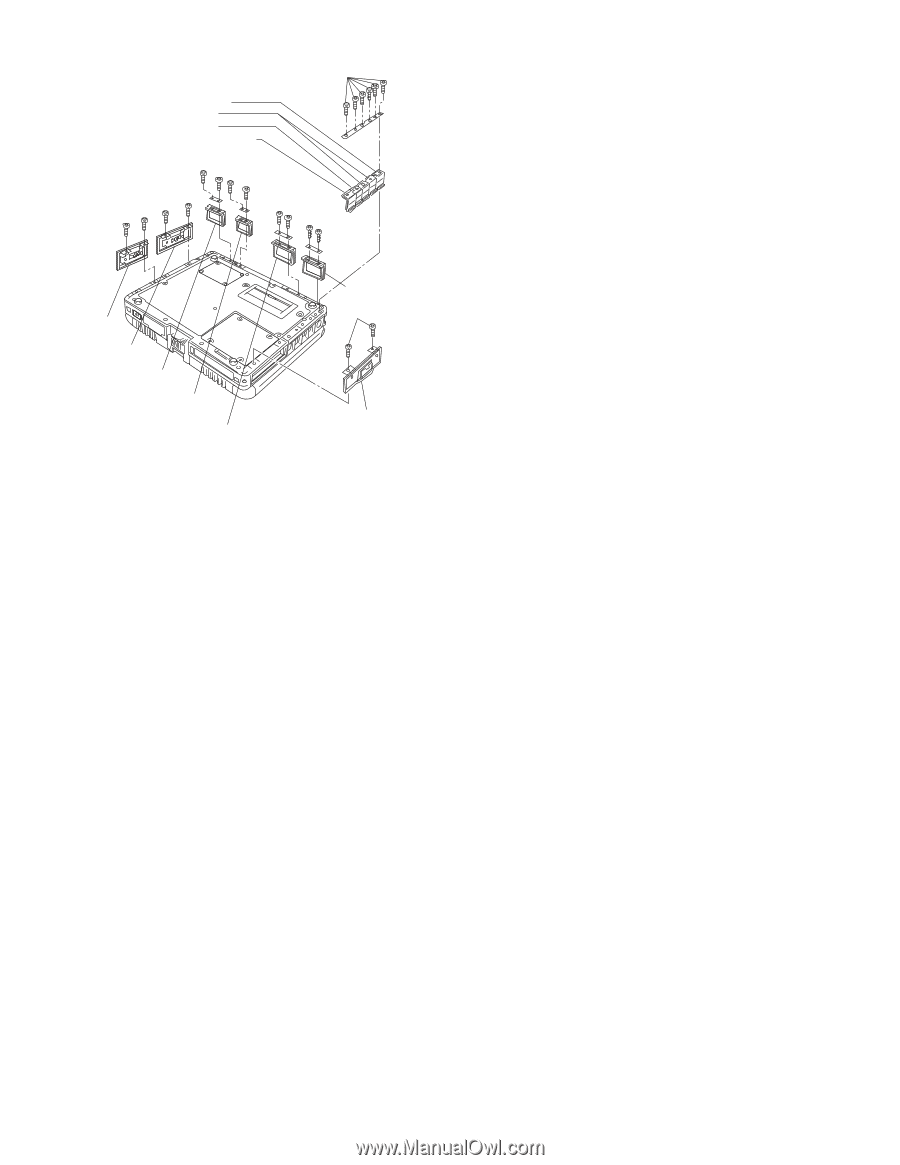
9.1.19.
Removing the Each Cover
1.Removethe14Screws<N6>.
2.RemovetheModem/LANLIDRubber,LANLIDRubber,
USB
LIDRubber,DCINLIDRubber,SerialLIDRubber,RGB
LIDRubber,AudioLIDRubberandUSBBackRubber.
3.RemovetheRearCabinet.
(Referto7.1.5RemovingtheRearCabinet)
4.Removethe6Screws<K12-16>.
5.RemovetheBatteryLIDASS'Y,HDDLIDAss'yand
PCMCIALIDAss'y.
Screws<K12-16>:DRQT26+D3FKL
Screws<N6>:DRHM5025YA
PCMCIALIDASS'Y
DCINLIDRubber
USBLIDRubber
LANLIDRubber
Moden/LANLIDRubber
Audio
LIDRubber
USBBack
Rubber
HDDLIDASS'Y
Battery
LIDASS'Y
<K12-16>
<K12-16>
<K12-16>
<K12-16>
<K12-16>
<N6>
<N6>
<N6>
<N6>
<N6>
<N6>
<N6>
<N6>
<N6>
RGB
LIDRubber
Serial
LIDRubber
30 / 90