Panasonic 72 Service Manual - Page 60
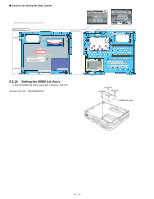
Setting the DIMM Lid Ass'y
 |
UPC - 092281808376
View all Panasonic 72 manuals
Add to My Manuals
Save this manual to your list of manuals |
Page 60 highlights
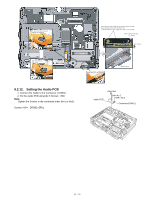
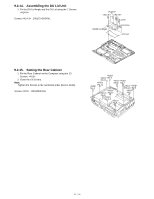
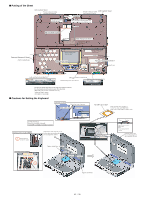
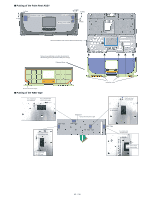
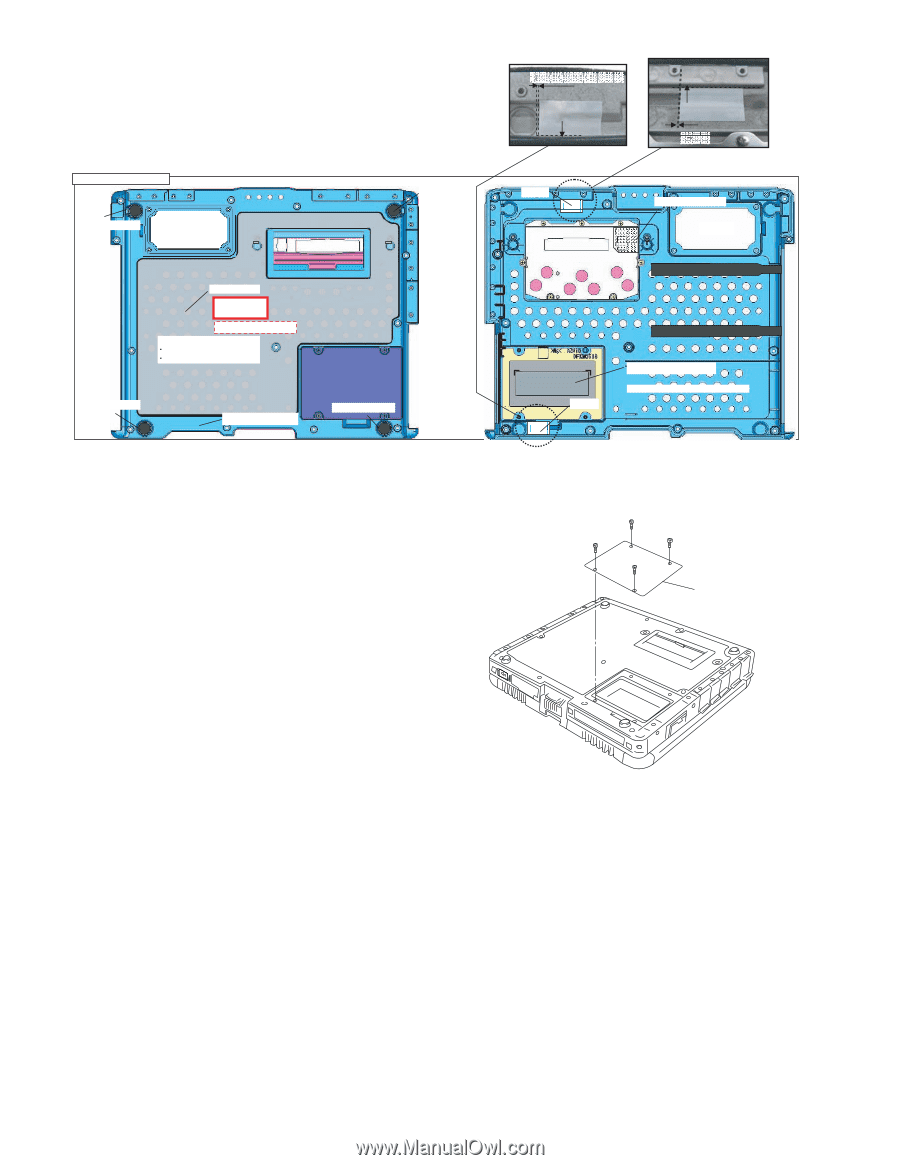
■ Cautions for Setting the Rear Cabinet (Note) Arrow without specified measurement: 0 to 0.5 mm Bottom Case Ass'y Bottom Rubber Bottom Rubber Match to the circles. 0 to 1mm Match to the wall. 0 to 1mm Match to the wall. 0 to 1mm 0 1mm Tape Potre Blind Sheet Rated Label Important Parts for Safety Safety critical component Note for attachment Avoid running over the frame. Avoid air leaking into it. Bottom Rubber Bottom Case Assy Bottom Rubber 9.2.16. Setting the DIMM Lid Ass'y 1. Fix the DIMM Lid Ass'y using the 4 Screws. Screws : DRHM5025YAT Tape DIMM Thermal Sheet Match to the marking line and attach it. DIMM Lid Ass'y
-
 1
1 -
2
-
3
-
4
-
5
-
6
-
7
-
8
-
9
-
10
-
11
-
12
-
13
-
14
-
15
-
16
-
17
-
18
-
19
-
20
-
21
-
22
-
23
-
24
-
25
-
26
-
27
-
28
-
29
-
30
-
31
-
32
-
33
-
34
-
35
-
36
-
37
-
38
-
39
-
40
-
41
-
42
-
43
-
44
-
45
-
46
-
47
-
48
-
49
-
50
-
51
-
52
-
53
-
54
-
 55
55 -
 56
56 -
 57
57 -
 58
58 -
 59
59 -
 60
60 -
 61
61 -
 62
62 -
 63
63 -
 64
64 -
 65
65 -
66
-
67
-
68
-
69
-
70
-
71
-
72
-
73
-
74
-
75
-
76
-
77
-
78
-
79
-
80
-
81
-
82
-
83
-
84
-
85
-
86
-
87
-
88
-
89
-
90
 |
 |
■
Cautions for Setting the Rear Cabinet
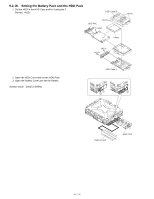
9.2.16.
Setting the DIMM Lid Ass'y
1.FixtheDIMMLidAss'yusingthe4Screws.<K14-8>
Screws<K14-8>:DRHM5025YAT
BottomCaseAss'y
Safetycriticalcomponent
Matchtothewall.
0to1mm
Matchtothewall.
0to1mm
Noteforattachment
Avoidrunningovertheframe.
Avoidairleakingintoit.
BottomCaseAssy
BottomRubber
BottomRubber
BottomRubber
BottomRubber
DIMMThermalSheet
Tape
Tape
RatedLabel
PotreBlindSheet
0 1mm
Matchtothecircles.0to1mm
Matchtothemarkinglineandattachit.
(Note)Arrowwithoutspecifiedmeasurement:0to0.5mm
ImportantParts
forSafety
<K14-8>
<K14-8>
<K14-8>
<K14-8>
DIMMLidAss'y
60 / 90