Panasonic 72 Service Manual - Page 61
Setting the Touch Pad and Keyboard
 |
UPC - 092281808376
View all Panasonic 72 manuals
Add to My Manuals
Save this manual to your list of manuals |
Page 61 highlights
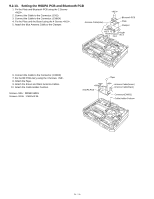
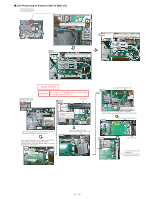
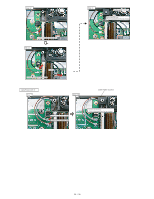
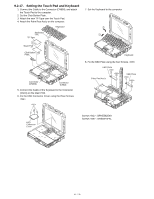
9.2.17. Setting the Touch Pad and Keyboard 1. Connect the Cable to the Connector (CN800), and attach the Touch Pad to the computer. 2. Set the Click Button Plate. 3. Attach the new TP Tape over the Touch Pad. 4. Attach the Palm Rest Ass'y on the computer. Keyboard Keyboard FPC TP Tape 7. Set the Keyboard to the computer. 1 2 Touch Pad Click Button Plate Connector (CN800) Connector (CN18) 5. Connect the Cable of the Keyboard to the Connector (CN18) on the Main PCB. 6. Fix the KBD Connector Cover using the three Screws. Keyboard 8. Fix the KBD Plate using the four Screws. KBD Plate Palm Rest Ass'y KBD Plate KBD Connector Cover Screws : DFHE5025XA Screws : DRSB2+5FKL
-
 1
1 -
2
-
3
-
4
-
5
-
6
-
7
-
8
-
9
-
10
-
11
-
12
-
13
-
14
-
15
-
16
-
17
-
18
-
19
-
20
-
21
-
22
-
23
-
24
-
25
-
26
-
27
-
28
-
29
-
30
-
31
-
32
-
33
-
34
-
35
-
36
-
37
-
38
-
39
-
40
-
41
-
42
-
43
-
44
-
45
-
46
-
47
-
48
-
49
-
50
-
51
-
52
-
53
-
54
-
55
-
 56
56 -
 57
57 -
 58
58 -
 59
59 -
 60
60 -
 61
61 -
 62
62 -
 63
63 -
 64
64 -
 65
65 -
 66
66 -
67
-
68
-
69
-
70
-
71
-
72
-
73
-
74
-
75
-
76
-
77
-
78
-
79
-
80
-
81
-
82
-
83
-
84
-
85
-
86
-
87
-
88
-
89
-
90
 |
 |
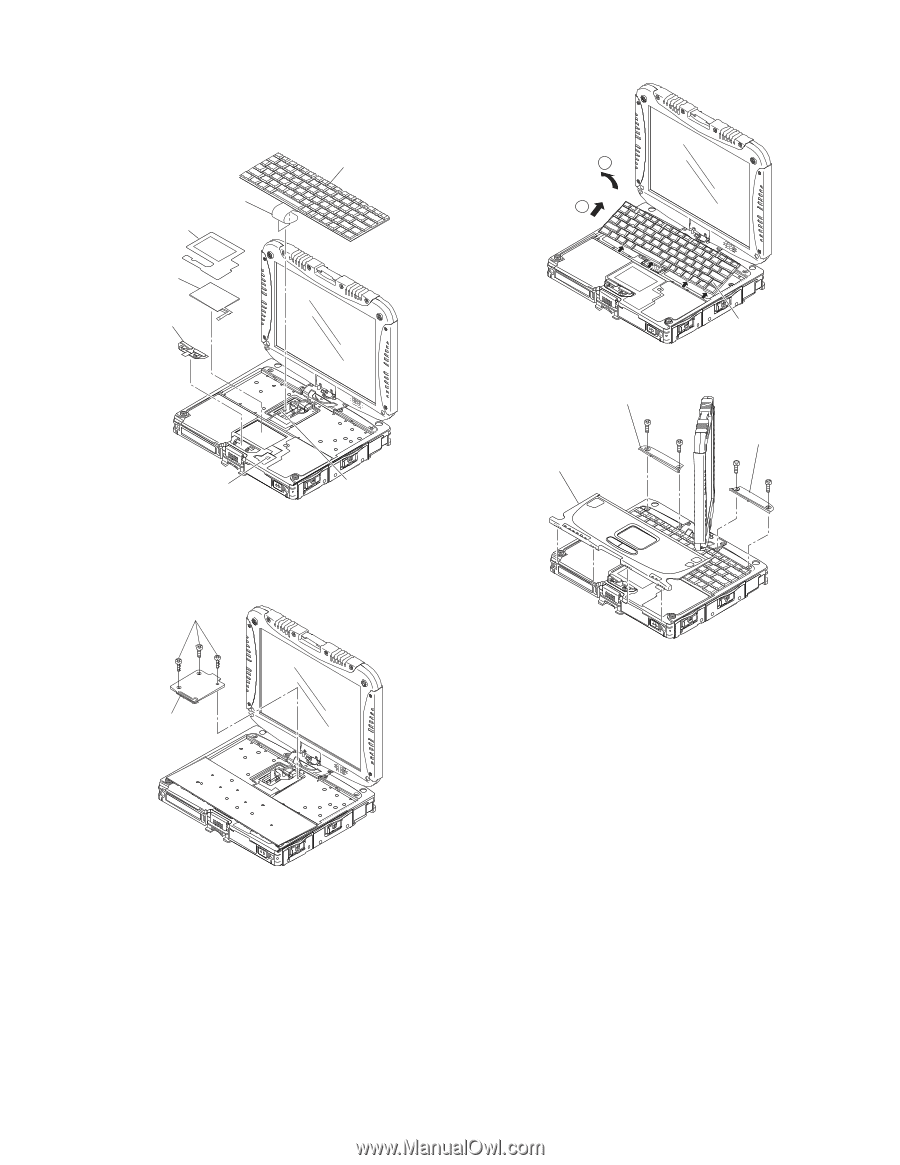
9.2.17.
Setting the Touch Pad and Keyboard
1.ConnecttheCabletotheConnector(CN800),andattach
theTouchPadtothecomputer.
2.SettheClickButtonPlate.
3.AttachthenewTPTapeovertheTouchPad.
4.AttachthePalmRestAss'yonthecomputer.
5.ConnecttheCableoftheKeyboardtotheConnector
(CN18)ontheMainPCB.
6.FixtheKBDConnectorCoverusingthethreeScrews.
<N1>
7.SettheKeyboardtothecomputer.
8.FixtheKBDPlateusingthefourScrews.<N9>
Screws<N1>:DFHE5025XA
Screws<N9>:DRSB2+5FKL
Keyboard
Keyboard
FPC
Connector
(CN18)
Connector
(CN800)
TPTape
TouchPad
ClickButton
Plate
<N1>
KBD
Connector
Cover
1
2
Keyboard
<N9>
<N9>
<N9>
KBDPlate
KBDPlate
PalmRestAss'y
<N9>
61 / 90