Panasonic BL-C10A Network Camera - Page 14
Using Operation Bar, End Display, and Preset, Display, Pan/Tilt, Position, Preset, Button - used
 |
UPC - 037988809738
View all Panasonic BL-C10A manuals
Add to My Manuals
Save this manual to your list of manuals |
Page 14 highlights
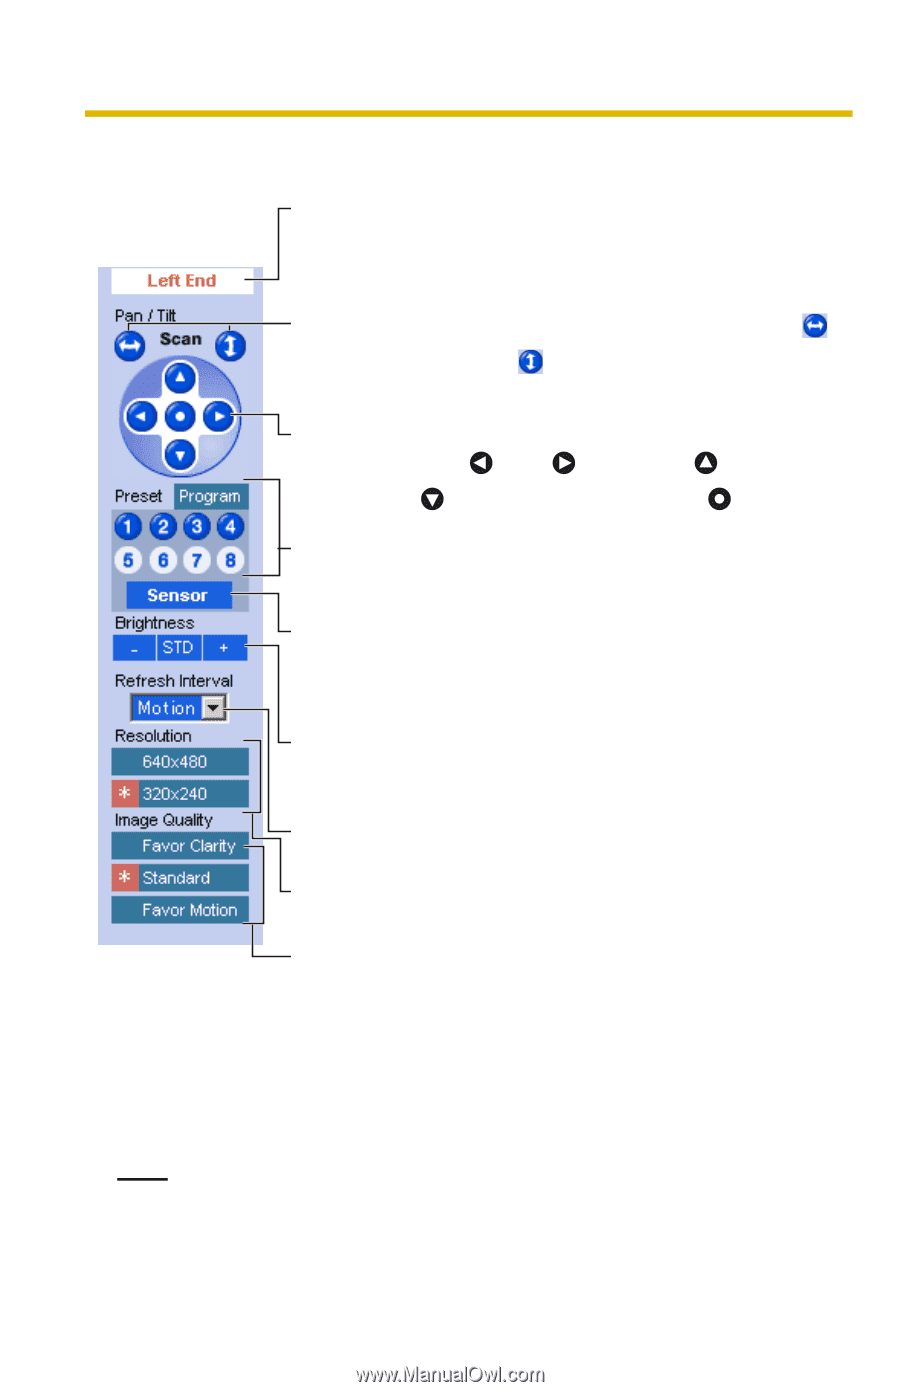
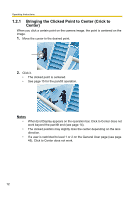
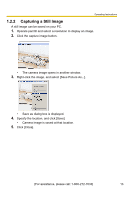
Operating Instructions 1.2.3 Using Operation Bar End Display When the pan/tilt has reached the end (Left and Preset End, Right End, Up End and Down End), End Display: Display appears. When clicking a preset button, the preset name appears. Pan/Tilt Scan: Moves the lens throughout the horizontal ( ) or vertical ( ) range, and returns to the original position. Pan/Tilt/ Home Position: Controls lens direction. Pan ( : Left, : Right), Tilt ( : Up, : Down) and Home Position ( : Center) Preset Button: Applies the camera direction to a preset position. You can preset 8 positions (see page 16-page 19). Sensor Position: When the sensor detects a temperature difference, the camera can be set up to turn to this position. Only an administrator can operate it (see page 16). Brightness: Changes brightness in nine steps including [STD] (Standard). Clicking [-] or [+] changes the image brightness. Refresh Interval: Sets a refresh interval. (Motion-60-second interval) Resolution: Selects [640 x 480] or [320 x 240] (default) pixels. Image Quality: Selects the image quality. • [Favor Clarity] optimizes the image for good clarity. • [Standard] keeps the standard quality. (default) • [Favor Motion] optimizes the image for motion display. Note When the camera image is not displayed correctly, click [Refresh] at the tool bar on the web browser. The image will be refreshed. 14
-
 1
1 -
2
-
3
-
4
-
5
-
6
-
7
-
8
-
 9
9 -
 10
10 -
 11
11 -
 12
12 -
 13
13 -
 14
14 -
 15
15 -
 16
16 -
 17
17 -
 18
18 -
 19
19 -
20
-
21
-
22
-
23
-
24
-
25
-
26
-
27
-
28
-
29
-
30
-
31
-
32
-
33
-
34
-
35
-
36
-
37
-
38
-
39
-
40
-
41
-
42
-
43
-
44
-
45
-
46
-
47
-
48
-
49
-
50
-
51
-
52
-
53
-
54
-
55
-
56
-
57
-
58
-
59
-
60
-
61
-
62
-
63
-
64
-
65
-
66
-
67
-
68
-
69
-
70
-
71
-
72
-
73
-
74
-
75
-
76
-
77
-
78
-
79
-
80
-
81
-
82
-
83
-
84
-
85
-
86
-
87
-
88
-
89
-
90
-
91
-
92
-
93
-
94
-
95
-
96
-
97
-
98
-
99
-
100
-
101
-
102
-
103
-
104
 |
 |