Panasonic BL-C10A Network Camera - Page 89
Setting an IP Address on Your PC, Private IP Address
 |
UPC - 037988809738
View all Panasonic BL-C10A manuals
Add to My Manuals
Save this manual to your list of manuals |
Page 89 highlights
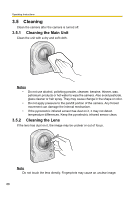
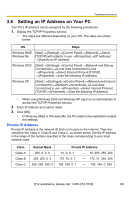
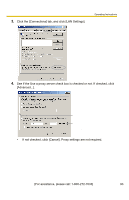
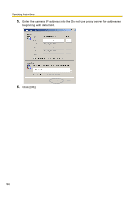
Operating Instructions 3.6 Setting an IP Address on Your PC Your PC's IP address can be assigned by the following procedures. 1. Display the TCP/IP Properties window. • The steps are different depending on your OS. The steps are shown below. OS Steps Windows 98SE, [Start] [Settings] [Control Panel] [Network] Select Windows Me [TCP/IP] with adaptor in use [Properties] [IP Address] [Specify an IP address] Windows 2000 [Start] [Settings] [Control Panel] [Network and Dial-up Connections] [Local Area Connection] in use [Properties] Select Internet Protocol [TCP/IP] [Properties] [Use the following IP address] Windows XP [Start] ( [Settings]) [Control Panel] [Network and Internet Connections] [Network Connections] [Local Area Connection] in use [Properties] Select Internet Protocol [TCP/IP] [Properties] [Use the following IP address] • When using Windows 2000 and Windows XP, log in as an administrator to access the TCP/IP Properties window. 2. Enter IP address and subnet mask. 3. Click [OK]. • In Windows 98SE or Windows Me, the PC needs to be restarted to enable the settings. Private IP Address Private IP address is the network ID that is not used on the Internet. They are classified into Class A, Class B and Class C, as shown below. Set the IP address in the range of the number specified in the class corresponding to your local network scale. Class Class A Class B Class C Subnet Mask 255. 0. 0. 0 255. 255. 0. 0 255. 255. 255. 0 Private IP Address 10. 0. 0. 1 - 10. 255. 255. 254 172. 16. 0. 1 - 172. 31. 255. 254 192. 168. 0. 1 - 192. 168. 0. 254 [For assistance, please call: 1-800-272-7033] 89
-
 1
1 -
2
-
3
-
4
-
5
-
6
-
7
-
8
-
9
-
10
-
11
-
12
-
13
-
14
-
15
-
16
-
17
-
18
-
19
-
20
-
21
-
22
-
23
-
24
-
25
-
26
-
27
-
28
-
29
-
30
-
31
-
32
-
33
-
34
-
35
-
36
-
37
-
38
-
39
-
40
-
41
-
42
-
43
-
44
-
45
-
46
-
47
-
48
-
49
-
50
-
51
-
52
-
53
-
54
-
55
-
56
-
57
-
58
-
59
-
60
-
61
-
62
-
63
-
64
-
65
-
66
-
67
-
68
-
69
-
70
-
71
-
72
-
73
-
74
-
75
-
76
-
77
-
78
-
79
-
80
-
81
-
82
-
83
-
 84
84 -
 85
85 -
 86
86 -
 87
87 -
 88
88 -
 89
89 -
 90
90 -
 91
91 -
 92
92 -
 93
93 -
 94
94 -
95
-
96
-
97
-
98
-
99
-
100
-
101
-
102
-
103
-
104
 |
 |