Pentax 645 645 Manual - Page 11
designation
 |
View all Pentax 645 manuals
Add to My Manuals
Save this manual to your list of manuals |
Page 11 highlights
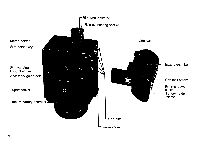
ti Attaching: 1. Loosen the grip lock screw. As indicated in the photographic illustration, align grip holes on the grip with the corresponding pins on the side of the camera. 2. Push up the grip until it engages with an audible click, signifying correct contact. 3. Turn the grip locking screw located on the bottom, in the direction of the "LOCK" arrow designation, using a coin or a similar tool. 9
-
 1
1 -
2
-
3
-
4
-
5
-
 6
6 -
 7
7 -
 8
8 -
 9
9 -
 10
10 -
 11
11 -
 12
12 -
 13
13 -
 14
14 -
 15
15 -
 16
16 -
17
-
18
-
19
-
20
-
21
-
22
-
23
-
24
-
25
-
26
-
27
-
28
-
29
-
30
-
31
-
32
-
33
-
34
-
35
-
36
-
37
-
38
-
39
-
40
-
41
-
42
-
43
-
44
-
45
-
46
-
47
-
48
-
49
-
50
-
51
-
52
-
53
-
54
-
55
-
56
-
57
-
58
-
59
-
60
-
61
-
62
-
63
-
64
-
65
-
66
-
67
-
68
-
69
-
70
-
71
-
72
-
73
-
74
-
75
 |
 |

ti
Attaching:
3.
Turn
the
grip
locking
screw
located
on
the
1.
Loosen
the
grip lock
screw.
As
indicated
in
the
bottom,
in
the
direction
of
the
"LOCK"
arrow
photographic
illustration,
align
grip
holes
on
the
designation,
using
a
coin
or
a
similar
tool.
grip
with
the
corresponding
pins
on
the
side
of
the
camera.
2.
Push
up
the
grip
until
it
engages
with
an
audible
cl
ick,
signifying
correct
contact.
9