Pentax Optio E50 Operation Manual - Page 74
Setting the Sensitivity, Press the, button in, mode., Use the four-way controller
 |
UPC - 898887001315
View all Pentax Optio E50 manuals
Add to My Manuals
Save this manual to your list of manuals |
Page 74 highlights
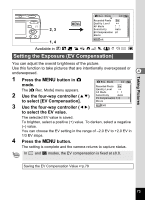
Taking Pictures 2, 3, 4 5 1, 6 MENU Rec. Mode 1/2 Recorded Pixels Quality Level AF Mode Sensitivity EV Compensation Movie 8M Auto ±0 MENU Exit Available in b R A q < I i \ E Y Setting the Sensitivity You can select the sensitivity to suit the brightness of the surroundings. 4 Sensitivity Auto Sensitivity is automatically adjusted between ISO XX - XX. (In Digital SR mode, it is automatically adjusted within the range of ISO XX - XX.) XX XX • The lower the sensitivity, the less noise that affects the image. The XX shutter speed will be slower in low light conditions. • Higher sensitivity settings use faster shutter speeds in low light XX conditions to reduce camera shake, but the image may be affected by XX noise. XX 1 Press the 3 button in A mode. The [A Rec. Mode] menu appears. 2 Use the four-way controller (23) to select [Sensitivity]. 3 Press the four-way controller (5). Rec. Mode 1/2 4 5 A pull-down menu appears. Use the four-way controller (23) to change the sensitivity. Press the 4 button. Recorded Pixels Quality Level AF Mode Sensitivity EV Compensation Movie Auto XX XXX XXX XXX XXX XXXX The Sensitivity setting is saved. MENU Cancel OK OK 6 Press the 3 button. The camera returns to capture status with the current setting. • In c mode, the sensitivity is fixed at Auto (ISO XX- XX). • In mode, the sensitivity is fixed at ISO XX. Saving the Sensitivity 1p.79 72
-
 1
1 -
2
-
3
-
4
-
5
-
6
-
7
-
8
-
9
-
10
-
11
-
12
-
13
-
14
-
15
-
16
-
17
-
18
-
19
-
20
-
21
-
22
-
23
-
24
-
25
-
26
-
27
-
28
-
29
-
30
-
31
-
32
-
33
-
34
-
35
-
36
-
37
-
38
-
39
-
40
-
41
-
42
-
43
-
44
-
45
-
46
-
47
-
48
-
49
-
50
-
51
-
52
-
53
-
54
-
55
-
56
-
57
-
58
-
59
-
60
-
61
-
62
-
63
-
64
-
65
-
66
-
67
-
68
-
 69
69 -
 70
70 -
 71
71 -
 72
72 -
 73
73 -
 74
74 -
 75
75 -
 76
76 -
 77
77 -
 78
78 -
 79
79 -
80
-
81
-
82
-
83
-
84
-
85
-
86
-
87
-
88
-
89
-
90
-
91
-
92
-
93
-
94
-
95
-
96
-
97
-
98
-
99
-
100
-
101
-
102
-
103
-
104
-
105
-
106
-
107
-
108
-
109
-
110
-
111
-
112
-
113
-
114
-
115
-
116
-
117
-
118
-
119
-
120
-
121
-
122
-
123
-
124
-
125
-
126
-
127
-
128
-
129
-
130
-
131
-
132
-
133
-
134
-
135
-
136
-
137
-
138
-
139
-
140
-
141
-
142
-
143
-
144
-
145
-
146
-
147
-
148
-
149
-
150
-
151
-
152
-
153
-
154
-
155
-
156
-
157
-
158
-
159
 |
 |
