Pfaff creative 1473 Owner's Manual - Page 105
Eyelet, buttonhole, Correcting, Changing, width, Adapting, lengths, the balance
 |
View all Pfaff creative 1473 manuals
Add to My Manuals
Save this manual to your list of manuals |
Page 105 highlights
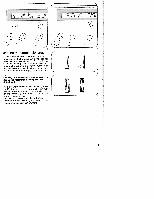
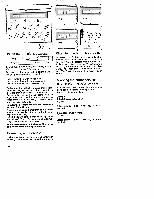
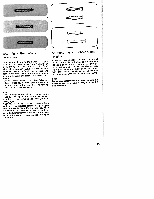
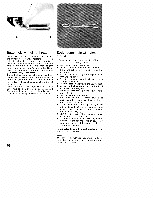
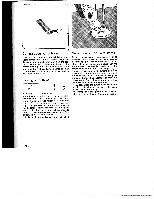
______ I I iIiiiiiiii±i prog •1 liii?!' prog / ,, prog 2 3 Eyelet buttonhole (fully automatic) prog -- 154a, b. c T E 3± 5A Sewing thread: embroidery and darning thread Key: press "slow sewing" Eyelet buttonholes with different tack designs: (see table on page 92). 1 54a = buttonhole with wedge tack 1 54b = buttonhole with lengthwise tack 1 54c = buttonhole with crosswise tack Eyelet buttonholes are often sewn in outerwear, such as jackets, coats or casual wear. They should always be sewn with backing material under neath. In spite of this, a piece of paper should be placed underneath during sewing. The buttonhole must be 3mm longer than the dia meter of the button, plus its height. The distance from the front edge should be equal to the button hole width. First mark the spacings and the dis tance from the edge. Mark the buttonhole length from this point to the inside. Sewing is then always begun from the inside to the outside towards the edge. 16 buttonholes are stored in the computer, from 10 to 40mm On program selection a programmed buttonhole length of 22 mm and a buttonhole width of 6 mm appear in the display Select the length of the but tonhole using stitch-length keys 7 (Fig. 1). The machine will automatically sew the selected but tonhole. Before beginning the buttonhole pull the runner of the buttonhole foot fully to the front. prog 4 7 Correcting a buttonhole If a buttonhole does not turn out well, cancel it b pressing "pattern start" key 26 and sew it again. Changing the buttonhole width For every type of fabric, the corresponding but tonhole width can be determined from 5.5 to 8.E mm, For heavy materials select a wide buttonhole and for light materials a narrow one. With stitch width keys 8, you determine the required button hole width. The length of the cut changes automa tically (Fig. 7). A buttonhole width of 6 mm is now stored. Adapting the buttonhole seam lengths with the balance keys With "balance" keys 5 the left buttonhole sean' length can be adapted to the right one. Sew a sample buttonhole first. Example: If the left seam is too short (Fig. 8d) Select balance +1 to +3 with key, or more ii required. If the left seam is too long (Fig. 8e) Select balance -1 to -2 with key, or more ii required. 96
-
 1
1 -
2
-
3
-
4
-
5
-
6
-
7
-
8
-
9
-
10
-
11
-
12
-
13
-
14
-
15
-
16
-
17
-
18
-
19
-
20
-
21
-
22
-
23
-
24
-
25
-
26
-
27
-
28
-
29
-
30
-
31
-
32
-
33
-
34
-
35
-
36
-
37
-
38
-
39
-
40
-
41
-
42
-
43
-
44
-
45
-
46
-
47
-
48
-
49
-
50
-
51
-
52
-
53
-
54
-
55
-
56
-
57
-
58
-
59
-
60
-
61
-
62
-
63
-
64
-
65
-
66
-
67
-
68
-
69
-
70
-
71
-
72
-
73
-
74
-
75
-
76
-
77
-
78
-
79
-
80
-
81
-
82
-
83
-
84
-
85
-
86
-
87
-
88
-
89
-
90
-
91
-
92
-
93
-
94
-
95
-
96
-
97
-
98
-
99
-
 100
100 -
 101
101 -
 102
102 -
 103
103 -
 104
104 -
 105
105 -
 106
106 -
 107
107 -
 108
108 -
 109
109 -
 110
110 -
111
-
112
-
113
-
114
-
115
-
116
-
117
-
118
-
119
-
120
-
121
-
122
-
123
-
124
-
125
-
126
-
127
-
128
-
129
-
130
-
131
-
132
-
133
-
134
-
135
-
136
-
137
-
138
-
139
-
140
-
141
-
142
-
143
-
144
-
145
-
146
-
147
-
148
-
149
-
150
-
151
-
152
-
153
-
154
-
155
-
156
-
157
-
158
-
159
-
160
-
161
-
162
-
163
-
164
-
165
-
166
-
167
-
168
-
169
-
170
-
171
-
172
-
173
-
174
-
175
-
176
-
177
-
178
-
179
-
180
 |
 |
