Pfaff creative 1473 Owner's Manual - Page 57
Change, needle, position, straight, stitch, zigzag - . cd
 |
View all Pfaff creative 1473 manuals
Add to My Manuals
Save this manual to your list of manuals |
Page 57 highlights
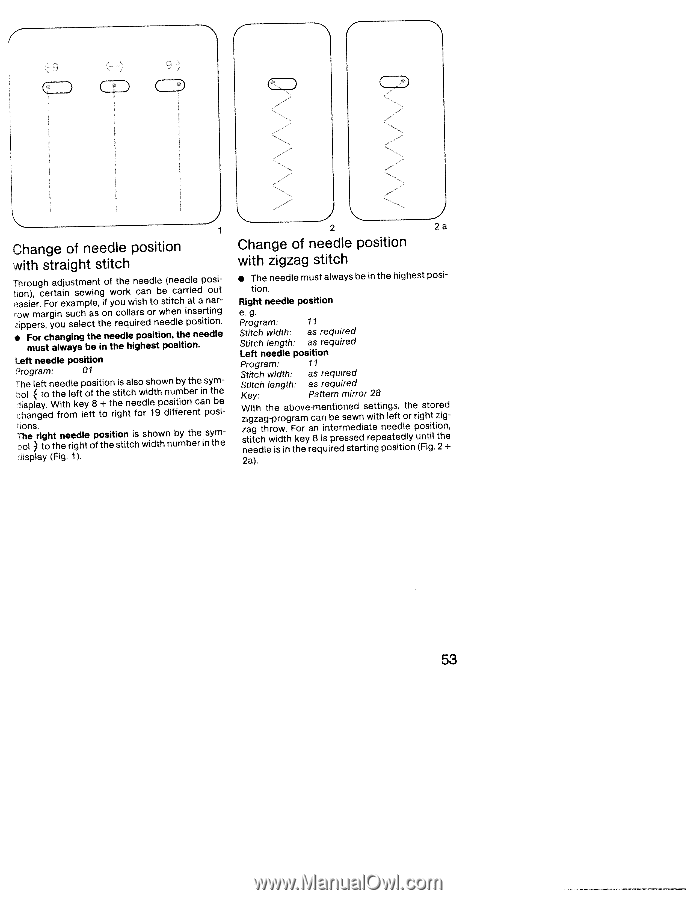
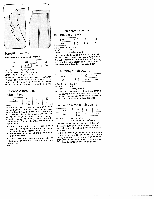
cz cD Change of needle position with straight stitch Through adjustment of the needle (needle posi tion), certain sewing easier. For example, if work can be carried you wish to stitch at a out nar row margin such as on zippers, you select the collars or when required needle inserting position. • For changing the needle position, the needle must always be in the highest position. Left needle position Program: 01 The left needle position is also shown by the sym ol to iisplay. the left of the stitch width number in the With key 8 + the needle position can be hanged from left to right for 19 different posi ions. The right needle position is shown by the sym ol to the right of the stitch width number in the iisplay (Fig. 1). 2 2a Change of needle position with zigzag stitch • The needle must always be in the highest posi tion. Right needle position e.g. Program: 11 Stitch width: as required Stitch length: as required Left needle position Program: Stitch width: Stitch length: Key: 11 as required as required Pattern mirror 28 With the above-mentioned settings, the stored zigzag-program can be sewn with left or right zig zag throw. For an intermediate needle position, stitch width key 8 is pressed repeatedly until the needle is in the required starting position (Fig. 2 + 2a). 53
-
 1
1 -
2
-
3
-
4
-
5
-
6
-
7
-
8
-
9
-
10
-
11
-
12
-
13
-
14
-
15
-
16
-
17
-
18
-
19
-
20
-
21
-
22
-
23
-
24
-
25
-
26
-
27
-
28
-
29
-
30
-
31
-
32
-
33
-
34
-
35
-
36
-
37
-
38
-
39
-
40
-
41
-
42
-
43
-
44
-
45
-
46
-
47
-
48
-
49
-
50
-
51
-
 52
52 -
 53
53 -
 54
54 -
 55
55 -
 56
56 -
 57
57 -
 58
58 -
 59
59 -
 60
60 -
 61
61 -
 62
62 -
63
-
64
-
65
-
66
-
67
-
68
-
69
-
70
-
71
-
72
-
73
-
74
-
75
-
76
-
77
-
78
-
79
-
80
-
81
-
82
-
83
-
84
-
85
-
86
-
87
-
88
-
89
-
90
-
91
-
92
-
93
-
94
-
95
-
96
-
97
-
98
-
99
-
100
-
101
-
102
-
103
-
104
-
105
-
106
-
107
-
108
-
109
-
110
-
111
-
112
-
113
-
114
-
115
-
116
-
117
-
118
-
119
-
120
-
121
-
122
-
123
-
124
-
125
-
126
-
127
-
128
-
129
-
130
-
131
-
132
-
133
-
134
-
135
-
136
-
137
-
138
-
139
-
140
-
141
-
142
-
143
-
144
-
145
-
146
-
147
-
148
-
149
-
150
-
151
-
152
-
153
-
154
-
155
-
156
-
157
-
158
-
159
-
160
-
161
-
162
-
163
-
164
-
165
-
166
-
167
-
168
-
169
-
170
-
171
-
172
-
173
-
174
-
175
-
176
-
177
-
178
-
179
-
180
 |
 |