Pfaff creative 1473 Owner's Manual - Page 71
Change, bartack, width, length, Bartacks, Elastic, stitch, straps
 |
View all Pfaff creative 1473 manuals
Add to My Manuals
Save this manual to your list of manuals |
Page 71 highlights
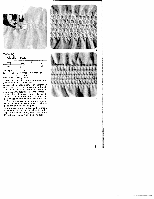
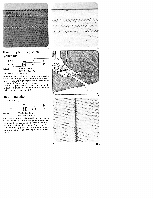
f Elastic stitch (for underwear) prog 13a 3-5 OA Cut off the stretched elastic tape close to the edge. Gather the fabric to the waist size using straight stitch. Push the part prepared in this way between the elastic tape and pin it firmly. Stitch it on using elastic stitches. Finally over-stitch the closed and rounded tape elastic stitches (Fig. 1>. Elastic straps (outerwear) prog [ 13a -- (1 11 3-5 On skirts or trousers sew the strap onto the pre pared edge with elastic stitches (Fig. 2>. Change of bartack width and length The bartacks can be changed to different width or lengths, or only in width or length (Fig. 4 + 4b) prog 157 1 KK 3-5OA Pattern length: as required Stitch-width: as required In order to ensure correct feeding of protrudinç crosswise seams, belt-loops and similar things we recommend supporting the sewing foot with correspondingly thick piece of material (se page 47). Bartacks prog (J -- 11 157 3-5 OA Belt loops, flies or pockets can be very easily tacked down with automatic bartacks (Fig. 3). 64
-
 1
1 -
2
-
3
-
4
-
5
-
6
-
7
-
8
-
9
-
10
-
11
-
12
-
13
-
14
-
15
-
16
-
17
-
18
-
19
-
20
-
21
-
22
-
23
-
24
-
25
-
26
-
27
-
28
-
29
-
30
-
31
-
32
-
33
-
34
-
35
-
36
-
37
-
38
-
39
-
40
-
41
-
42
-
43
-
44
-
45
-
46
-
47
-
48
-
49
-
50
-
51
-
52
-
53
-
54
-
55
-
56
-
57
-
58
-
59
-
60
-
61
-
62
-
63
-
64
-
65
-
 66
66 -
 67
67 -
 68
68 -
 69
69 -
 70
70 -
 71
71 -
 72
72 -
 73
73 -
 74
74 -
 75
75 -
 76
76 -
77
-
78
-
79
-
80
-
81
-
82
-
83
-
84
-
85
-
86
-
87
-
88
-
89
-
90
-
91
-
92
-
93
-
94
-
95
-
96
-
97
-
98
-
99
-
100
-
101
-
102
-
103
-
104
-
105
-
106
-
107
-
108
-
109
-
110
-
111
-
112
-
113
-
114
-
115
-
116
-
117
-
118
-
119
-
120
-
121
-
122
-
123
-
124
-
125
-
126
-
127
-
128
-
129
-
130
-
131
-
132
-
133
-
134
-
135
-
136
-
137
-
138
-
139
-
140
-
141
-
142
-
143
-
144
-
145
-
146
-
147
-
148
-
149
-
150
-
151
-
152
-
153
-
154
-
155
-
156
-
157
-
158
-
159
-
160
-
161
-
162
-
163
-
164
-
165
-
166
-
167
-
168
-
169
-
170
-
171
-
172
-
173
-
174
-
175
-
176
-
177
-
178
-
179
-
180
 |
 |
