Pioneer AVH-P7480DVD Owner's Manual - Page 134
Troubleshooting - cables
 |
View all Pioneer AVH-P7480DVD manuals
Add to My Manuals
Save this manual to your list of manuals |
Page 134 highlights
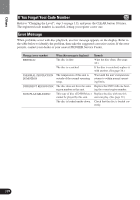
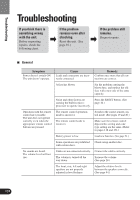
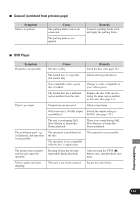
Troubleshooting Troubleshooting If you think there is something wrong with the unit. Before requesting repairs, check the following chart. \ If the problem remains even after checking. Reset the unit. (See page 10.) \ If the problem still remains. Request repairs. 7 General Symptom Power doesn't switch ON. The unit doesn't operate. Cause Leads and connectors are incorrectly connected. Remedy Confirm once more that all connections are correct. A fuse has blown. Fix the problem causing the blown fuse, and replace the old fuse with a new one of the same capacity. Noise and other factors are causing the built-in microprocessor to operate incorrectly. Press the RESET button. (See page 10.) Operation with the remote control isn't possible. The unit does not operate correctly even when the appropriate remote control buttons are pressed. The remote control operation mode is incorrect. The remote control code is incorrect. Switch to the correct remote control mode. (See pages 19 and 20.) Make sure the remote control dipswitches setting and code type setting are the same. (Refer to pages 118 and 131.) Battery power is low. Load new batteries. (See page 21.) Some operations are prohibited Check using another disc. with certain discs. No sounds are heard. The volume level will not rise. Cables are not connected correctly. Connect the cables correctly. The volume is turned all the way down. Increase the volume. (See page 28.) The front, rear, left and right speakers are not properly adjusted in level balance. Adjust the relative levels between the speakers correctly. (See page 94.) 133
-
 1
1 -
2
-
3
-
4
-
5
-
6
-
7
-
8
-
9
-
10
-
11
-
12
-
13
-
14
-
15
-
16
-
17
-
18
-
19
-
20
-
21
-
22
-
23
-
24
-
25
-
26
-
27
-
28
-
29
-
30
-
31
-
32
-
33
-
34
-
35
-
36
-
37
-
38
-
39
-
40
-
41
-
42
-
43
-
44
-
45
-
46
-
47
-
48
-
49
-
50
-
51
-
52
-
53
-
54
-
55
-
56
-
57
-
58
-
59
-
60
-
61
-
62
-
63
-
64
-
65
-
66
-
67
-
68
-
69
-
70
-
71
-
72
-
73
-
74
-
75
-
76
-
77
-
78
-
79
-
80
-
81
-
82
-
83
-
84
-
85
-
86
-
87
-
88
-
89
-
90
-
91
-
92
-
93
-
94
-
95
-
96
-
97
-
98
-
99
-
100
-
101
-
102
-
103
-
104
-
105
-
106
-
107
-
108
-
109
-
110
-
111
-
112
-
113
-
114
-
115
-
116
-
117
-
118
-
119
-
120
-
121
-
122
-
123
-
124
-
125
-
126
-
127
-
128
-
 129
129 -
 130
130 -
 131
131 -
 132
132 -
 133
133 -
 134
134 -
 135
135 -
 136
136 -
 137
137 -
 138
138 -
 139
139 -
140
-
141
-
142
-
143
-
144
-
145
-
146
-
147
-
148
-
149
-
150
-
151
-
152
-
153
-
154
-
155
-
156
-
157
-
158
-
159
-
160
 |
 |