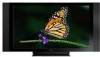
Pioneer PRO110FD Owner's Manual
Pioneer PRO110FD - 50" Plasma TV Manual
 |
UPC - 012562864976
View all Pioneer PRO110FD manuals
Add to My Manuals
Save this manual to your list of manuals |
Pioneer PRO110FD manual content summary:
- Pioneer PRO110FD | Owner's Manual - Page 1
Operating Instructions PLASMA DISPLAY SYSTEM - Pioneer PRO110FD | Owner's Manual - Page 2
view encrypted digital programming. Certain advanced and interactive digital cable services such as video-ondemand, a cable operator's enhanced program guide and data-enhanced television services may require the use of a set-top box. For more information call your local cable operator. VENTILATION - Pioneer PRO110FD | Owner's Manual - Page 3
Plasma Display System Model Number: PRO-150FD/PRO-110FD Product Category: Class B Personal Computers & Peripherals Responsible Party Name: PIONEER ELECTRONICS SERVICE instructions television reception, which can be determined by turning the equipment off and on, the user radio/TV technician for - Pioneer PRO110FD | Owner's Manual - Page 4
the language 34 Setting MTS/SAP mode 35 Viewing a channel banner 36 Using the POD service 36 4 En Using the multiscreen functions 36 Splitting the screen 36 Freezing images 37 07 TV Guide On Screen™ System Setup 38 About the TV Guide On Screen™ system 38 Setting up the TV Guide On Screen - Pioneer PRO110FD | Owner's Manual - Page 5
picture adjustments on the closed captions 48 screen 64 Selecting digital closed captions ........ 48 Sound adjustments 64 Selecting digital closed caption Power Control 65 parameters 49 Energy Save 65 Clock Setting 49 No Signal off (AV source only 65 10 TV Guide 67 Manual image - Pioneer PRO110FD | Owner's Manual - Page 6
HDMI Control 94 Using the HDMI Control functions ...........94 Making the HDMI Control connections ...95 Setting the HDMI Control 96 Using the HDMI Control menus 97 14 Useful Remote Control Features unit to control other devices 105 15 Appendix 109 Troubleshooting 109 Specifications 123 6 En - Pioneer PRO110FD | Owner's Manual - Page 7
of its lifetime, the luminosity of the Pioneer PRO150FD/PRO-110FD plasma display will diminish very slowly, such as with all phosphor-based screens (for example, a traditional tube-type television). To enjoy beautiful and bright images on your Pioneer plasma display for many years to come, please - Pioneer PRO110FD | Owner's Manual - Page 8
01 Important User Guidance Information Caution Pioneer bears no responsibility for any damage arising from incorrect use of the product by you or other people, malfunctions when in use, other product related problems, and use of the product except in cases where the company must be liable. Plasma - Pioneer PRO110FD | Owner's Manual - Page 9
turns the image off to prevent damage from screen burning. • To minimize image retention, the display position is automatically changed imperceptibly when watching plasma display. Some parts of the picture may not be visible (see Orbiter on page 70). Minimizing damage from screen burning • Set - Pioneer PRO110FD | Owner's Manual - Page 10
protection panel changes, resulting in discoloration or warp. 25. The plasma display weighs about 66.7 kg (147.0 lbs.) for the PRO-150FD (including the stand and speaker) and about 45.1 kg (99.4 lbs.) for the PRO-110FD (including the stand and speaker). Because it has small depth and is unstable - Pioneer PRO110FD | Owner's Manual - Page 11
instruction manual that comes with the optional bracket (or equivalent items). When using other items • Consult your dealer. • The following mounting holes can be used for the installation: Rear view (PRO-150FD) Side view Mounting surface Mounting hole 4 5 Mounting hole Median line Plasma - Pioneer PRO110FD | Owner's Manual - Page 12
3 Bead band × 3 Cleaning cloth Power cord (2 m/6.6 feet) Stand accessories (PRO-150FD only) Base cover x 1 Stand pipe (L) x 1 Stand pipe (R) x 1 Warranty card Light-blocking shield x 1 Plastic band x 4 Screw ➀ (M5 x 10 mm: black) x 6 Operating instructions Screw ➁ Screw ➂ (M6 x 20 mm: black - Pioneer PRO110FD | Owner's Manual - Page 13
Speaker accessories (PRO-150FD) Speaker (PRO-110FD) 03 Speaker Speaker cable × 2 Speaker Mounting Fittings Bracket for TOP-Left Bracket for BOTTOM-Left Bracket for TOP-Right Bracket for BOTTOM-Right Speaker mounting screw (M5 × 10 mm: black) × 16 Speaker cable × 2 Speaker Mounting Fittings For - Pioneer PRO110FD | Owner's Manual - Page 14
located on the bottom of the side panel of the plasma display for the PRO-150FD and at the bottom on the rear panel for the PRO-110FD (see 1 on page 15). If the button is off, the power will not turn on even when TV a on the remote control unit or STANDBY/ON on the - Pioneer PRO110FD | Owner's Manual - Page 15
-150FD and PRO-110FD. 1 a button 2 Ethernet cable port 3 CableCARD™ slot 4 ANT/CABLE A IN terminal 5 AC IN terminal 6 INPUT 4 terminal (HDMI) 7 INPUT 5 terminal (HDMI) 8 INPUT 6 terminal (HDMI) 9 INPUT 7 terminal (HDMI) 10 PC INPUT terminal (ANALOG RGB) 11 CONTROL OUT terminal (supports SR+) 12 RS - Pioneer PRO110FD | Owner's Manual - Page 16
to the previous channel. This button is disabled while the TV Guide On Screen™ system is displayed. 29 VOL +/-: Sets the volume. 30 M MUTING: Mutes the sound. 31 SHIFT: Moves the location of the small screen when in the picture-in-picture mode. 32 SWAP: Switches between the two screens when in - Pioneer PRO110FD | Owner's Manual - Page 17
injury. • The weight of a 60 inch plasma display is about 55.5 kg (122.4 lbs.) and a 50 inch about 38.8 kg (85.5 lbs.), it has no depth, and is unstable. Therefore, at least two people must assemble and install it. Assembling the stand (PRO-150FD only) 1 Turn the base cover over so the underside is - Pioneer PRO110FD | Owner's Manual - Page 18
05 Preparation Attaching the light-blocking shield (PRO-150FD only) This part prevents reflection of the cables connected to the back of the plasma display on the base cover. Note • Attach it after anchoring the base cover on a flat stable place. Light-blocking shield 2 While firmly holding the - Pioneer PRO110FD | Owner's Manual - Page 19
Preparation 05 Attaching the stand • Steps for attaching the stand are the same for PRO-150FD and PRO-110FD (use the screw holes with "T" inscribed). 1 With the plasma display lying flat, fit the stand's support columns to the bottom of the plasma display as indicated by the arrows, then slowly - Pioneer PRO110FD | Owner's Manual - Page 20
05 Preparation PRO-150FD with the speaker installed (with the Pioneer table top stand) Speaker mounting fitting (for TOP-Right) Speaker mounting screw (M5 x 10 mm) Speaker mounting screw (M5 x 10 mm) Speaker mounting screw (M5 x 10 mm) Speaker Speaker mounting fitting (for BOTTOM-Right) Bead - Pioneer PRO110FD | Owner's Manual - Page 21
fitting (top) over the screw, lower the speaker onto it. 6 Pass the supplied speaker cable between the speaker and the plasma display (below the speaker mounting fitting) from below. 7 Connect the speaker cables to the speaker (see next page). 8 Insert the cable in the groove on the speaker - Pioneer PRO110FD | Owner's Manual - Page 22
Red Connect the cables correctly with respect to the polarity of the plasma display speaker terminals, that is, cable (Gray) to terminals cable.· Caution Lever • Be sure to turn the connected devices off and remove the power cord from the wall outlet beforehand when changing the connection or - Pioneer PRO110FD | Owner's Manual - Page 23
mm) Speaker cable Speed clamp Speed clamp Speaker mounting screw (M5 x 10 mm) Note • Before installing the speaker, make sure that the Pioneer table top stand is attached to the plasma display. • When using the hang on wall unit, first lay the plasma display on top of a soft sheet, etc., remove - Pioneer PRO110FD | Owner's Manual - Page 24
fitting (top) over the screw, lower the speaker onto it. 6 Pass the supplied speaker cable between the speaker and the plasma display (below the speaker mounting fitting) from below. 7 Connect the speaker cables to the speaker (see next page). 8 Insert the cable in the groove on the speaker - Pioneer PRO110FD | Owner's Manual - Page 25
Red Connect the cables correctly with respect to the polarity of the plasma display speaker terminals, that is, cable (Gray) to terminals cable.· Caution Lever • Be sure to turn the connected devices off and remove the power cord from the wall outlet beforehand when changing the connection or - Pioneer PRO110FD | Owner's Manual - Page 26
the supplied plastic bands and screws. Note • To stabilize the plasma display on a table or rack, also use commercially available wood screws that have a nominal diameter of 4 mm (5/32 inch) and that are at least 20 mm (13/16 inch) long. (PRO-150FD) 20 mm min. (13/16 inch) 4 5 Supplied screw (M4 - Pioneer PRO110FD | Owner's Manual - Page 27
the Pioneer stand You can also install the display on a rack by detaching the stand. The method for attaching/detaching the stand varies depending on the product. Detaching the stand • Steps for detaching the stand are the same for PRO-150FD and PRO-110FD. 1 With the plasma display lying - Pioneer PRO110FD | Owner's Manual - Page 28
bolts (2) and (1) firmly using a screwdriver. Installation bolts (1): M8 x 23 mm (black) for PRO-110FD M6 x 20 mm (black) for PRO-150FD (PRO-110FD) 3 Replace the plasma display to stand upright. For speaker installation, see Installing the Pioneer speaker on page 19. Note • Be sure to install the - Pioneer PRO110FD | Owner's Manual - Page 29
plasma display is equipped with a slot for inserting a CableCARD™. When you are watching digital and/or High Definition TV channels over cable, the card allows you to use the POD service provided by the cable TV company; the POD stands ANT B IN terminals. • TV Guide may not be available in all areas - Pioneer PRO110FD | Owner's Manual - Page 30
60 inches: four holes) marked with below, depending on your routing system. for PRO-150FD for PRO-110FD Speed clamp Speed clamp Attaching and removing speed clamps Insert [1] into an appropriate hole on the rear of the plasma Note • Always turn off the power of the plasma display when connecting - Pioneer PRO110FD | Owner's Manual - Page 31
remote control sensor located at the bottom right of the front panel of the plasma display. The distance from the remote control sensor must be within 7 m ( sensor. Replace the batteries with new ones if necessary. • The plasma display emits very weak infrared rays from its screen. If you place - Pioneer PRO110FD | Owner's Manual - Page 32
-on mode even when TV a or STANDBY/ON button is pressed. Turn a on on the plasma display. • The plasma display will still consume some power as long as the power cord is inserted into the power outlet. Plasma display (PRO-150FD) POWER ON indicator STANDBY indicator (PRO-110FD) a button (located on - Pioneer PRO110FD | Owner's Manual - Page 33
that the Mode switch on the remote control unit has been set to "TV", press ANT on the remote control unit to select antenna A If you do not setup the TV Guide On Screen™ system, the channel banner may not display certain types of program information. 06 Plasma display (right side view) CHANNEL - Pioneer PRO110FD | Owner's Manual - Page 34
operates the same as VOL +/- on the remote control unit. Plasma display (right side view) Changing the language If you have selected a digital TV program that provides multilanguage services, you can switch among the languages by pressing MTS on the remote control unit. VOLUME +/- To increase the - Pioneer PRO110FD | Owner's Manual - Page 35
Basic Operations 06 Setting MTS/SAP mode When watching conventional TV programs, you may enjoy stereo sound and/or Secondary Audio Programs (SAP), using the Multichannel Television Sound (MTS) function. • Stereo broadcasts You can enjoy, for example, sports, shows, and concerts in dynamic stereo - Pioneer PRO110FD | Owner's Manual - Page 36
If you have watched digital and/or High Definition TV channels over cable, you can use the POD service provided by the cable TV company. This service presents various types of useful information, using HTML text. Picture-in-picture Press HOME MENU, 9, 9, then 9 to view the POD display. 36 En - Pioneer PRO110FD | Owner's Manual - Page 37
user is allowed to operate picture and sound. Freezing images Use the following procedure to capture and freeze one frame from a moving image that you are watching. • In picture-in-picture TV programs, press CH +/- to change the channel. Note • The SPLIT button is disabled while the TV Guide On - Pioneer PRO110FD | Owner's Manual - Page 38
in this manual. Follow the instructions shown on the screens. • TV Guide may not be available in all areas. As content providers move to digital programming and broadcasting, TV Guide data may be unavailable or become unavailable. Setting up the TV Guide On Screen™ system When the plasma display is - Pioneer PRO110FD | Owner's Manual - Page 39
TV Guide On Screen™ System Setup 07 System Setup Screens Screen 1: Select Country • This screen asks you the location of your TV. • Press / to highlight a country. • Press ENTER to display Screen 2. Screen 3: Select service previous setup screens to correct or review the information you entered. • - Pioneer PRO110FD | Owner's Manual - Page 40
07 TV Guide On Screen™ System Setup Screen 5: Are the settings correct? • If you select "Yes", you see Screen 6. • If you select "No", you see Screen 1. Screen 6: Congratulations 40 En - Pioneer PRO110FD | Owner's Manual - Page 41
source HOME MENU Picture Sound Power Control Sleep Timer Option Home Media Gallery HDMI Control Item AV Selection Contrast Brightness Red Green Blue Reset Same as the AV source Energy Save Power Management Auto Setup Manual Setup HDMI Input HDMI Control Setting Page 59 60 60 60 60 60 60 64 65 66 - Pioneer PRO110FD | Owner's Manual - Page 42
channel in step 6. • When using the Cable Converter, you may need to manually add Cable Converter output channels. Setting up TV channels manually This section describes how to manually set up TV channels that have not been set up by Auto Channel Preset. 1 Press HOME MENU. 2 Select "Tuner Setup - Pioneer PRO110FD | Owner's Manual - Page 43
the TV Guide On Screen™ system with a cable service, Picture Association of America (MPAA) and are used for original movies not edited for television. For the rating system in Canada, see page 45. TV-Y7 Children seven and above TV-G Age-Base TV-PG General audiences Parental guidance suggested TV - Pioneer PRO110FD | Owner's Manual - Page 44
to be automatically unblocked. Setting the TV ratings 1 Press HOME MENU. 2 Select "Tuner Setup" ( / then ENTER). 3 Select "Parental Control" ( / then ENTER). 4 Select "TV Ratings" ( / then ENTER). We suggest you write down your password so you don't forget it. PRO-150FD/PRO-110FD Your password No - Pioneer PRO110FD | Owner's Manual - Page 45
the setting ( / then ENTER). Parental Control TV Ratings TV Ratings TV-None TV-Y TV-Y7 TV-G TV-PG Blocked TV Ratings xxxxxxxxxxxxxxxxxxxxx or the Canadian French ratings. These ratings are based on the Canadian Radio-Television and Telecommunications Commission (CRTC) policy. Canadian English - Pioneer PRO110FD | Owner's Manual - Page 46
humorous or unrealistic manner. 8ans+ Age-Base General but inadvisable for young children: May not compatible with the plasma display's original Parental Control settings. When you first Control Status Status MPAA Ratings TV Ratings New XXXXXXXXXXXXX xxxxxxxxxxxxxxxxxxxxx xxxxxxxxxxxxxxxxxxxxx - Pioneer PRO110FD | Owner's Manual - Page 47
senses a blocked TV program (or content), the plasma display shows nothing but will also be shown during 2screen, picture-in-picture, and while freezing an image. • The password entry for deleting new ratings disappears in approximately 60 seconds after no settings are entered. 6 Press HOME MENU to - Pioneer PRO110FD | Owner's Manual - Page 48
3", or "Text 4" superimposes on the picture other information (e.g. TV guide, weather) that is independent of the TV program in progress. 1 Press HOME MENU. 2 Select "Tuner Setup" ( / then ENTER). 3 Select "Closed Captions" ( / then ENTER). 4 Select "Analog Settings" ( / then ENTER). 5 Select the - Pioneer PRO110FD | Owner's Manual - Page 49
Auto/Manual Set •Manual Set Date and Time 3 4 3 /17/04 11:58pm 5 6 Current Time: 11:58 pm PDT Monday 05/17/04 xxxxxxxxxxxxxxxxxxxxx xxxxxxxxxxxxxxxxxxxxx xxxxxxxxxxxxxxxxxxxxx Home Menu Exit 11 Press HOME MENU to exit the menu. Note • If you setup the TV Guide On Screen™ system, the plasma - Pioneer PRO110FD | Owner's Manual - Page 50
services. • Once you set up the TV Guide On Screen™ system it may take up to 24 hours to begin to receive TV program listings. Receipt of all eight days of listings may take up to one week. • TV Guide channel and time every Monday through Friday (manual reminder only). • Remind Regularly - Reminds - Pioneer PRO110FD | Owner's Manual - Page 51
buttons on the plasma display. The UP/DOWN and LEFT/ RIGHT buttons operate the same as the / and / buttons on the remote control unit. • With "LISTINGS" highlighted in the Service bar at the top of the screen, press INFO to display (and then close) Help information. • Press TV GUIDE anytime to exit - Pioneer PRO110FD | Owner's Manual - Page 52
TV Guide On Screen™ System Operation 3 Highlight "set reminder" and press ENTER. 4 Set the reminder options: Press / to highlight a field; press / to change the setting "Law & Order" will override the recording for "Friends". Timer Alert PLASMA DISPLAY Wed. 1/5 4 : 06am- 9 : 08am Ant. A 1000 - Pioneer PRO110FD | Owner's Manual - Page 53
TV Guide On Screen™ System Operation 10 Searching for programs The Search screen lets search for programs by category, and then by a further sub-category if you want. 1 Select "SEARCH" from the Service bar at the top of the screen. 2 Press to move to the search category bar, then press / to select - Pioneer PRO110FD | Owner's Manual - Page 54
TV Guide On Screen™ System Operation Searching by keyword Here you search for shows based on keywords you enter. The keywords you create are stored so you can use them again in the future. 1 Select "SEARCH" from the Service only the keyword, leave the category set to "All". • If you select a - Pioneer PRO110FD | Owner's Manual - Page 55
review, edit or delete reminders. 1 Select "SCHEDULE" from the Service Service bar - closes the panel menu and returns to the Service bar at the top of the screen. • tune to channel / watch now - exits the TV Guide On Screen™ guide and tunes to the channel. • set through Friday (manual reminder only) - Pioneer PRO110FD | Owner's Manual - Page 56
menu). Changing setup options You can change TV Guide On Screen™ settings from the Setup menu. Setup options are divided into three categories: system settings, channel display, default options, and display setup progress. 1 Select "SETUP" from the Service bar at the top of the screen. Changing - Pioneer PRO110FD | Owner's Manual - Page 57
settings and the options to change them. 2 Press ENTER to display the channel editor. 3 Select one of the options, then follow the on-screen instructions. • Yes, everything is correct: displays a helpful information screen. Press ENTER to quit the TV Guide in the Listings service (and Channel - Pioneer PRO110FD | Owner's Manual - Page 58
TV Guide On Screen™ System Operation Changing the default options This is the place to change the default settings for reminders and other general settings. 1 Select the "Change default options" item. Displaying setup progress Display setup progress lets you verify the status of the various Guide - Pioneer PRO110FD | Owner's Manual - Page 59
TV input sources. Allows you to customize settings as desired. You can set the mode for each input source. For PC source Item STANDARD USER dimmed. • If you have selected "OPTIMUM", you cannot select "Pro Adjust"; menu items in "Pro Adjust" are dimmed. • To prevent the screen from damage, - Pioneer PRO110FD | Owner's Manual - Page 60
Settings Basic picture adjustments Adjust the picture to your preference for the chosen AV Selection option (except DYNAMIC). 1 Press HOME MENU. 2 Select "Picture" ( / then ENTER). 3 Select an item to be adjusted ( / then ENTER). Picture AV Selection Contrast Brightness Color Tint Sharpness Pro - Pioneer PRO110FD | Owner's Manual - Page 61
for the following input signals: 1080p@60 Hz. • When you select "On" for "Game Control Pref" on the "Option" menu, the "PureCinema" setting is disabled. Using Intelligent Mode 1 Press HOME MENU. 2 Select "Picture" ( / then ENTER). 3 Select "Pro Adjust" ( / then ENTER). 4 Select "Intelligent - Pioneer PRO110FD | Owner's Manual - Page 62
and Settings Enhancer do this, select "Manual" first and then press and hold ENTER for more than three seconds. The manual adjustment screen appears. Using CTI and Color Space 1 Press HOME MENU. 2 Select "Picture" ( / then ENTER). 3 Select "Pro Adjust" ( / then ENTER). 4 Select "Color Detail" ( - Pioneer PRO110FD | Owner's Manual - Page 63
from images 1 Press HOME MENU. 2 Select "Picture" ( / then ENTER). 3 Select "Pro Adjust" ( / then ENTER). 4 Select " for clean crisp images. 3DNR stands for 3dimensional Noise Reduction. Selections 1080p. • The 3DYC setting is selectable when composite video or analog TV signals are received. 63 En - Pioneer PRO110FD | Owner's Manual - Page 64
menu by pressing HOME MENU or no operation is performed for 60 seconds, all the parameter settings displayed last are stored in memory. • If you want for "Pro Adjust" on the "Picture" menu and "Room Light Sensor" on the "Option" menu are set to off and image quality returns to default settings. • - Pioneer PRO110FD | Owner's Manual - Page 65
maintains efficiency of the screen for a long period of time by decreasing picture brightness and lowering power consumption. Setting Energy Save to "Mode 1" is recommended for increased efficiency. No Signal when noise signals are present at the plasma display after a TV program finishes. 65 En - Pioneer PRO110FD | Owner's Manual - Page 66
operation is performed for three hours 5 Press HOME MENU to by pressing STANDBY/ON on the plasma display or TV on the remote control unit. ENTER). • Select "Off" (cancel), "30 min", "60 min", "90 min" or "120 min". 4 Press HOME of the plasma display lights orange when the sleep timer is set. About - Pioneer PRO110FD | Owner's Manual - Page 67
TV channels, you can specify whether the plasma display should reduce video noise depending on the levels of broadcasting signals. Option Auto Setup Manual Even when "Auto Setup completed." appears, Auto Setup may HTuner NR Setting ANT.A have failed, depending on conditions. • Auto Setup may fail - Pioneer PRO110FD | Owner's Manual - Page 68
setting is not effective when freezing images or in the multiscreen mode. Selecting a screen size manually High Definition TV broadcasting, pressing 1080p signals only) ZOOM For 16:9 letterbox pictures. Bars may appear on the top and bottom on some programs CINEMA For 14:9 letterbox pictures - Pioneer PRO110FD | Owner's Manual - Page 69
Adjustments and Settings 11 Selecting a screen size automatically The plasma display automatically selects an appropriate in full and wide screen 5 Press HOME MENU to exit the menu. Note • Manually select an appropriate screen size if an image does not automatically switch to a correct screen - Pioneer PRO110FD | Owner's Manual - Page 70
mode, see Selecting a screen size manually on page 68. • This function does placed into standby one hour after the Video Pattern plasma display. • The Video Pattern timer has priority over the sleep timer. When the Video Pattern timer is on, the sleep timer becomes ineffective. Language setting - Pioneer PRO110FD | Owner's Manual - Page 71
a DVD image To watch a DVD image, press INPUT 2 on the remote control unit or press INPUT on the plasma display to select "INPUT 2". Note • Refer to your DVD player instruction manual for the signal type. • The INPUT 2 terminals are checked whether they are connected in the following order - Pioneer PRO110FD | Owner's Manual - Page 72
unit or press INPUT on the plasma display to select "INPUT 4", "INPUT 5", "INPUT 6" or "INPUT 7". Video signals supported 720 (1440) x [email protected] Hz/60 Hz 720 x [email protected] Hz/60 Hz 1280 x [email protected] Hz/60 Hz 1920 x [email protected] Hz/60 Hz 1920 x 1080p@24 Hz 1920 x 1080p@60 Hz • When connecting a PC to - Pioneer PRO110FD | Owner's Manual - Page 73
Note • If you select a parameter other than "Auto", make such a setting that results in natural color. • If no image appears, specify another digital . • For the audio signal types to be specified, check the operation manual that came with the connected equipment. • Depending on the equipment to be - Pioneer PRO110FD | Owner's Manual - Page 74
terminal (optical) on the rear of the plasma display. This allows audio such as digital TV broadcasting to be played in high quality. settings depending on your AV receiver. For more information, see the instruction manual that came with the AV receiver. • For details, refer to the operation manual - Pioneer PRO110FD | Owner's Manual - Page 75
External Equipment 12 Switching the optical audio signal type Set up for the DIGITAL OUT terminal (OPTICAL), PC on the remote control unit or press INPUT on the plasma display to select "PC". Note • The PC terminals cannot be (SXGA) Frequency 70 Hz 60 Hz 60 Hz 60 Hz 60 Hz 60 Hz 60 Hz 75 En - Pioneer PRO110FD | Owner's Manual - Page 76
on the rear of the plasma display supports SR+, which allows linked operations with a Pioneer AV receiver. SR+ presents functions such as the input switch linkage operation function and the DSP surround mode display function. For more information, see the instruction manual that came with the - Pioneer PRO110FD | Owner's Manual - Page 77
the plasma display supports Mass PC with Windows XP Service Pack 2 (SP2 , MMC, xD Picture and CF that supported. • Supported formats and contents are subject to change. Visit the Pioneer screen turn setting changes of software or other devices may be required. Please refer to the operating instructions - Pioneer PRO110FD | Owner's Manual - Page 78
the initialization is finished, setting values become effective and the top menu of the Home Media Gallery returns. Note • For information on DHCP, refer to network device's operating instructions. • You may need to contact your service provider or network administrator when manually entering an IP - Pioneer PRO110FD | Owner's Manual - Page 79
can start from step 3. Plasma display USB flash drive Removing to be damaged. • Pioneer is not liable for other equipment. • This system supports the USB Mass Storage Class. camera. See the operating instructions supplied with the digital camera to another server or manually select a server from - Pioneer PRO110FD | Owner's Manual - Page 80
Slow Playback BGM Setup Move Delete from My Playlist*1 Plays back in the slow mode on the Movie or Music screen Movie Player Used to set up the slideshow BGM on the Photo Player Photo Player Moves the order of content in My Playlist Contents List (Playlist) Deletes the selected Contents - Pioneer PRO110FD | Owner's Manual - Page 81
Components 1 Title Movie Server XXXXXX 3 Media Navigator Movie Music Photos User Files D Tool 4 5 1/4 1 6 2 7 1 (Category or Folder name) 3 Date 4 Album name 5 Play time 6 Play status 7 Key guide 8 Progress bar 9 Audio mode icon 10 A-B repeat mode icon 11 Repeat mode icon 12 Random - Pioneer PRO110FD | Owner's Manual - Page 82
table ENTER, (PLAY) A (BLUE) See the key guide table See the key guide table B (RED) C (GREEN) See the key guide table See the key guide table D (YELLOW) See the key guide table Note • Some functions may not be supported depending on the server type or version used. • During playback, an - Pioneer PRO110FD | Owner's Manual - Page 83
the slow mode. • To discontinue slow playback, press ENTER or PLAY. The system returns to the normal playback mode. Note • This function may not be supported depending on the content. Add to My Playlist 1 While navigating or playing, select the file to be added to My Playlist ( / / / then ENTER - Pioneer PRO110FD | Owner's Manual - Page 84
items 6 Detailed display 7 Play status 8 Time counter 9 Key guide 10 Progress bar 11 A-B repeat mode icon 12 Repeat mode icon 13 Random mode Player.) (FF): Same as (RWD): Same as A (BLUE): Sets A-B repeat mode. Sets the desired point A to start and B to end during playback. To cancel - Pioneer PRO110FD | Owner's Manual - Page 85
) See the key guide table See the key guide table (Tool Menu) D (YELLOW) See the key guide table • Setup procedures for the above play modes are the same as for the Movie Player. • Refer to page 80 for the color button D (Tool Menu). Note • Some functions may not be supported depending on the - Pioneer PRO110FD | Owner's Manual - Page 86
press of the key displays a key guide, as well. No Player information is displayed problem may be solved by viewing the photo content through the network after having transferred it to the server PC. • Even with the supported format, files may not be played properly depending on the content. Setting - Pioneer PRO110FD | Owner's Manual - Page 87
folder automatically display one by one. See "Setting up the slideshow" (page 86) for setting up the interval time. • To display a key guide, press INFO. • To display the next image content manually, press or . • To display the previous image content manually, press or . 5 Press ENTER or (Pause - Pioneer PRO110FD | Owner's Manual - Page 88
XXXX Date 2006/11/30 Play Time 00:00:59 Server XXXXXX XXXX Search Set the search condition. Title Contains the following: OK Cancel D Tool 1/24 on the "Sort" dialog screen ( / then ENTER). • The sorting starts based on your selection and sort results are displayed. • Even while sorting, you can - Pioneer PRO110FD | Owner's Manual - Page 89
• The system restarts then the Home Media Gallery screen returns. To manually set: Before setting up, check your media server for IP Address and Subnet mask. 1 Connection Setup" on page 92. "Wake on LAN (WOL)" functions to turn the last accessed server's power on if the server is WOL-compliant and - Pioneer PRO110FD | Owner's Manual - Page 90
12 Enjoying through External Equipment "Software Update" Select "Next" to follow the procedure on the subsequent screens or "Cancel" to return to the previous screen ( / then ENTER). When update is completed, a confirmation message "To activate the updated software, restart Home Media Gallery." - Pioneer PRO110FD | Owner's Manual - Page 91
able to start a media server if it supports "Wake On LAN". Select the server and server has been set up. Resetting to default You can not supplied with the plasma display. The software is to update the software. Do not turn the system off until the procedure available on the Pioneer website (http:// - Pioneer PRO110FD | Owner's Manual - Page 92
Failed to obtain (505). The content WMDRM authorization license is off. Please turn on the license from the server. • The message consists of "Error", "Warning" and "Information" and is displayed for 5 seconds. Displaying pictures in the Home Media Gallery for an extended period may cause an - Pioneer PRO110FD | Owner's Manual - Page 93
PCs and other digital devices, as set down in the DLNA Guidelines for . DNS (Domain Name Service) Server DNS Server is based computer networking technology for local area networks (LANs). The plasma display supports media you are purchasing (music, video, pictures) will play on this unit. Subnet mask - Pioneer PRO110FD | Owner's Manual - Page 94
can operate such Pioneer devices as a recorder, player or AV system support the HDMI Control functions using the remote control of the plasma display. The HDMI to the recorder or player connected to the plasma display. For details, see the operation manual that came with the recorder or player. - Pioneer PRO110FD | Owner's Manual - Page 95
Control connections When you make changes in connections between the plasma display and the device(s) that supports the HDMI Control functions or settings for the "HDMI Control Setting", perform the following procedure: 1 Turn on the plasma display and all the connected devices. 2 Confirm that the - Pioneer PRO110FD | Owner's Manual - Page 96
and controlled using the remote control unit of the plasma display is as follows: recorder x 2, player x 2, AV manual that came with the connected device(s). • For more information on the devices that support the HDMI Control functions, check the Pioneer Web site (see back cover). Setting - Pioneer PRO110FD | Owner's Manual - Page 97
device is turned Off when the plasma display is turned Off. (factory default is "On") 1 Press HOME MENU. 2 Select "Option" ( / then ENTER). 3 Select "HDMI Control Setting" ( / then ENTER). You can enjoy various functions with the connected Pioneer recorder, player or AV system that supports the - Pioneer PRO110FD | Owner's Manual - Page 98
. 1 Press EDIT/LEARN and 2 at the same time. • The LED indicator flashes and the remote control unit enters the Learning mode. 2 Press and hold TV a for more than two seconds. • The remote control unit starts deleting all learned codes in the selected mode (marked by a lit LED). • When completed - Pioneer PRO110FD | Owner's Manual - Page 99
control does not work, use the Learn mode. • The initial mode is "PIONEER". • When using any of the receiver buttons (a, INPUT, or VOL +/ -) to cancel the Learn mode, follow the procedure with the Mode switch set to "TV". You cannot cancel the mode otherwise. • You may not be able to partially - Pioneer PRO110FD | Owner's Manual - Page 100
0775, 0280 Optimus 0775, 0280, 1775 Panasonic 1142, 0749, 1749, Pansat 1442, 1443, 1444, 1538 Paysat 1790 Philips 1535 0099 0210 0210 Pioneer 0152 Primestar 0869 Proscan 0775, 1170, 1775 Proton 0210 RadioShack 0269 1226, 1414 RCA 0724, 0722 0869 100 En Codes Brand 1551 - Pioneer PRO110FD | Owner's Manual - Page 101
Useful Remote Control Features VCR Brand A-Mark ABS Admiral Adventura Adyson Aiko Aiwa Akai Alba Alienware Allegro America Action American High Amstrad Anam National Asha Astra Audio-Technica Audiovox Avis Beaumark Bell & Howell Broksonic Calix Candle Canon Capehart Carrera Carver CCE Cineral - Pioneer PRO110FD | Owner's Manual - Page 102
14 Useful Remote Control Features VCR Brand Panasonic Penney Pentax Philco Philips Pilot Pioneer Polk Audio Portland Presidian Profitronic Proscan Protec Protech Pulsar Pulser Quarter Quartz Quasar RadioShack Radix Randex RCA Codes Brand 1062, 0035, 0162, Realistic 0000, 0020, - Pioneer PRO110FD | Owner's Manual - Page 103
Soundworks 0690 Elta Cary Audio Design 1477 Emerson Codes 1972 0739 0739 1972 1972 1972 1972 1972 1972 Brand Niveus Media Northgate Panasonic Philips Pioneer RCA ReplayTV Samsung Sonic Blue Sony Codes 1972 1972 0614, 0616 0618, 0739 1337 0880 0614, 0616 0739 0614, 0616 0636, 1972 Brand Stack - Pioneer PRO110FD | Owner's Manual - Page 104
Codes Brand Nesa 0717 Presidian NeuNeo 0509 Primare Next Base 0826 Princeton NexxTech 1402 Proceed Nintaus 1051 Proscan Norcent Funai Gateway Go Video iLo JVC Kreisen LG BD (HD-DVD) Brand Pioneer Codes 2052, 0142 Brand Samsung LD Brand Aiwa Carver Denon Disco Vision Funai - Pioneer PRO110FD | Owner's Manual - Page 105
the remote control unit to control other devices Receiver control buttons When a Pioneer receiver is connected to the plasma display, the receiver can be operated using buttons 1 to 3. 1. RECEIVER (STANDBY/ON) Turns the Pioneer receiver power on and off. 2. RECEIVER INPUT Selects the input source - Pioneer PRO110FD | Owner's Manual - Page 106
control buttons When the Mode switch is set to CBL/SAT, the cable converter or satellite broadcast tuner connected to the plasma display can be operated using the buttons . 5. SOURCE Turns the equipment power on and off. 6. SAT GUIDE Displays the satellite broadcasting guide screen. 7. RETURN When - Pioneer PRO110FD | Owner's Manual - Page 107
selected) 14 VCR control buttons When the Mode switch is set to VCR, VCRs connected to the plasma display can be operated with the remote control unit. • playback. 3. (REW) Rewinds the tape and allows picture search. 4. SOURCE Turns the power of the VCR on and off. 5. (PAUSE/STILL) - Pioneer PRO110FD | Owner's Manual - Page 108
set to DVD/DVR, DVD players, DVD recorders or BD players connected to the plasma display SOURCE Turns the equipment power on and off. 5. (PAUSE/STILL) Pauses playback and displays still pictures. 6. to stop recording. This operation applies to only Pioneer DVD recorders. Note • A DVD player, DVD - Pioneer PRO110FD | Owner's Manual - Page 109
display again. If this does not solve the problem, contact the nearest Pioneer Authorized Independent Service Company, or the Customer Support Division (see back cover). • HDMI connection irregularity. • This plasma display is HDMI compatible. However, depending on the type of the connected source - Pioneer PRO110FD | Owner's Manual - Page 110
settings properly for "Setting the HDMI Control". (See page 96.) • No picture. • Check if the connections are properly made between the plasma display and the device that supports router's instruction manual for problem, try turning a off on the remote control unit then turn TV a on on the plasma - Pioneer PRO110FD | Owner's Manual - Page 111
display a large-sized image. If this is the case, no operation may be performed. • See the Pioneer website (www.pioneerelectronics.com) for the formats that are supported. Home Media Gallery/FIRMWARE • No updates are possible on USB. • Check if the device is Mass Storage Class compliant, if it - Pioneer PRO110FD | Owner's Manual - Page 112
digital still camera is in the viewing mode. • Refer to the instruction manual for the digital still camera. • Check if the device is connectable to the display. (See page 79.) • Check if the digital still camera is turned on. • Panel generated sounds, examples: Fan motor noise, Electrical Circuit - Pioneer PRO110FD | Owner's Manual - Page 113
distributed, then the accompanying documentation must state that "this software is based in part on the work of the Independent JPEG Group" COPYRIGHT risk of satisfactory quality, performance, accuracy, and effort is with the user. libpng versions 0.97, January 1998, through 1.0.6, March 20, 2000, - Pioneer PRO110FD | Owner's Manual - Page 114
Authors" is defined as the following set of individuals: Andreas Dilger Dave Martindale source code as a component to supporting the PNG file format in commercial . Glenn Randers-Pehrson [email protected] September 12, , PROCUREMENT OF SUBSTITUTE GOODS OR SERVICES; LOSS OF USE, DATA, - Pioneer PRO110FD | Owner's Manual - Page 115
The Pioneer Plasma Television is free for all its users. This General Public License to freedom, not price. Our General Public Licenses charge for this service if you wish), original, so that any problems introduced by others will not program or work, and a "work based on the Program" means either the - Pioneer PRO110FD | Owner's Manual - Page 116
redistribute the program under these conditions, and telling the user how to view a copy of this License. (Exception: if the Program itself is interactive but does not normally print such an announcement, your work based on the Program is not required to print an announcement.) These requirements - Pioneer PRO110FD | Owner's Manual - Page 117
, but may differ in detail to address new problems or concerns. Each version is given a distinguishing exceptions for this. Our decision will be guided by the two goals of preserving the DEFECTIVE, YOU ASSUME THE COST OF ALL NECESSARY SERVICING, REPAIR OR CORRECTION. 12. IN NO EVENT UNLESS REQUIRED - Pioneer PRO110FD | Owner's Manual - Page 118
users based on the explanations below. When we speak of free software, we are referring to freedom of use, not price . Our General Public Licenses are designed to make sure that you have the freedom to distribute copies of free software (and charge for this service affected by problems that might - Pioneer PRO110FD | Owner's Manual - Page 119
the user of a program that is linked with the Library has the freedom and the wherewithal to run that program using a modified version of the Library. The precise terms and conditions for copying, distribution and modification follow. Pay close attention to the difference between a "work based on - Pioneer PRO110FD | Owner's Manual - Page 120
a written offer, valid for at least three years, to give the same user the materials specified in Subsection 6a, above, for a charge no more than with the combined library of the fact that part of it is a work based on the Library, and explaining where to find the accompanying uncombined form of - Pioneer PRO110FD | Owner's Manual - Page 121
any work based on the but may differ in detail to address new problems or concerns. Each version is given a distinguishing for this. Our decision will be guided by the two goals of preserving the DEFECTIVE, YOU ASSUME THE COST OF ALL NECESSARY SERVICING, REPAIR OR CORRECTION. 16. IN NO EVENT UNLESS - Pioneer PRO110FD | Owner's Manual - Page 122
15 Appendix How to Apply These Terms to Your New Libraries If you develop a new library, and you want it to be of the greatest possible use to the public, we recommend making it free software that everyone can redistribute and change. You can do so by permitting redistribution under these terms (or, - Pioneer PRO110FD | Owner's Manual - Page 123
plasma display model: PRO-150FD 1920 × 1080 pixels 17 W + 17 W (1 kHz, 10 %, 6 Ω) Woofer: 6.6 cm x 10.6 cm cone type Tweeter: 2.5 cm semidome type SRS FOCUS/SRS/SRS TruBass 120 V AC, 60 Hz, 536 W (20 W Standby) Main unit: 55.5 kg (122.4 lbs.) Stand: 6.8 kg (15 lbs.) (including bolts) Speaker system - Pioneer PRO110FD | Owner's Manual - Page 124
PRO-110FD Unit: mm (inch) 1444 (56-27/32) 381 (15) 120 (4-23/32) 788 (31-1/32) 722 (28-7/16) 552 (21-23/32) 301 (11-27/32) Trademarks • In the United States, TV GUIDE • CableCARD is a trademark of Cable Television Laboratories, Inc. • This software is based in part on the work of the - Pioneer PRO110FD | Owner's Manual - Page 125
with the accuracy or availability of the program schedule information or other data in the TV Guide On Screen system. • Pioneer provides information to help in setting up a network and connecting the plasma display to the network, but you are solely responsible for proper network setup and the - Pioneer PRO110FD | Owner's Manual - Page 126
if you wish to purchase replacement parts, operating instructions, service manuals, or accessories, please call the number shown below. 8 0 0 - 4 2 1 - 1 6 2 5 Please do not ship your product to Pioneer without first calling the Customer Support Division at the above listed number for assistance
-
 1
1 -
 2
2 -
 3
3 -
 4
4 -
 5
5 -
 6
6 -
 7
7 -
8
-
9
-
10
-
11
-
12
-
13
-
14
-
15
-
16
-
17
-
18
-
19
-
20
-
21
-
22
-
23
-
24
-
25
-
26
-
27
-
28
-
29
-
30
-
31
-
32
-
33
-
34
-
35
-
36
-
37
-
38
-
39
-
40
-
41
-
42
-
43
-
44
-
45
-
46
-
47
-
48
-
49
-
50
-
51
-
52
-
53
-
54
-
55
-
56
-
57
-
58
-
59
-
60
-
61
-
62
-
63
-
64
-
65
-
66
-
67
-
68
-
69
-
70
-
71
-
72
-
73
-
74
-
75
-
76
-
77
-
78
-
79
-
80
-
81
-
82
-
83
-
84
-
85
-
86
-
87
-
88
-
89
-
90
-
91
-
92
-
93
-
94
-
95
-
96
-
97
-
98
-
99
-
100
-
101
-
102
-
103
-
104
-
105
-
106
-
107
-
108
-
109
-
110
-
111
-
112
-
113
-
114
-
115
-
116
-
117
-
118
-
119
-
120
-
121
-
122
-
123
-
124
-
125
-
126
 |
 |

Operating Instructions
PLASMA DISPLAY SYSTEM