Pioneer PRO110FD Owner's Manual - Page 97
Using the HDMI Control menus - pdp
 |
UPC - 012562864976
View all Pioneer PRO110FD manuals
Add to My Manuals
Save this manual to your list of manuals |
Page 97 highlights
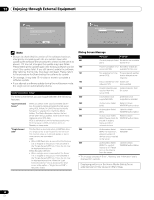
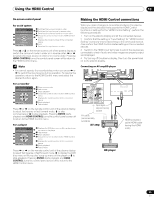
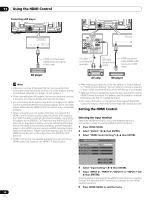
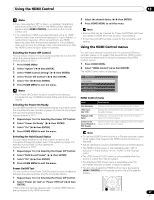
Using the HDMI Control 13 Note • If you have selected "Off" in step 5, a message "Operations cannot be carried out. Confirm the HDMI control settings." appears when HDMI CONTROL is pressed on the remote control unit. • If you operate an HDMI supported device(s) using an HDMI terminal other than the terminal selected in "Input Setting", a malfunction may occur. When connecting to any HDMI terminals other than the terminal selected in "Input Setting", make sure to enter the settings of the external device(s) so that the HDMI Control function does not operate. 3 Select the desired device ( / then ENTER). 4 Press HOME MENU to exit the menu. Note • Devices that can be checked for Power On/Off Test are those connected to HDMI terminals as set in "Input Setting". • If the Power On/Off Test fails, check for the connection and setting. Using the HDMI Control menus Selecting the Power Off Control You can select whether or not the connected device is turned Off when the plasma display is turned Off. (factory default is "On") 1 Press HOME MENU. 2 Select "Option" ( / then ENTER). 3 Select "HDMI Control Setting" ( / then ENTER). You can enjoy various functions with the connected Pioneer recorder, player or AV system that supports the HDMI Control functions by selecting and using the corresponding HDMI Control menus. 1 Press HOME MENU. 2 Select "HDMI Control" ( / then ENTER). The HDMI Control menu is displayed. 4 Select "Power Off Control" ( / then ENTER). HDMI Control 5 Select "On" ( / then ENTER). Disc Navigator 6 Press HOME MENU to exit the menu. CTRL Panel(AV-SYS) Playback CTRL Panel Note Switch to AV Sound • The "Power Off Control" function is valid for the devices connected to any of HDMI terminals at the rear of the plasma display. Selecting the Power-On Ready You can select whether or not the plasma display is turned On when the connected Pioneer recorder or player is turned On and images are input to the plasma display. (factory default is "On") 1 Repeat steps 1 to 3 in Selecting the Power Off Control. 2 Select "Power-On Ready" ( / then ENTER). 3 Select "On" ( / then ENTER). HDMI Control menu Item Description Disc Navigator Displays a title list of the connected recorder or player CTRL Panel (AV-SYS) Displays the control panel for the connected AV system on the plasma display Playback CTRL Panel Displays the control panel for the connected recorder or player on the plasma display Switch to AV Sound (Switch to PDP Sound) Switches between the plasma display and the connected AV system to which sound is output 4 Press HOME MENU to exit the menu. Note Selecting the Hold Sound Status You can select whether or not the function is held for the connected Pioneer AV system even if the system is placed into standby during HDMI Control operations. (factory default is "Off") 1 Repeat steps 1 to 3 in Selecting the Power Off Control. 2 Select "Hold Sound Status" ( / then ENTER). 3 Select "On" ( / then ENTER). 4 Press HOME MENU to exit the menu. Power On/Off Test You can confirm if the Power On/Off control function is effective between the plasma display and the connected device. • To use the HDMI Control functions, a Pioneer recorder, player or AV system that supports the HDMI Control functions is required. • Not all operations may be controlled for the connected devices. • The HDMI Control menu is not selectable when "Off" is selected in "Input Setting" for the "HDMI Control Setting" menu. • The CTRL Panel (AV-SYS) menu is only available when the sound is output from the AV system. • The Playback CTRL Panel menu is selectable when the connected recorder or player is ready to operate. • You can also display the HDMI Control menu by pressing HDMI CONTROL on the remote control unit of the plasma display. 1 Repeat steps 1 to 3 in Selecting the Power Off Control. 2 Select "Power On Test" or "Power Off Test" ( / then ENTER). A list containing devices appears when multiple HDMI devices are connected to the HDMI terminals. 97 En
-
 1
1 -
2
-
3
-
4
-
5
-
6
-
7
-
8
-
9
-
10
-
11
-
12
-
13
-
14
-
15
-
16
-
17
-
18
-
19
-
20
-
21
-
22
-
23
-
24
-
25
-
26
-
27
-
28
-
29
-
30
-
31
-
32
-
33
-
34
-
35
-
36
-
37
-
38
-
39
-
40
-
41
-
42
-
43
-
44
-
45
-
46
-
47
-
48
-
49
-
50
-
51
-
52
-
53
-
54
-
55
-
56
-
57
-
58
-
59
-
60
-
61
-
62
-
63
-
64
-
65
-
66
-
67
-
68
-
69
-
70
-
71
-
72
-
73
-
74
-
75
-
76
-
77
-
78
-
79
-
80
-
81
-
82
-
83
-
84
-
85
-
86
-
87
-
88
-
89
-
90
-
91
-
 92
92 -
 93
93 -
 94
94 -
 95
95 -
 96
96 -
 97
97 -
 98
98 -
 99
99 -
 100
100 -
 101
101 -
 102
102 -
103
-
104
-
105
-
106
-
107
-
108
-
109
-
110
-
111
-
112
-
113
-
114
-
115
-
116
-
117
-
118
-
119
-
120
-
121
-
122
-
123
-
124
-
125
-
126
 |
 |