Samsung HT-D6500W User Manual (user Manual) (ver.1.0) (English) - Page 15
Description, Front Panel
 |
UPC - 036725617445
View all Samsung HT-D6500W manuals
Add to My Manuals
Save this manual to your list of manuals |
Page 15 highlights
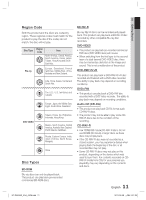
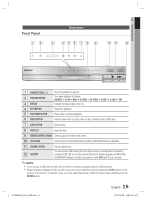
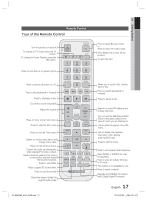
01 Getting Started Front Panel 12 Description 3 456 7 8 9 10 11 12 ASC IN 5V 500mA 1 POWER BUTTON ( ) 2 FUNCTION BUTTON 3 DISPLAY Turns the product on and off. The mode switches as follows : BD/DVD D. IN AUX R. IPOD W. IPOD H. IN1 H. IN2 FM Displays the playing status, time, etc. 4 STOP BUTTON 5 PLAY/PAUSE BUTTON Stops disc playback. Plays a disc or pauses playback. 6 ENTER BUTTON Selects menu items or starts a Blu-ray disc. (It will not start a DVD disc.) 7 EJECT BUTTON Ejects a Disc. 8 DISC SLOT Insert disc here. 9 REMOTE CONTROL SENSOR Detects signals from the remote control. 10 ASC IN JACK Used to connect the ASC Microphone for setting up MRC (Musical Room Calibration). 11 VOLUME CONTROL Volume adjustment. 12 USB PORT You can connect a USB memory flash stick here and use it as storage when the product is connected to BD-LIVE. You can also use the USB Host for software upgrades and MP3/JPEG/ DivX/MKV/MP4 playback. And also it is possible to use R. IPOD when iPod is connected. ✎ NOTE You must use a USB memory flash stick to perform a software upgrade using the USB Host jack. When the product displays the Blu-ray disc menu, you cannot start the movie by pressing the PLAY button on the product or the remote. To play the movie, you must select Play Movie or Start in the disc menu, and then press the ENTER button. 15 English HT-D6500W_XAA_0208.indd 15 2011-02-09 ¿ÀÀü 2:51:41
-
 1
1 -
2
-
3
-
4
-
5
-
6
-
7
-
8
-
9
-
 10
10 -
 11
11 -
 12
12 -
 13
13 -
 14
14 -
 15
15 -
 16
16 -
 17
17 -
 18
18 -
 19
19 -
 20
20 -
21
-
22
-
23
-
24
-
25
-
26
-
27
-
28
-
29
-
30
-
31
-
32
-
33
-
34
-
35
-
36
-
37
-
38
-
39
-
40
-
41
-
42
-
43
-
44
-
45
-
46
-
47
-
48
-
49
-
50
-
51
-
52
-
53
-
54
-
55
-
56
-
57
-
58
-
59
-
60
-
61
-
62
-
63
-
64
-
65
-
66
-
67
-
68
-
69
-
70
-
71
-
72
-
73
-
74
-
75
-
76
-
77
-
78
-
79
-
80
 |
 |