Samsung L700 User Manual - Page 16
Starting the recording mode - manual
 |
UPC - 044701007814
View all Samsung L700 manuals
Add to My Manuals
Save this manual to your list of manuals |
Page 16 highlights
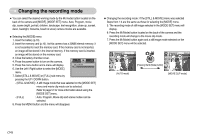
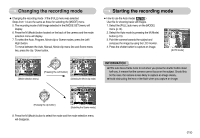
Changing the recording mode ● Changing the recording mode : If the [FULL] menu was selected Steps from 1-4 are the same as those for selecting the [MODE] menu. 5. The recording mode of still image selected in the [MODE SET] menu will display. 6. Press the M (Mode) button located on the back of the camera and the mode selection menu will display. 7. To select the Auto, Program, Movie clip or Scene modes, press the Left / Right button. To move between the Auto, Manual, Movie clip menu line and Scene menu line, press the Up / Down button. Starting the recording mode ■ How to use the Auto mode( ) Use this for shooting basic still images. 1. Select the [FULL] sub menu on the [MODE] menu (p.14). 2. Select the Auto mode by pressing the M (Mode) button (p.15). 3. Point the camera towards the subject and compose the image by using the LCD monitor. 4. Press the shutter button to capture an image. [AUTO mode] AUTO Confirm:Mode/OK [Mode selection menu] [Pressing the Left button] MOVIE Confirm:Mode/OK [Selecting the Movie clip mode] INFORMATION ●If the auto focus frame turns to red when you press the shutter button down half way, it means that the camera cannot focus on the subject. Should this be the case, the camera is less likely to capture an image clearly. ●Avoid obstructing the lens or the flash when you capture an image. Portrait [Pressing the Up button] Confirm:Mode/OK [Selecting the Scene mode] 8. Press the M (Mode) button to select the mode and the mode selection menu will disappear. 《15》
-
 1
1 -
2
-
3
-
4
-
5
-
6
-
7
-
8
-
9
-
10
-
 11
11 -
 12
12 -
 13
13 -
 14
14 -
 15
15 -
 16
16 -
 17
17 -
 18
18 -
 19
19 -
 20
20 -
 21
21 -
22
-
23
-
24
-
25
-
26
-
27
-
28
-
29
-
30
-
31
-
32
-
33
-
34
-
35
-
36
-
37
-
38
-
39
-
40
-
41
-
42
-
43
-
44
-
45
-
46
-
47
-
48
-
49
-
50
-
51
-
52
-
53
-
54
-
55
-
56
-
57
-
58
-
59
-
60
-
61
-
62
-
63
-
64
-
65
-
66
-
67
-
68
-
69
-
70
-
71
-
72
-
73
-
74
-
75
-
76
-
77
-
78
 |
 |