Samsung NE58H9970WS/AA User Manual Ver.1.0 (English, French) - Page 74
Care And Cleaning Of The Oven
 |
View all Samsung NE58H9970WS/AA manuals
Add to My Manuals
Save this manual to your list of manuals |
Page 74 highlights
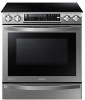
CARE AND CLEANING OF THE OVEN • Be sure all controls are OFF and all surfaces are COOL before cleaning any part of the range. WARNING • If your range is moved for cleaning, servicing, or any reason, be sure the Anti-Tip device is re-engaged properly when the range is replaced. If you fail to re-engage the Anti-Tip device, the range could tip and cause serous injury. Oven vent Oven vent • The oven vent is located below the control box. • This area could become hot during oven use. • It is normal for steam to come out of the vent. • The vent is important for proper air circulation. Never block this vent. Cleaning painted parts and decorative trim • For general cleaning, use a cloth with hot and soapy water. • For more difficult residue and built-up grease, apply a liquid detergent directly onto the area and leave for 30 to 60 minutes. Wipe with a damp cloth and dry. Do not use abrasive cleaners on any of these surfaces. They can scratch. Cleaning stainless steel surfaces 1. Shake the bottle of Stainless Steel Appliance Cleaner or polish well. 2. Place a small amount of Stainless Steel Appliance Cleaner or polish on a damp cloth or damp paper towel. 3. Clean a small area, rubbing with the grain of the stainless steel if applicable. 4. Dry and buff with a clean, dry paper towel or soft cloth. 5. Repeat as necessary. • Do not use a steel-wool pad. It will scratch the surface. • If a mineral oil-based stainless steel appliance cleaner has been used before to clean the appliance, wash the surface with dishwashing liquid and water prior to using the Stainless Steel Appliance Cleaner or polish. English - 74 Manual Users_NE58H9970WS_AA_AC_DG68-00550A-00_EN.indd 74 19/05/2014 18:21:37
-
 1
1 -
2
-
3
-
4
-
5
-
6
-
7
-
8
-
9
-
10
-
11
-
12
-
13
-
14
-
15
-
16
-
17
-
18
-
19
-
20
-
21
-
22
-
23
-
24
-
25
-
26
-
27
-
28
-
29
-
30
-
31
-
32
-
33
-
34
-
35
-
36
-
37
-
38
-
39
-
40
-
41
-
42
-
43
-
44
-
45
-
46
-
47
-
48
-
49
-
50
-
51
-
52
-
53
-
54
-
55
-
56
-
57
-
58
-
59
-
60
-
61
-
62
-
63
-
64
-
65
-
66
-
67
-
68
-
 69
69 -
 70
70 -
 71
71 -
 72
72 -
 73
73 -
 74
74 -
 75
75 -
 76
76 -
 77
77 -
 78
78 -
 79
79 -
80
-
81
-
82
-
83
-
84
-
85
-
86
-
87
-
88
-
89
-
90
-
91
-
92
-
93
-
94
-
95
-
96
-
97
-
98
-
99
-
100
-
101
-
102
-
103
-
104
-
105
-
106
-
107
-
108
-
109
-
110
-
111
-
112
-
113
-
114
-
115
-
116
-
117
-
118
-
119
-
120
-
121
-
122
-
123
-
124
-
125
-
126
-
127
-
128
-
129
-
130
-
131
-
132
-
133
-
134
-
135
-
136
-
137
-
138
-
139
-
140
-
141
-
142
-
143
-
144
-
145
-
146
-
147
-
148
-
149
-
150
-
151
-
152
-
153
-
154
-
155
-
156
-
157
-
158
-
159
-
160
-
161
-
162
-
163
-
164
-
165
-
166
-
167
-
168
-
169
-
170
-
171
-
172
-
173
-
174
-
175
-
176
-
177
-
178
-
179
-
180
-
181
-
182
-
183
-
184
-
185
-
186
-
187
-
188
-
189
-
190
-
191
-
192
 |
 |
