| Section |
Page |
| User’s Guide Basic |
1 |
| Contents |
2 |
| 1. Introduction |
2 |
| 5 Key benefits |
2 |
| 7 Features by models |
2 |
| 8 Useful to know |
2 |
| 9 About this user’s guide |
2 |
| 10 Safety information |
2 |
| 16 Machine overview |
2 |
| 21 Control panel overview |
2 |
| 28 Turning on the machine |
2 |
| 29 Installing the driver locally |
2 |
| 30 Reinstalling the driver |
2 |
| 2. Menu overview and basic setup |
2 |
| 32 Menu overview |
2 |
| 48 Changing the display language |
2 |
| 49 Media and tray |
2 |
| 64 Basic printing |
2 |
| 71 Basic copying |
2 |
| 75 Basic scanning |
2 |
| 77 Basic faxing |
2 |
| 82 Using USB memory device |
2 |
| 3. Maintenance |
2 |
| 90 Ordering supplies and accessories |
2 |
| 91 Available supplies |
2 |
| 92 Available accessories |
2 |
| 94 Available maintenance parts |
2 |
| 95 Redistributing toner |
2 |
| 97 Replacing the toner cartridge |
2 |
| 99 Upgrading a memory module |
2 |
| 101 Monitoring the supplies life |
2 |
| 102 Setting the toner low alert |
2 |
| 103 Cleaning the machine |
2 |
| 4. Troubleshooting |
2 |
| 108 Tips for avoiding paper jams |
2 |
| 109 Clearing original document jams |
2 |
| 116 Clearing paper jams |
2 |
| 123 Understanding the status LED |
2 |
| 125 Understanding display messages |
2 |
| 5. Appendix |
2 |
| 133 Specifications |
2 |
| 143 Regulatory information |
3 |
| 157 Copyright |
3 |
| 1. Introduction |
4 |
| 2. Menu overview and basic setup |
31 |
| 3. Maintenance |
89 |
| 4. Troubleshooting |
107 |
| 5. Appendix |
132 |
| Index |
158 |
| A |
158 |
| accessories |
158 |
| ordering 92 |
158 |
| address book button 23, 25 |
158 |
| arrow button 22, 24 |
158 |
| B |
158 |
| back button 23, 25 |
158 |
| C |
158 |
| cleaning |
158 |
| inside 103 |
158 |
| outside 103 |
158 |
| pickup roller 105 |
158 |
| scan unit 106 |
158 |
| cleaning a machine 103 |
158 |
| clear button 26 |
158 |
| control panel 21 |
158 |
| convention 9 |
158 |
| copy button 22, 24 |
158 |
| copying |
158 |
| basic copying 71 |
158 |
| reducing or enlarging copies 73 |
158 |
| D |
158 |
| darkness button 22, 24 |
158 |
| default settings |
158 |
| tray setting 60 |
158 |
| direct USB button 23, 25 |
158 |
| display screen 22, 24, 26 |
158 |
| E |
158 |
| eco button 23, 25 |
158 |
| eco printing 67 |
158 |
| error message 125 |
158 |
| F |
158 |
| favorites settings, for printing 66 |
158 |
| fax button 22, 24 |
158 |
| fax sending |
158 |
| multi sending 78 |
158 |
| faxing |
158 |
| adjusting darkness 81 |
158 |
| adjusting resolution 80 |
158 |
| preparing to fax 77 |
158 |
| receiving in Fax mode 79 |
158 |
| features 5 |
158 |
| print media feature 135 |
158 |
| front view 18 |
158 |
| G |
158 |
| general icons 9 |
158 |
| H |
158 |
| help button 27 |
158 |
| I |
158 |
| id copy 73 |
158 |
| ID copy button 22, 24 |
158 |
| J |
158 |
| jam |
158 |
| clearing original document 109 |
158 |
| clearing paper 116 |
158 |
| tips for avoiding paper jams 108 |
158 |
| L |
158 |
| Linux |
158 |
| system requirements 140 |
158 |
| loading |
158 |
| paper in multi-purpose tray 52 |
158 |
| paper in the tray1 51 |
158 |
| special media 54 |
158 |
| loading originals 61 |
158 |
| M |
159 |
| Macintosh |
159 |
| system requirements 139 |
159 |
| maintenance parts 94 |
159 |
| memory |
159 |
| installing memory module 99 |
159 |
| memory upgrading 99 |
159 |
| menu button 22, 25 |
159 |
| menu overview 32 |
159 |
| multi-purpose tray |
159 |
| loading 52 |
159 |
| tips on using 52 |
159 |
| using special media 54 |
159 |
| N |
159 |
| network |
159 |
| installing environment 141 |
159 |
| numeric keypad 22, 24, 26 |
159 |
| O |
159 |
| OK button 22, 24 |
159 |
| on hook dial button 23, 25, 27 |
159 |
| optional tray 92 |
159 |
| loading paper 51 |
159 |
| ordering 92 |
159 |
| P |
159 |
| Parallel |
159 |
| ordering 93 |
159 |
| power saver button 23, 25, 26 |
159 |
| preparing originals type 60 |
159 |
| print media |
159 |
| card stock 59 |
159 |
| envelope 55 |
159 |
| labels 58 |
159 |
| output support 135 |
159 |
| preprinted paper 59 |
159 |
| setting the paper size 60 |
159 |
| setting the paper type 60 |
159 |
| special media 54 |
159 |
| transparency 57 |
159 |
| Printing 64 |
159 |
| printing |
159 |
| printing a document |
159 |
| Windows 64 |
159 |
| USB memory 84 |
159 |
| R |
159 |
| rear view 20 |
159 |
| redial/pause button 23, 25 |
159 |
| regulatiory information 143 |
159 |
| reset button 27 |
159 |
| resolution |
159 |
| faxing 80 |
159 |
| S |
159 |
| safety |
159 |
| information 10 |
159 |
| symbols 10 |
159 |
| scan button 23, 25 |
159 |
| scanning |
159 |
| for local connection 75 |
159 |
| USB flash memory 83 |
159 |
| secu printing 69 |
159 |
| specifications 133 |
159 |
| print media 135 |
159 |
| start button 23, 25, 26 |
159 |
| status 23, 25, 26 |
159 |
| stop/clear button 23, 25, 26 |
159 |
| supplies |
159 |
| available supplies 91 |
159 |
| monitoring the supplies life 101 |
159 |
| ordering 91 |
159 |
| replacing toner cartridge 97 |
159 |
| T |
160 |
| toner cartridge |
160 |
| redistributing toner 95 |
160 |
| replacing the cartridge 97 |
160 |
| tray |
160 |
| adjusting the width and length 49 |
160 |
| changing the tray size 49 |
160 |
| loading paper in multi-purpose tray 52 |
160 |
| ordering an optional tray 92 |
160 |
| ordering an parallel 93 |
160 |
| setting the paper size and type 60 |
160 |
| U |
160 |
| understanding the status LED 123 |
160 |
| Unix |
160 |
| system requirements 140 |
160 |
| USB cable |
160 |
| driver installation 29, 30 |
160 |
| USB flash memory |
160 |
| data backup 85 |
160 |
| managing 86 |
160 |
| printing 84 |
160 |
| scanning 83 |
160 |
| using help 67 |
160 |
| W |
160 |
| Windows |
160 |
| driver installation for USB cable connected 29, 30 |
160 |
| system requirements 138 |
160 |
| wireless LED 26 |
160 |
| Advanced |
161 |
| User’s Guide Advanced |
161 |
| Contents |
162 |
| 1. Software installation |
162 |
| 5 Installation for Macintosh |
162 |
| 6 Reinstallation for Macintosh |
162 |
| 7 Installation for Linux |
162 |
| 9 Reinstallation for Linux |
162 |
| 2. Using a network-connected machine |
162 |
| 11 Useful network programs |
162 |
| 12 Wired network setup |
162 |
| 16 Installing driver over the network |
162 |
| 28 IPv6 configuration |
162 |
| 31 Wireless network setup |
162 |
| 3. Useful setting menus |
162 |
| 56 Print menu |
162 |
| 57 Copy menu |
162 |
| 62 Fax menu |
162 |
| 66 Scan menu |
162 |
| 68 System setup |
162 |
| 81 Custom setup |
162 |
| 4. Special features |
162 |
| 83 Altitude adjustment |
162 |
| 84 Changing the font setting |
162 |
| 85 Storing email address |
162 |
| 87 Entering various characters |
162 |
| 88 Setting up the address book |
162 |
| 91 Registering authorized users |
162 |
| 92 Printing features |
162 |
| 109 Fax features |
162 |
| 118 Scan features |
162 |
| 127 Using shared folder features |
162 |
| 128 Using memory/hard drive features |
162 |
| 5. Maintenance |
162 |
| 130 Storing the toner cartridge |
162 |
| 132 Tips for moving & storing your machine |
162 |
| 133 Useful management tools |
162 |
| 6. Troubleshooting |
163 |
| 146 Paper feeding problems |
163 |
| 147 Power and cable connecting problems |
163 |
| 148 Printing problems |
163 |
| 152 Printing quality problems |
163 |
| 160 Copying problems |
163 |
| 161 Scanning problems |
163 |
| 163 Faxing problems |
163 |
| 165 Operating system problems |
163 |
| Contact SAMSUNG worldwide |
163 |
| Glossary |
163 |
| 1. Software installation |
164 |
| 2. Using a network-connected machine |
170 |
| 3. Useful setting menus |
215 |
| 4. Special features |
242 |
| 5. Maintenance |
289 |
| 6. Troubleshooting |
305 |
| Index |
348 |
| A |
348 |
| address book |
348 |
| editing 89 |
348 |
| general setup 78 |
348 |
| group editing 90 |
348 |
| group registering 89 |
348 |
| registering 88 |
348 |
| using 88 |
348 |
| address book setup 88 |
348 |
| AnyWeb Print 133 |
348 |
| authorized users |
348 |
| registering 91 |
348 |
| C |
348 |
| Changing 84 |
348 |
| Confirming 109 |
348 |
| copy |
348 |
| general setup 57 |
348 |
| custom setup 81 |
348 |
| D |
348 |
| direct printing utility 101 |
348 |
| document box 78 |
348 |
| general setup 78 |
348 |
| driver installation |
348 |
| Unix 25 |
348 |
| E |
348 |
| Easy Printer Manager 136 |
348 |
| email |
348 |
| general setup 78 |
348 |
| email address 85 |
348 |
| searching 85 |
348 |
| storing 85 |
348 |
| emulation |
348 |
| general setup 77 |
348 |
| Emulation setup 77 |
348 |
| entering character 87 |
348 |
| F |
348 |
| fax |
348 |
| Adding documents to a reserved fax 111 |
348 |
| automatic redialing 109 |
348 |
| Canceling a reserved fax job 111 |
348 |
| Changing the receive modes 114 |
348 |
| Delaying a fax transmission 110 |
348 |
| Forwarding a received fax to another destination 112 |
348 |
| Forwarding a sent fax to another destination 112 |
348 |
| general setup 62 |
348 |
| Printing faxes on both sides of the paper 117 |
348 |
| Printing sent fax report automatically 117 |
348 |
| Receiving a fax in the computer 113 |
348 |
| Receiving faxes in memory 117 |
348 |
| receiving in Answering Machine mode 115 |
348 |
| receiving in DRPD mode 115 |
348 |
| receiving in Fax mode 115 |
348 |
| receiving in secure mode 116 |
348 |
| receiving in Tel mode 114 |
348 |
| receiving with ext. telephone 115 |
348 |
| redialing the last number 109 |
348 |
| Sending a fax in the computer 109 |
348 |
| Sending a priority fax 111 |
348 |
| Sending faxes on both sides of paper 113 |
348 |
| fax feature 109 |
348 |
| features |
348 |
| machine features 55 |
348 |
| font setting 84 |
348 |
| G |
348 |
| general settings 68 |
348 |
| glossary 175 |
348 |
| L |
348 |
| LCD display |
348 |
| browsing the machine status 57, 61, 62, 67, 72 |
349 |
| Linux |
349 |
| common Linux problems 167 |
349 |
| driver installation for network connected 24 |
349 |
| driver installation for USB cable connected 7 |
349 |
| driver reinstallation for USB cable connected 9 |
349 |
| printer properties 106 |
349 |
| printing 104 |
349 |
| scanning 125 |
349 |
| unifled driver configurator 141 |
349 |
| using SetIP 14 |
349 |
| Linux scanning 125 |
349 |
| M |
349 |
| machine information 57, 61, 62, 67, 72 |
349 |
| machine setup |
349 |
| machine status 57, 61, 62, 67, 72 |
349 |
| Macintosh |
349 |
| common Macintosh problems 166 |
349 |
| driver installation for network connected 22 |
349 |
| driver installation for USB cable connected 5 |
349 |
| printing 102 |
349 |
| Reinstallation for USB connected 6 |
349 |
| scanning 123 |
349 |
| using SetIP 13 |
349 |
| Macintosh scanning 123 |
349 |
| memory/hard drive feature 127, 128 |
349 |
| N |
349 |
| network |
349 |
| driver installation |
349 |
| Linux 24 |
349 |
| Macintosh 22 |
349 |
| UNIX 25 |
349 |
| Windows 16 |
349 |
| general setup 79 |
349 |
| installing driver over the network 16 |
349 |
| introducing network programs 11 |
349 |
| IPv6 configuration 28 |
349 |
| SetIP program 12, 13, 14, 49 |
349 |
| wired network setup 12 |
349 |
| wireless network setup 31 |
349 |
| N-up printing |
349 |
| Macintosh 103 |
349 |
| O |
349 |
| optional memory |
349 |
| Setting up the optional memory 128 |
349 |
| overlay printing |
349 |
| create 98 |
349 |
| delete 99 |
349 |
| print 99 |
349 |
| P |
349 |
| placing a machine |
349 |
| adjusting the altitude 83 |
349 |
| PostScript driver |
349 |
| troubleshooting 170 |
349 |
| print |
349 |
| general setup 56 |
349 |
| Print Menu 56 |
349 |
| print resolution set |
349 |
| Linux 105 |
349 |
| printer preferences |
349 |
| Linux 106 |
349 |
| Printer Status |
349 |
| general information 138, 140 |
349 |
| printing |
349 |
| changing the default print settings 92 |
349 |
| Linux 104 |
349 |
| Macintosh 102 |
349 |
| multiple pages on one sheet of paper |
349 |
| Macintosh 103 |
349 |
| printing on both sides of paper |
350 |
| Macintosh 103 |
350 |
| printing to a file 93 |
350 |
| setting as a default machine 92 |
350 |
| special printer features 93 |
350 |
| UNIX 106 |
350 |
| using direct printing utility 101 |
350 |
| printing a document |
350 |
| Linux 104 |
350 |
| Macintosh 102 |
350 |
| UNIX 106 |
350 |
| printing feature 92 |
350 |
| problem |
350 |
| operating system problems 165 |
350 |
| problems |
350 |
| copying problems 160 |
350 |
| faxing problems 163 |
350 |
| paper feeding problems 146 |
350 |
| power problems 147 |
350 |
| printing problems 148 |
350 |
| printing quality problems 152 |
350 |
| scanning problems 161 |
350 |
| R |
350 |
| reports |
350 |
| machine information 57, 62, 63, 64, 67, 68, 69, 73, 74 |
350 |
| S |
350 |
| Samsung Printer Status 138 |
350 |
| scan |
350 |
| general setup 66 |
350 |
| Scan Assitant 121 |
350 |
| scan feature 118 |
350 |
| Scanning |
350 |
| Scanning with Samsung Scan Assitant 121 |
350 |
| Scanning with SmarThru 4 122 |
350 |
| scanning |
350 |
| Linux scanning 125 |
350 |
| Macintosh scanning 123 |
350 |
| Scanning from image editing program 120 |
350 |
| Scanning from network connected machine 118 |
350 |
| Scanning to email 118 |
350 |
| Scanning to FTP/SMB server 119 |
350 |
| Scanning using the WIA driver 121 |
350 |
| Scanning with SmarThru Office 123 |
350 |
| service contact numbers 171 |
350 |
| SetIP program 12, 49 |
350 |
| SmarThru 4 122 |
350 |
| SmarThru Office 123 |
350 |
| Special features 82 |
350 |
| Storing 85 |
350 |
| supplies |
350 |
| estimated toner cartridge life 131 |
350 |
| SyncThru Web Service |
350 |
| general information 133 |
350 |
| SyncThru™ Web Service 133 |
350 |
| T |
350 |
| toner cartridge |
350 |
| estimated life 131 |
350 |
| handling instructions 130 |
350 |
| non-Samsung and refilled 130 |
350 |
| storing 130 |
350 |
| U |
350 |
| UNIX |
350 |
| driver installation for network connected 25 |
350 |
| printing 106 |
350 |
| usb 77 |
350 |
| general setupusb 77 |
350 |
| USB cable |
350 |
| driver installation 5, 7 |
350 |
| driver reinstallation 6, 9 |
350 |
| using help 104 |
350 |
| W |
351 |
| watermark |
351 |
| create 97 |
351 |
| delete 97 |
351 |
| edit 97 |
351 |
| Windows |
351 |
| common Windows problems 165 |
351 |
| driver installation for network connected 16 |
351 |
| using SetIP 12, 49 |
351 |
| wireless |
351 |
| ad hoc mode 31 |
351 |
| computer 31 |
351 |
| control panel 31 |
351 |
| Infrastructure mode 31 |
351 |
| installation 31 |
351 |
| USB cable 34 |
351 |
| wireless network |
351 |

 1
1 58
58 59
59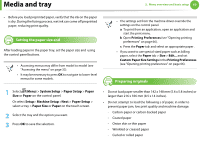 60
60 61
61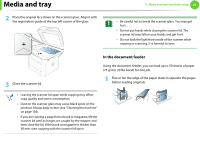 62
62 63
63 64
64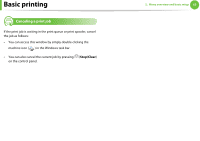 65
65 66
66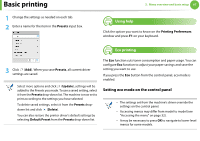 67
67 68
68

