Samsung SCX 6322DN Service Manual - Page 113
Changing the display language, 4.2 Setting the date and time
 |
UPC - 635753620658
View all Samsung SCX 6322DN manuals
Add to My Manuals
Save this manual to your list of manuals |
Page 113 highlights
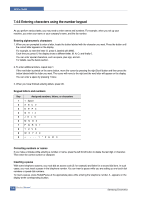
Setting Guide 7.4.1 Changing the display language To change the language that appears on the control panel, follow these steps: 1. Press Menu until System Setup appears on the bottom line of the display and press OK. 2. Press OK when Machine Setup appears. 3. Press the Scroll buttons until Language appears and press OK. 4. Press the Scroll buttons until the language you want appears and press OK. 5. Press Stop/Clear to return to Standby mode. 7.4.2 Setting the date and time The current date and time are shown on the display when your machine is on and ready to work. All of your faxes will have the date and time printed on them. 1. Press Menu until System Setup appears on the bottom line of the display and press OK. 2. Press OK when Machine Setup appears. 3. Press the Scroll buttons until Date & Time appears and press OK. 4. Enter the correct time and date using the number keypad. Month = 01 to 12 Day = 01 to 31 Year = requires four digits Hour = 01 to 12 (12-hour mode) 00 to 23 (24-hour mode) Minute = 00 to 59 You can also use the Scroll buttons to move the cursor under the digit you want to correct and enter a new number. 5. To s el ect AM or PM for 12-hour format, press the or button or any number button. When the cursor is not under the AM or PM indicator, pressing the or button immediately moves the cursor to the indicator. You can change the clock mode to 24-hour format (e.g. 01:00 PM as 13:00). For details, see the next section. 6. Press OK to save the time and date. When you enter a wrong number, Out of Range appears and the machine does not proceed to the next step. If this happens, simply reenter the correct number. 7. Press Stop/Clear to return to Standby mode. Changing the clock mode You can set your machine to display the current time using either a 12-hour or 24-hour format. 1. Press Menu until System Setup appears on the bottom line of the display and press OK. 2. Press OK when Machine Setup appears. 3. Press the Scroll buttons until Clock Mode appears and press OK. 4. Press the Scroll buttons to select the other mode and press OK. 5. Press Stop/Clear to return to Standby mode. Samsung Electronics Service Manual 7-7
-
 1
1 -
2
-
3
-
4
-
5
-
6
-
7
-
8
-
9
-
10
-
11
-
12
-
13
-
14
-
15
-
16
-
17
-
18
-
19
-
20
-
21
-
22
-
23
-
24
-
25
-
26
-
27
-
28
-
29
-
30
-
31
-
32
-
33
-
34
-
35
-
36
-
37
-
38
-
39
-
40
-
41
-
42
-
43
-
44
-
45
-
46
-
47
-
48
-
49
-
50
-
51
-
52
-
53
-
54
-
55
-
56
-
57
-
58
-
59
-
60
-
61
-
62
-
63
-
64
-
65
-
66
-
67
-
68
-
69
-
70
-
71
-
72
-
73
-
74
-
75
-
76
-
77
-
78
-
79
-
80
-
81
-
82
-
83
-
84
-
85
-
86
-
87
-
88
-
89
-
90
-
91
-
92
-
93
-
94
-
95
-
96
-
97
-
98
-
99
-
100
-
101
-
102
-
103
-
104
-
105
-
106
-
107
-
 108
108 -
 109
109 -
 110
110 -
 111
111 -
 112
112 -
 113
113 -
 114
114 -
 115
115 -
 116
116 -
 117
117 -
 118
118 -
119
-
120
-
121
-
122
-
123
-
124
-
125
-
126
-
127
-
128
-
129
-
130
-
131
-
132
-
133
-
134
-
135
-
136
-
137
-
138
-
139
-
140
-
141
-
142
-
143
-
144
-
145
-
146
-
147
-
148
-
149
-
150
-
151
-
152
-
153
-
154
-
155
-
156
-
157
-
158
-
159
-
160
-
161
-
162
-
163
-
164
-
165
-
166
-
167
-
168
-
169
-
170
-
171
-
172
-
173
-
174
-
175
-
176
-
177
-
178
-
179
-
180
-
181
-
182
-
183
-
184
-
185
 |
 |