Sanyo PLC XE40 Owners Manual - Page 42
Setting - reset switch
 |
View all Sanyo PLC XE40 manuals
Add to My Manuals
Save this manual to your list of manuals |
Page 42 highlights
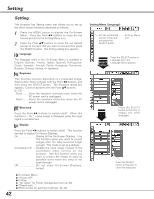
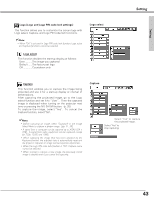
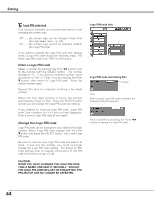
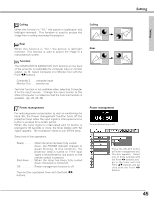
Setting Setting This projector has Setting menu that allows you to set up the other various functions described as follows; 1 Press the MENU button to display the On-Screen Menu. Press the Point 7 8 buttons to move the red framed pointer to the Setting Menu icon. 2 Press the Point ed buttons to move the red framed pointer to the item that you want to set and then press the SELECT button. The Setting dialog box appears. Language The language used in the On-Screen Menu is available in English, German, French, Italian, Spanish, Portuguese, Dutch, Swedish, Finnish, Polish, Hungarian, Romanian, Russian, Chinese, Korean, or Japanese. Keystone This function corrects distortion of a projected image. Select either Store or Reset with the Point 7 8 buttons, and then press the SELECT button. The keystone dialog box appears. Correct keystone with the Point ed buttons. (p. 23) Store .........Store the keystone correction even when the AC power cord is unplugged. Reset........Reset the keystone correction when the AC power cord is unplugged. Blue back Press the Point 7 8 buttons to switch on/off. When this function is "On," a blue image is displayed while the input signal is not detected. Display Press the Point 7 8 buttons to switch on/off. This function decides to display On-Screen Displays. On Display all the On-Screen Displays. Use this function when you want to project images after the lamp becomes bright enough. This mode is set as a default.. Countdown off......Display the input image instead of the countdown when turning on the projector. Use this function when you want to project the image as early as possible even when the lamp is not bright enough. Off Do not show On-Screen Displays. except; 42 ● On-Screen Menu ● "Power off?" ● P-Timer ● "No signal" for Power management item (p. 45) ● "Please wait..." ● White arrows for panning mode (pp. 33, 34) Setting Menu (Language) Set the red framed pointer to the item and press the SELECT button. Setting Menu icon SELECT button Press the SELECT button at Language item, the Language Menu appears. Press the SELECT button at this item to display the other languages. Press the SELECT button at this item to close the dialog box.
-
 1
1 -
2
-
3
-
4
-
5
-
6
-
7
-
8
-
9
-
10
-
11
-
12
-
13
-
14
-
15
-
16
-
17
-
18
-
19
-
20
-
21
-
22
-
23
-
24
-
25
-
26
-
27
-
28
-
29
-
30
-
31
-
32
-
33
-
34
-
35
-
36
-
 37
37 -
 38
38 -
 39
39 -
 40
40 -
 41
41 -
 42
42 -
 43
43 -
 44
44 -
 45
45 -
 46
46 -
 47
47 -
48
-
49
-
50
-
51
-
52
-
53
-
54
-
55
-
56
-
57
-
58
-
59
-
60
-
61
-
62
-
63
-
64
-
65
-
66
-
67
-
68
 |
 |
