Sanyo PLC XE40 Owners Manual - Page 45
Ceiling, Terminal, Power management, The COMPUTER IN 2/MONITOR OUT terminal on the back
 |
View all Sanyo PLC XE40 manuals
Add to My Manuals
Save this manual to your list of manuals |
Page 45 highlights
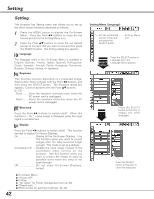
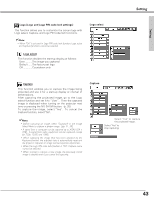
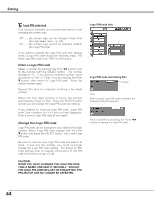
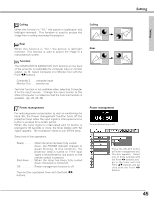
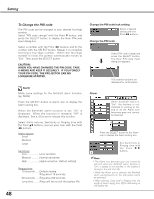
Setting Setting Ceiling When this function is "On," the picture is top/bottom and left/right reversed. This function is used to project the image from a ceiling mounting the projector. Rear When this function is "On," the picture is left/right reversed. This function is used to project the image to a rear projection screen. Terminal The COMPUTER IN 2/MONITOR OUT terminal on the back of the projector is switchable for computer input or monitor output. (p. 9) Select Computer 2 or Monitor Out with the Point 7 8 buttons. Computer 2 . . . .computer input Monitor Out . . .monitor out Terminal function is not available when selecting Computer 2 to the input source. Change the input source to the others (Computer1 or Video) so that the Terminal function is available. (pp. 26, 35, 36) Ceiling Rear Power management For reducing power consumption as well as maintaining the lamp life, the Power management function turns off the projection lamp when the input signal is interrupted and no button is pressed for a certain period. When the input signal is interrupted and no button is pressed for 30 seconds or more, the timer display with "No signal" appears. The countdown starts to turn off the lamp. Select one of the operations. Ready When the lamp has been fully cooled down, the POWER indicator changes to green blinking. In this condition, the projection lamp is turned on if the input signal is reconnected or any button on the remote control is pressed. Shut down. . . When the lamp has been fully cooled down, the power is turned off. Off Power management function is off. Then set the countdown timer with the Point 7 8 buttons. Power management Time left before Lamp is off. Press the SELECT button at Power management and this box appears. Select one of three settings with the Point 7 8 buttons, and go to the timer with the Point ed buttons and set time with the Point 7 8 buttons. 45
-
 1
1 -
2
-
3
-
4
-
5
-
6
-
7
-
8
-
9
-
10
-
11
-
12
-
13
-
14
-
15
-
16
-
17
-
18
-
19
-
20
-
21
-
22
-
23
-
24
-
25
-
26
-
27
-
28
-
29
-
30
-
31
-
32
-
33
-
34
-
35
-
36
-
37
-
38
-
39
-
 40
40 -
 41
41 -
 42
42 -
 43
43 -
 44
44 -
 45
45 -
 46
46 -
 47
47 -
 48
48 -
 49
49 -
 50
50 -
51
-
52
-
53
-
54
-
55
-
56
-
57
-
58
-
59
-
60
-
61
-
62
-
63
-
64
-
65
-
66
-
67
-
68
 |
 |
