Sharp GX29 User Guide - Page 56
Email, About Email Messaging, Creating a New Email Message
 |
View all Sharp GX29 manuals
Add to My Manuals
Save this manual to your list of manuals |
Page 56 highlights
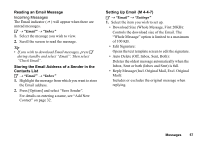
Email (M 4-4) About Email Messaging The Email service allows you to send and receive Email messages. Email messages of up to 2000 characters can be sent. The size of the Email messages to be received depends on Email settings. Note • You cannot send Email messages with files attached. If you forward Email messages with files attached, the attached files are deleted. Creating a New Email Message A → "Email" → "Create Message" 1. Enter the message. 2. Select the desired recipient from the Contacts List entries. If the desired entry does not exist, select "Enter Email Address" and enter the Email address. 3. Select "Send". After the message is sent, the message is moved to the Sent box. Note • If a message cannot be sent for some reason, the message stays in the Outbox. To re-send the massage, carry out the following: A → "Email" → "Outbox" 1. Highlight the desired message. 2. Press [Options] and select "Re-send". Tip • You can use the text template to make it easier to complete the message, and you can add your signature at the end of the message. To use the text template, move the cursor to the point you wish to insert the template. Press [Options] and select "Add Text Template". Select the desired template. To add the signature, press [Options] and select "Add Signature". Select the desired signature. • Select "Save to Drafts" instead in step 3 to save the message without sending. • Select "Subject" in step 3 to enter the subject. Up to 40 characters as the subject can be entered. • Select "Add Contact" instead in step 3 to add more recipients (up to 30 recipients (for To, Cc and Bcc)). Select "To", "Cc" or "Bcc" and select or enter the desired address of the recipients. 56 Messages
-
 1
1 -
2
-
3
-
4
-
5
-
6
-
7
-
8
-
9
-
10
-
11
-
12
-
13
-
14
-
15
-
16
-
17
-
18
-
19
-
20
-
21
-
22
-
23
-
24
-
25
-
26
-
27
-
28
-
29
-
30
-
31
-
32
-
33
-
34
-
35
-
36
-
37
-
38
-
39
-
40
-
41
-
42
-
43
-
44
-
45
-
46
-
47
-
48
-
49
-
50
-
 51
51 -
 52
52 -
 53
53 -
 54
54 -
 55
55 -
 56
56 -
 57
57 -
 58
58 -
 59
59 -
 60
60 -
 61
61 -
62
-
63
-
64
-
65
-
66
-
67
-
68
-
69
-
70
-
71
-
72
-
73
-
74
-
75
-
76
-
77
-
78
-
79
-
80
-
81
-
82
-
83
-
84
-
85
-
86
-
87
-
88
-
89
-
90
-
91
-
92
-
93
-
94
-
95
-
96
-
97
-
98
-
99
-
100
-
101
-
102
-
103
-
104
-
105
-
106
-
107
-
108
-
109
-
110
-
111
-
112
-
113
-
114
-
115
-
116
-
117
-
118
-
119
-
120
-
121
-
122
-
123
-
124
-
125
-
126
-
127
-
128
 |
 |
