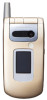
Sharp GX30 User Guide
Sharp GX30 Manual
 |
View all Sharp GX30 manuals
Add to My Manuals
Save this manual to your list of manuals |
Sharp GX30 manual content summary:
- Sharp GX30 | User Guide - Page 1
Hereby, Sharp Telecommunications of Europe Ltd, declares that this GX30 is in compliance with the essential requirements and other relevant provisions of Directive 1999/5/EC. A copy of the original declaration of conformity can be found at the following Internet address: http://www.sharp-mobile.com - Sharp GX30 | User Guide - Page 2
for choosing the GX30. About This User Guide This user guide is carefully designed to help you learn about your phone's features and operations whether as a result of improper use, repairs, defects, battery replacement, use after the specified battery life has expired or any other cause. • We assume - Sharp GX30 | User Guide - Page 3
; and additional patents are pending worldwide. SD logo is a trademark. Bluetooth is a trademark of the Bluetooth SIG, Inc. The Bluetooth word mark and logos are owned by the Bluetooth SIG, Inc. and any use of such marks by Sharp is under license. Other trademarks and trade names are those of - Sharp GX30 | User Guide - Page 4
Message). • MMS (Multimedia Messaging Service) can personalise your phone in various ways: you can Mobile light with large number of uses: as a camera flash, battery charge notification, incoming call indicator and a makeshift torch. • Melody editing function allows you to create original ringtones - Sharp GX30 | User Guide - Page 5
Table of Contents Introduction 1 Useful Functions and Services of the Phone 3 Table of Contents 4 Your Phone 7 Optional Accessories 7 Getting Started 8 Inserting the SIM Card and the Battery .....11 Charging the Battery 15 Inserting the Memory Card 16 Removing the Memory Card 18 Turning - Sharp GX30 | User Guide - Page 6
116 SIM Application 116 MP3 Player 116 Calendar 116 Alarm 119 Calculator 122 Voice Recorder 123 Melody Editor 125 Phone Help 134 Profiles 135 Activating a Profile 135 Customising Profiles 136 Resetting Profile Settings 136 Ringer Volume 137 Assigning Ringtone 137 Vibration 138 Light - Sharp GX30 | User Guide - Page 7
Internet Settings 172 Network Settings 178 Security 180 Master Reset 186 Connecting GX30 to Your PC 187 System Requirements 187 GSM/GPRS Modem 187 Handset Manager 187 Software Installation 187 Note 188 Troubleshooting 189 Safety Precautions and Conditions of Use 191 CONDITIONS OF USE - Sharp GX30 | User Guide - Page 8
900/1800/1900 GPRS phone • Rechargeable Li-ion battery • AC charger • Handsfree Kit • CD-ROM • SD memory card • User guide Optional Accessories • Lithium-ion spare battery (XN-1BT30) • High capacity Lithium-ion battery (XN-1BT31) • Cigarette lighter charger (XN-1CL30) • USB data cable (USB cable: XN - Sharp GX30 | User Guide - Page 9
Getting Started 1 15 16 17 8 18 2 19 3 4 9 5 10 11 6 24 12 25 7 13 26 14 27 8 Getting Started 20 21 22 23 - Sharp GX30 | User Guide - Page 10
pictures in the handset memory in stand-by mode. 3. Centre Key: Displays Main menu in stand-by mode and executes functions. in this manual indicates this key Vodafone live!" Key) Executes the function at the bottom right of the screen. C in this manual indicates this key. Used to access "Vodafone - Sharp GX30 | User Guide - Page 11
mode. Turns the flash/auxiliary light on or off in digital camera/video camera mode. 18.Mobile Light: Used as a flash or an auxiliary light in digital camera/video camera mode, as a battery charge indicator, or notification for incoming calls, data/fax calls or messages. 19.External Display 20 - Sharp GX30 | User Guide - Page 12
-up) Switches between normal ( ) and macro ( ) position. 25.Handsfree Kit Connector 26.Memory Card Slot Cover 27.External Connector: Used to connect either the charger or USB data cable. Inserting the SIM Card and the Battery 1. Slide off the battery cover ( ). 1 2 Getting Started 11 - Sharp GX30 | User Guide - Page 13
2. Slide the SIM card into the SIM holder. SIM card 3. Hold the battery so that the metal contacts of the battery are facing down, slide the guides on the top of the battery into the battery slots , and then insert it . 2 1 12 Getting Started - Sharp GX30 | User Guide - Page 14
cover as shown below and slide it as shown. Removing the SIM Card and the Battery 1. Make sure to turn off your phone and disconnect the charger and other accessories. Slide off the battery cover . 1 2 Note • Make sure that only 3V SIM cards are used. • Make sure that the standard accessory - Sharp GX30 | User Guide - Page 15
card out of the SIM holder . Battery Disposal The device is supported by a battery. In order to protect the environment, please read the following points concerning battery disposal: • Take the used battery to your local waste depot, dealer or customer service centre for recycling. • Do not expose - Sharp GX30 | User Guide - Page 16
2. When charging is complete, the mobile light turns off. Unplug the charger from the AC outlet, then unplug the charger connector from the phone. Note • Do not use any non approved charger, this may damage your phone and invalidate any warranty, please see "Battery" on page 192 for details. • When - Sharp GX30 | User Guide - Page 17
low, an alarm will sound and the " " is displayed on the main display and the external display. If you are using your phone and you hear the "low battery" alarm, attach your charger as soon as possible. The phone may not be able to continue normal operation if you continue to use it. The - Sharp GX30 | User Guide - Page 18
, you cannot save or delete files. • Do not open the memory card cover whilst an memory card is being formatted or being written by the phone. The card may be damaged beyond use. • Keep all memory cards out of the reach of small children. Memory Card Folder Configurations Four folders entitled - Sharp GX30 | User Guide - Page 19
, press and hold F for approximately 2 seconds. To Enter the PIN Code If activated you are asked to enter a PIN (Personal Identification Number) code after turning on your phone. 1. Enter your PIN code. 2. Press . Note • If your PIN code is entered incorrectly three times in a row, the SIM card is - Sharp GX30 | User Guide - Page 20
the SIM Card When you insert the SIM card into your phone for the first time and start the Contacts List application, you are asked whether you wish to copy Contacts List entries on the SIM card. Follow the on-screen instructions, or you can do it later using the Contacts List - Sharp GX30 | User Guide - Page 21
Indicates the strength of received signal/the service is out of range. 2. : Appears when your phone is GPRS enabled and within range. communication is in CSD or GPRS mode. 14. : Indicates the battery level. 15. : Appears when your phone is roaming outside of your network. 16. : Appears when - Sharp GX30 | User Guide - Page 22
Appears when vibration (p. 138) alert is set. Appears when the USB data cable is connected to your phone. 19. / : 20. : 21. : Appears when "Infrared" is on/during connection. Appears when the Bluetooth is activated. Appears when your phone is in data communication mode. 22. : Appears when your - Sharp GX30 | User Guide - Page 23
Volume" (p. 137) is set to "Silent". Appears when in call. Appears when the WAP or MMS communication is in CSD or GPRS mode. Indicates the battery level. Appears when your phone is roaming outside of your network. Appears when "Diverts" (p. 165) is set to "All Calls". Appears when your - Sharp GX30 | User Guide - Page 24
13. : 14. / : 15. : 16. : 17. : Appears when the USB data cable is connected to your phone. Appears when "Infrared" is on/during connection. Appears when the Bluetooth is activated. Appears when the Outbox contains multimedia messages you failed to send. Appears when the memory card (p. 16) is - Sharp GX30 | User Guide - Page 25
not be available on all mobile phone networks when certain network services and/ or phone features are in use. Contact code omitting the first 0 when making international calls, in most cases. (It differs for some countries.) Speed Dialling Up to 9 phone numbers from the Contacts List memory (Handset - Sharp GX30 | User Guide - Page 26
redialling is not available for fax and data calls. Ending a Call 1. Press F to end the call. Tip • When the handsfree kit is connected to the phone, you can end calls by pressing the Answer button. Call Functions 25 - Sharp GX30 | User Guide - Page 27
an incoming call is detected, the phone rings and the mobile light flashes. 1. Open your phone. 2. Press D, or A [ phone and the Any Key Answer function is enabled, you can answer calls by pressing the side-up or side-down key. • If you have subscribed to the Calling Line Identification (CLI) service - Sharp GX30 | User Guide - Page 28
side-down key or b to decrease the volume. Five levels (level 1 to 5) are selectable. 3. Press when the volume is set to the desired level. The phone returns to the in-call screen automatically if left unoperated. Putting a Call on Hold This function allows you to manage two calls at the same - Sharp GX30 | User Guide - Page 29
current call and return to the held call. Note • You need to set "Call Waiting" to "On" if you use the Call Waiting service (p. 162). • Call Waiting service may not be available on all networks. Contact your network operator for more information. • If you do not wish to answer the second call - Sharp GX30 | User Guide - Page 30
Press a or b to highlight "Conference All", then press to join the conference call. 4. Press F to end the conference call. Note • Conference call service may not be available on all networks. Contact your network operator for more information. • You have more options for the Conference call in step - Sharp GX30 | User Guide - Page 31
To Add New Participants to the Conference Call 1. Press A [Options] to display the Options menu. 2. Press a or b to highlight "Dial", then press or A [Select] to select. 3. Enter the number you wish to include in the conference call. 4. Press D to dial. 5. Press A [Options] to display the Options - Sharp GX30 | User Guide - Page 32
Muting the Dial Tone (DTMF Tone) 1. During a call, press A [Options] and press a or b to highlight "DTMF Tones Off", then press or A [Select]. To unmute the dial tone, highlight "DTMF Tones On" in step 1. Muting the Microphone 1. During a call, press C [Mute] to mute the microphone. To unmute the - Sharp GX30 | User Guide - Page 33
Entering Characters When entering characters to create Contacts List entries, text messages or multimedia messages, etc., press the corresponding keys. In multi-tap input method, press each key until the desired character is displayed. For example, press H once for the letter "A" or twice for the - Sharp GX30 | User Guide - Page 34
Changing the Input Languages You can change the input language on the text entry screen. 1. On the text entry screen, press A [Options] to display the Options menu. 2. Press a or b to highlight "Input Language", then press or A [Select] to select. 3. Press a or b to highlight the language you wish - Sharp GX30 | User Guide - Page 35
Using Text Templates You can use the sentences registered in Text Templates when entering characters. For details on creating the text template, see "Adding Phrases to Text Templates" on page 108. 1. On the text entry screen, press a, b, c or d to move the cursor to the point you wish to insert the - Sharp GX30 | User Guide - Page 36
for the menu's corresponding number also accesses function. In this manual, the operation to access function is described by navigation keys Main menu, press C [Exit]. Operation Guidance Your phone uses soft keys to help you to navigate the phone (A and C). These keys change usage depending on - Sharp GX30 | User Guide - Page 37
Example: To Access "Language" Sub Menu Using Shortcut Keys Press O G G. Note • The shortcut keys work for the first three menu levels only. 36 Using the Menu - Sharp GX30 | User Guide - Page 38
Menu1 1 Applications 2 Screensavers 3 More Games 4 Settings 5 Java™ Information 1 Vodafone live! 2 Games 3 Ringtones 4 Pictures 5 News 6 Sport 7 Find & Seek 8 Chat 9 Search 1 SIM Application* 2 MP3 Player 3 Calendar 4 Alarm 5 Calculator 6 Voice Recorder 7 Melody Editor 8 Phone Help 1 Create Message - Sharp GX30 | User Guide - Page 39
numbers. In a Contacts List, you can store the following items. Items stored in the handset memory Name: Up to 30 characters Phone number: Up to 40 digits, 3 phone numbers / entry E-mail Address: Up to 60 characters, 2 addresses / entry Group: Selectable from 7 groups Address: Up to 100 - Sharp GX30 | User Guide - Page 40
store to the SIM card is dependent on its capacity. Contact your network operator for details. If you create a new entry in the handset memory, you need to enter one of the following: "Name", "Phone number" or "E-mail Address". If you create a new entry on the SIM card, you need to enter - Sharp GX30 | User Guide - Page 41
to move the cursor to the phone field, then press . The phone number entry screen is displayed. 6. Enter the phone number, then press . Up to Adding a Thumbnail to an Entry You can add a thumbnail to an entry in the handset memory. 1. Perform steps 1 to 3 in "Displaying the Contacts List" on page 38 - Sharp GX30 | User Guide - Page 42
the picture added, select "Remove" after step 4. Note • If you delete a picture added as a thumbnail in the handset memory, the corresponding thumbnail is also removed. Adding the Phone Number from Call Log Entries 1. Display the call log entry you wish to store (p. 142). 2. Press A [Options] to - Sharp GX30 | User Guide - Page 43
copying an entry, press C [No] in step 6. Copying All Entries from SIM Card to Handset You can copy all entries from the SIM card to the handset memory at once. When you insert the SIM card into your phone for the first time and start the Contacts List application, the confirmation screen appears - Sharp GX30 | User Guide - Page 44
the desired name, then press D to dial. 3. If two or more phone numbers are registered for the selected entry, press a or b to highlight the desired phone number, then press D to dial. Tip • You can also dial the desired phone number by pressing the digit key corresponding to the list number instead - Sharp GX30 | User Guide - Page 45
Tip • If you select "SIM Memory" for the "Contacts Location" option in Contacts List menu (p. 38), only one phone number entry is displayed. • If no entries are found in the list, you can create an entry from the list. Press A [Options]. Then follow the - Sharp GX30 | User Guide - Page 46
or A [Select] to select. 4. Press a or b to highlight "Delete All Entries", then press to select. 5. Enter your handset code, then press . 6. Press a or b to highlight "Handset Entries" or "SIM Entries", then press to select. 7. Press A [Yes]. To cancel deletion, press C [No] in step 7. Viewing - Sharp GX30 | User Guide - Page 47
can be set for each group. When you purchase this phone, groups are set to off. If you do not set a group ringtone, the ringtone assigned in the Profiles is used. 1. Perform steps 1 to 3 in "Displaying the Contacts List" on page 38. 2. Press A [Options] to display the Options menu. 3. Press - Sharp GX30 | User Guide - Page 48
ringtone setting, select "Off" after step 4. Making a Backup File on the Memory Card With a memory card attached to your phone, you can make backup files of Contacts List entries in the handset ", then press to select. 5. Enter your handset code, then press . A confirmation message for overwriting - Sharp GX30 | User Guide - Page 49
"Advanced", then press or A [Select] to select. 4. Press a or b to highlight "Delete", then press or A [Select] to select. 5. Enter your handset code, then press . A confirmation message is displayed. 6. Press A [Yes]. To cancel deleting, press C [No] in step 6. Memory Status This function helps you - Sharp GX30 | User Guide - Page 50
. For details on searching through Contacts List entries, perform steps 1 to 4 in "Finding a Name and Number" on page 43. 2. Press a or b to highlight the phone number you wish to set in the Speed Dial List. 3. Press A [Options] to display the Options menu. 4. Press a or b to highlight "Add to Speed - Sharp GX30 | User Guide - Page 51
38. 2. Press a or b to scroll through list for selecting the desired name, then press to select. 3. Press a or b to highlight the desired phone number. 4. Press A [Options] to display the Options menu. 5. Press a or b to highlight "Swap", then press or A [Select] to select. 6. Enter the location - Sharp GX30 | User Guide - Page 52
b to highlight "Save New Pictures to", then press or A [Select] to select. 3. Press a or b to highlight "Handset Memory", "Memory Card" or "Choice", then press to select. Take Picture (M 5-1) Put the phone into the digital camera mode to take a picture. Pictures are saved in JPEG format in the - Sharp GX30 | User Guide - Page 53
name) to My Stuff..." is displayed, then the picture is registered. If you have selected "Choice" when saving, press a or b to highlight "Save to Handset" or "Save to Card" then press . If you wish to send a picture by multimedia message after taking the picture, press before step 5. 6. Press F to - Sharp GX30 | User Guide - Page 54
is available. Note • The digital camera uses a CCD sensor. Although this camera has been manufactured to the highest specifications, some pictures may still appear too bright or too dark. • If the phone has been left in a warm place for a long time before taking or registering a picture, the picture - Sharp GX30 | User Guide - Page 55
: Indicates a memory card is not inserted or cannot be recognized by the phone. (When "Memory Card" is selected for the "Save New Pictures to" Pictures to" is "Choice". Memory indicators (p. 51) : Indicates the handset memory where the pictures are saved. : Indicates the memory card where the - Sharp GX30 | User Guide - Page 56
Continuous shooting indicators (p. 57) : When pictures are taken in continuous shooting mode, these indicators appear on the screen. * When delay timer and continuous shooting functions are simultaneously set, " " is displayed instead. Picture size indicators (p. 53) XXL (default): 858 × 1144 dots - Sharp GX30 | User Guide - Page 57
of the Picture Press a or b to adjust the brightness of the picture. Once the phone has returned to the stand-by screen the brightness settings return to default. Viewing the Taken Pictures Taken pictures in the handset memory or in the memory card can be viewed. 1. In digital camera mode, press - Sharp GX30 | User Guide - Page 58
"Off". 4. Press or the side-down key to start continuous shooting. Auto Shooting: Four pictures are taken in a row by pressing or the sidedown key. Manual Shooting: Pictures are taken one by one by pressing or the side-down key. When the Continuous Shooting is completed, the taken pictures are saved - Sharp GX30 | User Guide - Page 59
used with the Manual Shooting setting. Selecting a Frame You can select the frame from preset patterns. You can also select a frame in the handset memory or in Off • If you do not operate your phone for approximately one minute, the flash light turns off automatically to save the power. 58 Camera - Sharp GX30 | User Guide - Page 60
the desired sound, then press to select. To play back the shutter sound, press A [Play] in step 3. Sending Pictures To send your picture to another phone or e-mail address, see "Sending Messages" on page 96 for instructions. Deleting Pictures See "Deleting Pictures" on page 97 for - Sharp GX30 | User Guide - Page 61
Record Video (M 5-2) Put the phone into the video camera mode to record a video. You can send video clips registered in the handset memory or memory card with your message. Video clips are saved in ".3gp" format. Recording Video Clips Sound can be recorded with the video clip. 1. - Sharp GX30 | User Guide - Page 62
Using the Zoom Function Zooming ratio can be altered approximately up to 3 times in 10 steps. Press c or d to change the zooming ratio. Selecting Video Quality 1. In video camera mode, press A [Options]. The Options menu is displayed. 2. Press a or b to highlight "Video Quality", then press or A [ - Sharp GX30 | User Guide - Page 63
to adjust the brightness of the video clip. Once the phone has returned to the stand-by screen, the brightness settings My Videos", then press or A [Select] to select. 3. Press a or b to highlight "Handset Memory" or "Memory Card", then press to select. The list of video clips is displayed. 4. - Sharp GX30 | User Guide - Page 64
• Your video clips are given file names such as "videoNNN.3gp" for the handset, or "videoNNNNN.3gp" for the memory card (NNN or NNNNN are integer. Each "On", then press to select. " " is displayed on the screen and the phone returns to video camera mode. 4. Press or the side-down key to start the - Sharp GX30 | User Guide - Page 65
about one minute, the flash light turns off automatically to save power. Sending Video Clips To send your video clips to another phone or e-mail address, see "Sending Messages" on page 106 for instructions. Deleting Video Clips See "Deleting Video Clip Files" on page 107 for instructions. 64 Camera - Sharp GX30 | User Guide - Page 66
Messages (M 4) Your phone allows you to send and receive text messages or multimedia messages and to receive WAP alerts. Multimedia (MMS) (M 4-2) About Multimedia Messaging Multimedia Messaging Service (MMS) allows you to send and receive multimedia messages with graphical images, photographs, sound - Sharp GX30 | User Guide - Page 67
select. 3. Enter the subject of your message, then press . Note • This phone allows you to enter up to 40 characters as the subject, and enter up operator for more information. To Send a Message Template MMS Your phone provides message templates with an image and voice attachment that help you - Sharp GX30 | User Guide - Page 68
or b to highlight a desired number from the list, then press to select. 5. Enter the phone number or e-mail address of the other recipients, then press . 6. Press C [Back] twice. Note • You can send it later following the instructions in "Sending a Message in the Drafts Box" on page 70. Messages 67 - Sharp GX30 | User Guide - Page 69
of text (up to the message total 100 Kbytes limit). Inserting Attached Data You can send pictures, sounds and video clips saved in the handset memory attached to multimedia messages. When attaching video clips, "Slide Show" must be set to "Off". 1. Press A during stand-by. 2. Press a or b to - Sharp GX30 | User Guide - Page 70
to display the Options menu. 5. Press a or b to highlight "Picture", "Sound" or "Video", then press or A [Select] to select. 6. Press a or b to highlight "Handset Memory" or "Memory Card", then press to select. 7. Press a or b to highlight the file name you wish to attach, then press to select. The - Sharp GX30 | User Guide - Page 71
then press . 8. Press a or b to highlight "Send", then press to select. Note • You cannot modify a Slide Show message that is created on another phone as shown in step 6. Go to step 7. Reading MMS Messages you receive are stored in the Inbox. Incoming Messages The MMS indicator ( ) will appear when - Sharp GX30 | User Guide - Page 72
message, then press A [Options] to display the Options menu. 3. Press a or b to highlight "Details", then press or A [Select] to select. The sender's phone number or e-mail address, time and date stamp, subject and size are displayed. Replying to a Message from the Sender from the Inbox 1. Press - Sharp GX30 | User Guide - Page 73
", then press to select. Note • When a message with attached data is forwarded the data is also sent. However, if there is any data which the phone recognises as having copyright, then it will not be sent. • The "Subject" field is automatically filled in with the original subject preceded by "Fw - Sharp GX30 | User Guide - Page 74
Storing the Phone Number or E-mail Address of a Sender in the Contacts List 1. Perform steps 1 to 5 in "Replying to a Message from the Sender from the Inbox" on page - Sharp GX30 | User Guide - Page 75
Confirming Arrival of Delivery Report 1. Perform steps 1 and 2 in "Creating a New MMS" on page 65. 2. Press a or b to highlight "Sent", then press to select. 3. Press a or b to highlight the message of which you wish to confirm arrival of delivery report, then press A [Options] to display the - Sharp GX30 | User Guide - Page 76
[Options]. The Options menu is displayed. 4. Press a or b to highlight "Lock/Unlock", then press or A [Select] to select. Making a Call to the Sender of the sender of a message in the Inbox whose address (From) is the phone number. 1. Perform steps 1 to 3 in "Replying to a Message from the - Sharp GX30 | User Guide - Page 77
you finish setting, press C [Back]. Text (SMS) (M 4-3) About Text Messaging The Short Message Service (SMS) allows you to send text messages of up to 1024 characters to other GSM users. To Use SMS with Your Phone Messages longer than 160 characters may be composed. During sending, the messages are - Sharp GX30 | User Guide - Page 78
from the list, then press to select. To Save the Message in the Drafts box 1. Perform steps 1 to 5 in "Creating a New SMS". 2. Enter the phone number of the recipient, then press . 3. Press a or b to highlight "Save to Drafts", then press to select. Sending a Message 1. Press A during stand-by - Sharp GX30 | User Guide - Page 79
details on searching the Contacts List entries, see "Finding a Name and Number" on page 43. 7. Press a or b to highlight "Send", then press to select. The phone begins the sending process and the SMS is sent. After the message has been sent, the message is added to the Sent box. Note • When - Sharp GX30 | User Guide - Page 80
the message you wish to view. The sender's phone number and a part of the message are displayed. When the sender's phone number is stored in the Contacts List, the sender's name is displayed instead of the phone number. Messages are marked with " " denote unread messages. If - Sharp GX30 | User Guide - Page 81
on page 43. 5. Press a or b to highlight "Send", then press to select. 6. Follow the procedure from step 7 in "Sending a Message" on page 77. The phone begins the sending process and the SMS is sent. Modifying a Message 1. Perform steps 1 and 2 in "Creating a New SMS" on page 77. 2. Press a or b to - Sharp GX30 | User Guide - Page 82
highlight the number, then press A [Options] to display the Options menu. 5. Press a or b to highlight "Make Call", then press to select. To save this phone number in the Contacts List, press a or b to highlight "Save to Contacts", then press to select. For details on entering a name, see "Add New - Sharp GX30 | User Guide - Page 83
phone number entry screen with the sender's number entered. For details on entering a name, see "Add New Contact" on page 39. Setting Up SMS (M 4-3-5) To Set Up the Service 5. Enter the centre number. If you wish to enter a country code for a message to an international number, press and hold P until - Sharp GX30 | User Guide - Page 84
and traffic reports. This information is broadcast to subscribers in certain network areas. This function may not be available on all mobile phone networks. Contact your network operator for more information. Enabling/Disabling Cell Broadcasts (M 4-7-1) 1. Press A during stand-by. 2. Press a or b to - Sharp GX30 | User Guide - Page 85
is not in the list that appears in step 6, select "Create Subject" in step 5, then enter the subject code to add a page. For details on the subject code, contact your service provider. Setting Languages Allows you to select your preferred language for the cell broadcast message display. 1. Perform - Sharp GX30 | User Guide - Page 86
sent to subscribers in certain areas. When you receive Area Info, the message (area code) is displayed on the stand-by screen. Note • This function may not be available on all mobile phone networks. Contact your network operator for more information. Enabling/Disabling Area Info 1. Press A during - Sharp GX30 | User Guide - Page 87
re connected. * If you have problems getting connected, please phone Vodafone Customer Support. Your phone contains a WAP browser used for surfing on the Mobile Internet, where you can get a lot of useful information. Normally, pages are designed for a mobile phone. Viewing the WAP Browser 1. Press - Sharp GX30 | User Guide - Page 88
in the lower right corner of the screen. Used to access "Vodafone live!" by opening the browser. • Q (press and hold): (WAP). • F: Exit (short press) Turn off the phone. (press and hold) Browser Menu When you have started or video clips in the handset memory. • Go to URL: Input the URL of - Sharp GX30 | User Guide - Page 89
. This means that a service provider sends WAP content to your phone, without any set up. • Settings: Includes "Downloads", etc. • Security: Set the security. • Clear...: Clear History, cache, etc. 88 Vodafone live! • Restart Browser: Restart the browser. Bookmarks To Add a Bookmark 1. Press - Sharp GX30 | User Guide - Page 90
", then press or A [Select] to select. 6. Press A [Options] to display the Options menu, then press a or b to highlight "OK", then press or A [Select] to delete. Vodafone live! 89 - Sharp GX30 | User Guide - Page 91
bookmark, then press to select. Tip • From the Main menu, you can also access the screen shown in step 5: My Stuff → Bookmarks → Options → 6 Hotkeys 90 Vodafone live! - Sharp GX30 | User Guide - Page 92
a digital camera or images that are downloaded from mobile Internet sites can be managed. : Images in PNG in WPNG format Note • The phone can store approximately 6 Mbytes of data across Pictures, Games & More, Sounds and Videos. Location indicator (handset: or memory card: is displayed so that you can - Sharp GX30 | User Guide - Page 93
d to specify the area you wish to display, then press . Saving to Contacts List You can use this option only for pictures saved in the handset memory. 1. Perform steps 1 to 4 in "Viewing Pictures" on page 91. 2. Press a or b to highlight the file name you wish to add to Contacts List, then - Sharp GX30 | User Guide - Page 94
Editing Pictures To Retouch Pictures 1. Perform steps 1 to 4 in "Viewing Pictures" on page 91. 2. Press a or b to highlight the file name you wish to retouch, then press A [Options]. The Options menu is displayed. 3. Press a or b to highlight "Edit Picture", then press or A [Select] to select. 4. - Sharp GX30 | User Guide - Page 95
To Add Stamps to Pictures 1. Perform steps 1 to 4 in "Viewing Pictures" on page 91. 2. Press a or b to highlight the file name you wish to add stamp to, then press A [Options]. The Options menu is displayed. 3. Press a or b to highlight "Edit Picture", then press or A [Select] to select. 4. Press a - Sharp GX30 | User Guide - Page 96
Copying or Moving Pictures You can copy or move pictures between the handset memory and memory card. 1. Perform steps 1 to 4 in "Viewing Pictures" on page 91. 2. Press a or b to highlight the file name you wish to copy or - Sharp GX30 | User Guide - Page 97
Adjusting the Size of the Picture The pictures that are registered in the handset memory or in the memory card can be adjusted for use as main or external displays as well as incoming call, alarm or power on/ - Sharp GX30 | User Guide - Page 98
Deleting Pictures 1. Perform steps 1 to 4 in "Viewing Pictures" on page 91. 2. Press a or b to highlight the file name you wish to delete, then press A [Options]. The Options menu is displayed. 3. Press a or b to highlight "Delete", then press or A [Select] to select. 4. Press a or b to highlight " - Sharp GX30 | User Guide - Page 99
Various kinds of Vodafone specific applications can be used in this phone. To use applications, download the applications via the mobile Internet. Some mobile Internet to update information/play games). The network may charge you more for using network-based applications. Please contact your service - Sharp GX30 | User Guide - Page 100
1. Press to display the Main menu. 2. Press a, b, c or d to highlight "My Stuff", then press to select. 3. Press a or b to highlight "Games & More", then press to select. 4. Press a or b to highlight "Applications", then press to select. The list of Applications is displayed. Downloaded applications - Sharp GX30 | User Guide - Page 101
Press A [Yes]. The selected application is deleted. To cancel deletion, press C [No] in step 4. Note • You cannot delete preloaded applications. More Games (M 6-2-2) 1. Press to display the Main menu. 2. Press a, b, c or d to highlight "My Stuff", then press to select. 3. Press a or b to highlight - Sharp GX30 | User Guide - Page 102
ringtone (composed in Melody Editor) : Sound file in Standard MIDI format : Sound file in i Melody format : Sound file in WAVE format : Sound file in AMR format : Sound file in MP3 format Tip • SMAF (Synthetic music Mobile Application Format) is a format of music data for mobile phones. • The MP3 - Sharp GX30 | User Guide - Page 103
to select. The selected sound is automatically used for the ringtone of the current Profiles. Note • Files in AMR/WAVE and MP3 format cannot be used for the ringtone. Copying or Moving Sound Files You can copy or move sound files between the handset memory and memory card. 1. Perform steps 1 to 4 in - Sharp GX30 | User Guide - Page 104
to edit the sound (p. 132). Once you have completed editing the newly saved file overwrites the old file. This new file then becomes the original ringtone. Setting the Tone and Strength 1. Perform steps 1 to 4 in "Playing Back Sounds" on page 101. 2. Press a or b to highlight the file name you wish - Sharp GX30 | User Guide - Page 105
creating a message, see "Creating a New MMS" on page 65. Note • MP3 sound files cannot be sent attached to a message. • Sounds with a red icon are recorded by a video camera or video clips that are downloaded from mobile Internet sites can be managed. Downloading Video Clip Files (M 6-4-3) 1. Press - Sharp GX30 | User Guide - Page 106
so that you can find the memory you are using. Copying or Moving Video Clips You can copy or move video clips between the handset memory and memory card. 1. Perform steps 1 to 4 in "Playing Back Video Clip Files". 2. Press A [Options] to display the Options menu. 3. Press a or b to highlight - Sharp GX30 | User Guide - Page 107
Changing the File Name 1. Perform steps 1 to 4 in "Playing Back Video Clip Files" on page 105. 2. Press a or b to highlight the file name you wish to change, then press A [Options]. The Options menu is displayed. 3. Press a or b to highlight "Rename", then press or A [Select] to select. 4. Enter a - Sharp GX30 | User Guide - Page 108
(M 6-5) You can store desired (or frequently used) pages (addresses) in Bookmarks. It can save your time in accessing WAP pages sites. For further details, see "Vodafone live!" on page 86. My Stuff 107 - Sharp GX30 | User Guide - Page 109
Text Templates (M 6-6) You can register up to 20 text templates for use in text messages and multimedia messages. You can input messages more easily by registering frequently used text. 120 characters may be registered in any text template. Adding Phrases to Text Templates 1. Press to display the - Sharp GX30 | User Guide - Page 110
C [No] in step 4. Memory Status (M 6-7) This function helps you to check the memory status of the handset memory or memory card. Memory status covers the followings. Handset Memory: Applications, Pictures, Sounds, and Videos Memory Card: Pictures, Sounds, Videos and Others 1. Press to display the - Sharp GX30 | User Guide - Page 111
& More (M 1) Executing Applications (M 1-1) You can execute games and other applications on your phone. For details about Applications, see page 99. 1. Press to display the Main menu. 2. Press a, b, c or d to highlight "Games & More", then press to select. 3. Perform steps 4 and 5 in "Executing - Sharp GX30 | User Guide - Page 112
" on page 100. Settings (M 1-4) Opening the Settings Screen 1. Press to display the Main menu. 2. Press a, b, c or d to highlight "Games & More", then press to select. 3. Press a or b to highlight "Settings", then press to select. The Settings screen is displayed. The following settings can be made - Sharp GX30 | User Guide - Page 113
if a key is pressed. • "Normal Settings": Works with the main backlight setting. (p. 153) 1. Perform steps 1 to 4 in "Opening the Settings Screen" on page 111. 112 Games & More - Sharp GX30 | User Guide - Page 114
can operate the vibrator set in the SMAF file. Note • SMAF (Synthetic music Mobile Application Format) is a music data format for mobile phones. 1. Perform steps 1 to 3 in "Opening the Settings Screen" on page set "Link to Sound", the application is synchronised with the vibrator. Games & More 113 - Sharp GX30 | User Guide - Page 115
handset code, the screen will return to step 3 in "Opening the Settings Screen" on page 111. 4. Press a or b to highlight "Settings Reset", then press to select. 5. Press A [Yes]. All items in Settings menu and screensaver settings are reset. To cancel resetting, press C [No] in step 5. 114 Games - Sharp GX30 | User Guide - Page 116
Press a or b to highlight "Reset", then press to select. 3. Enter your handset code, then press . If you enter a wrong handset code, the screen will return to step 3 in "Opening the Settings Screen" on page 1-5) The information about the license belonging to Java™ can be displayed. Games & More 115 - Sharp GX30 | User Guide - Page 117
Application (M 3-1) You can refer to the information on the SIM. Contact your service provider for further details. MP3 Player (M 3-2) The MP3 Player allows you to play back MP3 sound files. Playing Back MP3 Files 1. Press to display the Main menu. 2. Press a, b, c or d to highlight "Applications - Sharp GX30 | User Guide - Page 118
3. Press a or b to highlight "Calendar", then press to select. The current month is displayed and the current date is highlighted. 4. Press a, b, c or d to highlight the day for the schedule, then press to select. 5. Press a or b to highlight the desired note frame, then press to select. Up to 3 - Sharp GX30 | User Guide - Page 119
to highlight "1 data", then press to select. 6. Press A [Yes]. To cancel deleting, press C [No] in step 6. To Delete All Scheduled Tasks/Meetings for a Specific Day 1. Perform steps 1 to 3 in "Calendar" on page 116. 2. Press a, b, c or d to highlight the day you wish to delete, then press A [Options - Sharp GX30 | User Guide - Page 120
at a specified time. Note that the alarm may not function correctly if the clock has not been set. The alarm functions only if the phone is switched on. 1. Press to display the Main menu. 2. Press a, b, c or d to highlight "Applications", then press to select. 3. Press a or b to highlight "Alarm - Sharp GX30 | User Guide - Page 121
To Change the Type of Alarm Tone 1. Perform steps 1 to 5 in "Setting the Alarm" on page 119. 2. Press a or b to highlight "Alarm Tone", then press to select. 3. Press a or b to highlight "Tone", then press to select. 4. Press a or b to highlight "Preset Sounds" or "My Sounds", then press to select. - Sharp GX30 | User Guide - Page 122
Changing Alarm Settings 1. Perform steps 1 to 4 in "Setting the Alarm" on page 119. 2. Press a or b to highlight the number you wish to change, then press to select. 3. Change alarm settings. For details on changing alarm settings, see "Setting the Alarm" on page 119. Disabling the Alarm Function 1. - Sharp GX30 | User Guide - Page 123
Calculator (M 3-5) The calculator function performs the 4 arithmetic calculations using up to 12 digits. 1. Press to display the Main menu. 2. Press a, b, c or d to highlight "Applications", then press to select. 3. Press a or b to highlight "Calculator", then press to select. 4. Press a or b to - Sharp GX30 | User Guide - Page 124
which can be used to remind you of schedule entries or be sent within a multimedia message. The recorded voice message is registered in the handset memory or in the memory card. To Record a Voice Message 1. Press to display the Main menu. 2. Press a, b, c or d to highlight "Applications", then press - Sharp GX30 | User Guide - Page 125
step 5. The screen will return to step 4. • Whilst performing step 4, press A [Options] instead in order to switch the memory back and forth to either the handset memory or the memory card, then press a or b to highlight "Save New Sounds to", then press to select. Then press a or b to highlight - Sharp GX30 | User Guide - Page 126
95 tones × 32 voices, 190 tones × 16 voices, or 380 tones × 8 voices per melody. The original ringtone is registered in the handset memory. Creating Your Original Ringtone (M 3-7-1) 1. Press to display the Main menu. 2. Press a, b, c or d to highlight "Applications", then press to select. 3. Press - Sharp GX30 | User Guide - Page 127
. 15.Press a or b to highlight "Save to My Stuff", then press to select. Your original ringtone is registered in the handset memory. Note • If the capacity or memory in the handset memory becomes insufficient, the message, "Maximum capacity : 1000 Not registered." or "Not registered. Memory full - Sharp GX30 | User Guide - Page 128
To Specify the Musical Scale and Rest Using the keys shown below, specify the musical scale and rest. Do Re Mi Fa Sol La Ti Rest G HI J KL M Q When you press the key shown above once, a crotchet is specified in the middle scale (no mark). When you press the same key repeatedly, the note will shift - Sharp GX30 | User Guide - Page 129
repeat the note immediately left of the cursor when a or b is pressed. To Set the Tone The phone can play notes using different instruments. 1. Perform steps 1 to 13 in "Creating Your Original Ringtone" on page 125. 2. Press a or b to highlight "Set Tone", then press to select. 3. Press c or d to - Sharp GX30 | User Guide - Page 130
You can select from the following 128 basic tones and 61 extended tones. Basic tones Category Tone Pianos Piano Bright Piano E. Grand Piano Honky-tonk Electric Piano 1 Electric Piano 2 Harpsichord Clavi Organs Drawbar Organ Percussive Organ Rock Organ Church Organ Reed Organ Accordion - Sharp GX30 | User Guide - Page 131
Category Tone Synth Effects Rain Soundtrack Crystal Atmosphere Brightness Goblins Echoes Science Fiction Percussions Tinkle Bell Agogo Steel Drums Woodblock Taiko Drums Melodic Tom Synth Drum Reverse Cymbal Category Tone Ethnics Sitar Banjo Shamisen Koto Kalimba Bagpipe Fiddle Shanai - Sharp GX30 | User Guide - Page 132
Cymbal 2 Chinese Cymbal Splash Cymbal To Set the Strength of the Original Ringtone The strength of the original ringtone can be set in 3 levels for each melody. When you purchase this phone, the strength of the original ringtone is set to "Loud". 1. Perform steps 1 to 13 in "Creating Your Original - Sharp GX30 | User Guide - Page 133
"Melody Editor", then press to select. 4. Press a or b to highlight "My Sounds", then press to select. 5. Press a or b to highlight an original ringtone you wish to edit, then press A [Options]. The Options menu is displayed. 6. Press a or b to highlight "Edit Data", then press or A [Select - Sharp GX30 | User Guide - Page 134
Pasting Notes You can copy and move a part of the melody to another position. Only original ringtones or editable melodies can be copied or moved. 1. Perform steps 1 to 9 in "Editing Original Ringtones" on page 132. 2. Press A [Options] to display the Options menu. 3. Press a or b to highlight "Copy - Sharp GX30 | User Guide - Page 135
Help (M 3-8) You can view the help list and use it to guide you in the phone's functions. 1. Press to display the Main menu. 2. Press a, b, c or d to highlight "Applications", then press to select. 3. Press a or b to highlight "Phone Help", then press to select. The help list is displayed. 4. Press - Sharp GX30 | User Guide - Page 136
phone tone (e.g. the ringer volume, keypad tones, etc.) according to your environment. Tone sound and vibration set can be customised for each profile. There are 5 profiles including one user free car kit for Bluetooth). Headset: For use with a headset (connected via Bluetooth). Silent: For use - Sharp GX30 | User Guide - Page 137
highlight the profile you wish to reset, then press A [Options]. 3. Press a or b to highlight "Set to Default", then press or A [Select] to select. 4. Enter your handset code, then press . 5. Press A [Yes]. To cancel the resetting, press C [No] in step 5. Note • If you enter a wrong - Sharp GX30 | User Guide - Page 138
level 5. To select "Silent", press b at level 1. Assigning Ringtone You can select the ringtone from 28 tones including 5 patterns, 13 sound effects and 10 melodies. You can also select a sound in the handset memory as the default ringtone excluding the AMR/WAVE format. 1. Perform steps 1 to 4 in - Sharp GX30 | User Guide - Page 139
When the vibrator option is set on, the phone will vibrate for incoming calls regardless of the ringer • When "Link to Sound" is selected in step 3, melodies are synchronised with the vibrator for the ringtone. However, this function may not work depending on the data. • When you select "Enable" or - Sharp GX30 | User Guide - Page 140
, see "Assigning Ringtone" on page 137. 9. Press a or b to highlight "Duration", then press to select. 10.Press a or b to highlight the desired duration, then press to select. Warning Tone This function enables your phone to emit the warning tone when an error occurs. 1. Perform steps 1 to 4 in - Sharp GX30 | User Guide - Page 141
the duration, then press to select. Power On/Off Sound The phone can be set up to emit a sound when it is Sounds" or "My Sounds", then press to select. 8. Select the ringtone. For details on selecting a ringtone, see "Assigning Ringtone" on page 137. 9. Press a or b to highlight "Duration", then - Sharp GX30 | User Guide - Page 142
b to highlight "Duration", then press to select. 12.Enter the duration of ringtone in 2 digits (01 to 15 seconds) using the digit keys, then press . Low Battery Alert Adjust the volume of the alarm when the battery becomes low. 1. Perform steps 1 to 4 in "Customising Profiles" on page 136. 2. Press - Sharp GX30 | User Guide - Page 143
Contacts (M 8) Call Log (M 8-3) The phone will record the last 10 missed calls, received calls and dialled numbers. Viewing Call Log 1. Press to display the Main menu. 2. Press a, b, c or d to highlight " - Sharp GX30 | User Guide - Page 144
Deleting a Call Log To Delete a Single Call Log 1. Perform steps 1 to 5 in "Viewing Call Log" on page 142. 2. Press a or b to highlight the call log you wish to delete, then press to select. The selected call log is displayed in detail. 3. Press A [Options] to display the Options menu. 4. Press a or - Sharp GX30 | User Guide - Page 145
Enter your handset code, then press . 4. Press A [Yes]. The Call Timers are reset to zero. To cancel resetting, press C [No] in step 4. Call Costs (M 8-3-5) This function lets you check the charges for your calls. Some networks do not support Charging Advice. Please check with your service provider - Sharp GX30 | User Guide - Page 146
or b to highlight "Cost Units", then press to select. 3. Press a or b to highlight "Set Units", then press to select. 4. Enter your PIN2 code, then press . 5. Enter a cost per unit, then press . To enter a decimal point, press R. 6. Enter a currency unit (up to 3 characters), then press . Checking - Sharp GX30 | User Guide - Page 147
in "Checking the Cost of the Last Call" on page 144. 2. Press a or b to highlight "Clear Costs", then press to select. 3. Enter your PIN2 code, then press . 4. Press A [Yes]. The Call Costs are reset to zero. To cancel resetting, press C [No] in step 4. Checking the Residual Credit 1. Perform steps - Sharp GX30 | User Guide - Page 148
Data Counter is reset to zero. To cancel resetting, press C [No] in step 3. Speed Dial List (M 8-4) You can view and perform other operations for phone numbers registered in the Speed Dial List. 1. Press to display the Main menu. 2. Press a, b, c or d to highlight "Contacts", then press to select - Sharp GX30 | User Guide - Page 149
c or d to highlight "Contacts", then press to select. 3. Press a or b to highlight "My Numbers", then press to select. 4. Press a or b to highlight the phone number you wish to check from either "Voice", "Data" or "Fax", then press to select. Note • "Data" or "Fax" may not be displayed depending on - Sharp GX30 | User Guide - Page 150
• If you select "Automatic" in step 3, the language preset on the SIM card is selected. • If the language preset on the SIM card is not supported, then the default language of the phone is selected. Date & Time (M 9-1-2) You need to set the correct time and date in order for your - Sharp GX30 | User Guide - Page 151
The date format can be switched between "Day.Month.Year", "Month-Day-Year" or "Year/ Month/Day". 1. Perform steps 1 to 3 in "Opening the Phone Settings Screen" on page 149. 2. Press a or b to highlight "Date & Time", then press to select. 3. Press a or b to highlight "Clock Settings", then press - Sharp GX30 | User Guide - Page 152
then press to select. 5. Press a or b to highlight "On", then press to select. To Set the Time Zone 1. Perform steps 1 to 3 in "Opening the Phone Settings Screen" on page 149. 2. Press a or b to highlight "Date & Time", then press to select. 3. Press a or b to highlight "Set Time Zone", then press - Sharp GX30 | User Guide - Page 153
-in Pictures of the Main Display 1. Perform steps 1 to 3 in "Opening the Phone Settings Screen" on page 149. 2. Press a or b to highlight "Main Display", "My Pictures", then press to select. 5. Press a or b to highlight "Handset Memory" or "Memory Card", then press to select. The file names of the - Sharp GX30 | User Guide - Page 154
off when you press the keypad or the optional cigarette lighter charger is connected to the phone. You can change or specify the amount of time the backlight is on for, which will help conserve battery life. Tip • When you purchase this phone, Backlight is set to 15 seconds. To Turn On/Off the - Sharp GX30 | User Guide - Page 155
Enter the duration of the backlight using 2 digits, then press . To Turn On/Off the Backlight whilst Charging with the Cigarette Lighter Charger With this setting On, the phone's backlight is on when the cigarette lighter charger is connected. (The backlight of the external display is on, when the - Sharp GX30 | User Guide - Page 156
turn off after a given amount of time if the phone is left open. This is in order to conserve battery life. You can change the time before the Display Saving will go into effect from between 2 and 20 minutes. Tip • When you purchase this phone, Display Saving is set to 10 minutes. 1. Perform - Sharp GX30 | User Guide - Page 157
by a digital camera or images downloaded from a WAP site can be used. To Set Built-in Pictures 1. Perform steps 1 to 3 in "Opening the Phone Settings Screen" on page 149. 2. Press a or b to highlight "Main Display", then press to select. 3. Press a or b to highlight "Assign Pictures", then press - Sharp GX30 | User Guide - Page 158
"My Pictures", then press to select. 6. Press a or b to highlight "Handset Memory" or "Memory Card", then press to select. The file name of the turn the external display on or off when the phone is closed. 1. Perform steps 1 to 3 in "Opening the Phone Settings Screen" on page 149. 2. Press a - Sharp GX30 | User Guide - Page 159
Pictures for the External Display 1. Perform steps 1 to 3 in "Opening the Phone Settings Screen" on page 149. 2. Press a or b to highlight "External "My Pictures", then press to select. 5. Press a or b to highlight "Handset Memory" or "Memory Card", then press to select. The file names of the - Sharp GX30 | User Guide - Page 160
. • Even if an animation is selected, the stand-by screen displays a still picture when you do not operate the phone for about 2 minutes. • When an animation is set as the wallpaper of the external display, the battery consumes large amounts of power and stand-by time may be shortened. To use the - Sharp GX30 | User Guide - Page 161
sometimes need to adjust the LCD contrast of the external display to suit certain lighting conditions. 1. Perform steps 1 to 3 in "Opening the Phone Settings Screen" on page 149. 2. Press a or b to highlight "External Display", then press to select. 3. Press a or b to highlight "LCD Contrast", then - Sharp GX30 | User Guide - Page 162
can be reset to their default settings. 1. Perform steps 1 to 3 in "Opening the Phone Settings Screen" on page 149. 2. Press a or b to highlight "Set to Default", then press to select. 3. Enter your handset code, then press . 4. Press A [Yes]. To cancel resetting, press C [No] in step 4. Note • If - Sharp GX30 | User Guide - Page 163
to select. 3. Press a or b to highlight "On" to activate the Call Waiting service or "Off" to deactivate it, then press to select. 4. Press . Note • The Call Waiting service may not be available on all mobile phone networks. Contact your network operator for more information. To Check the Call - Sharp GX30 | User Guide - Page 164
"On" or "Off", then press to select. Showing Your Phone Number (M 9-2-3) This lets you control whether to show your phone number when calling another party or not. Some networks do not support this service. Please check with your service provider for availability. 1. Perform steps 1 to 3 in "Opening - Sharp GX30 | User Guide - Page 165
the hands free car kit for Bluetooth to your phone via Bluetooth. You can select the desired time until your phone answers. 1. Perform steps 1 to Set to Default", then press to select. 3. Enter your handset code, then press . 4. Press A [Yes]. To cancel resetting, press C [No] in - Sharp GX30 | User Guide - Page 166
you enter the wrong handset code in step 3, the operation is cancelled and the screen returns to step 3 in "Call Waiting" on page 162. Diverts (M 9-3) This service is used to of time. • "Not Reachable": Diverts incoming calls when your phone is out of network service or switched off. Settings 165 - Sharp GX30 | User Guide - Page 167
entries, perform steps 1 to 4 in "Finding a Name and Number" on page 43. 7. If you wish to divert calls to a number which you can enter manually, enter the phone number. 8. Press . If you select "No Answer" in step 4: 9. Press a or b to highlight the period of time from 6 levels (05 to 30 seconds - Sharp GX30 | User Guide - Page 168
is complete, a message is displayed. 7. Press . Note • If you enter the wrong handset code in step 5, the operation is cancelled and the screen returns to step 4. • If the card is locked, you will be requested to unlock it and then perform the aforementioned steps once again. • If the card is - Sharp GX30 | User Guide - Page 169
Connectivity (M 9-5) By using this menu, you can connect your phone to a Bluetooth-enabled device via the Bluetooth connection, or to a PC via the Infrared connection or using a USB cable. Using the Bluetooth Function To turn the Bluetooth Function On or Off (M 9-5-1) 1. Press to display the Main - Sharp GX30 | User Guide - Page 170
search in other categories, repeat step 3. 5. Enter your passcode, then press A [OK]. Note • If the Bluetooth function is off before searching in step 2, the phone turns the Bluetooth on automatically and starts searching. • If the infrared function is active, the confirmation screen to deactivate - Sharp GX30 | User Guide - Page 171
highlight other device name after step 2, then press or A [Select] to select. • You can save battery power by turning the Bluetooth off whilst it is not in use. Turn the Bluetooth function off in "To turn the Bluetooth Function On or Off" on page 168. • During a call, you can divert voice call to - Sharp GX30 | User Guide - Page 172
(M 9-5-3) By connecting your phone to a PC, you can transmit pictures, sounds, video clips, and Contacts List entries. Follow the procedure to select the connection method (USB or Infrared connection). For details on how to get the link software, see page 187. 1. Press to display the Main menu - Sharp GX30 | User Guide - Page 173
Internet Settings (M 9-6) WAP/MMS Settings WAP settings and MMS settings can perform following various setups, respectively. In normal operation, you do not need to change these settings. WAP Settings (M 9-6-1) Item Description Operation Profile Name* Press a or b to highlight WAP Profile " - Sharp GX30 | User Guide - Page 174
Operation Press a or b to highlight "Phone No." and press to select. Enter Access Point Number and press . Line Type ISDN or Analogue Press a or b to highlight "Line Type" and press to select. Press a or b to highlight "ISDN" or "Analogue" and press to select. Username User Name Press a or b to - Sharp GX30 | User Guide - Page 175
Item Description Linger Time Linger Time Operation Press a or b to highlight "Linger Time" and press to select. Enter time in seconds (099999) and press . *: Item to be set as mandatory. MMS Settings (M 9-6-2) Item Description Operation Profile Name* Press a or b to highlight MMS Profile - Sharp GX30 | User Guide - Page 176
press . Item Username Description User Name Operation Press a or b to highlight "Username" and press to select. Enter User Name and press . Password connection type, they should be set) Phone No.* Access Point Number Press a or b to highlight "Phone No." and press to select. Enter Access - Sharp GX30 | User Guide - Page 177
" and press to select. Press a or b to highlight "ISDN" or "Analogue" and press to select. Username User Name Password Password Press a or b to highlight "Username" and press to select. Enter User Name and press . Press a or b to highlight "Password" and press to select. Enter Password and press - Sharp GX30 | User Guide - Page 178
To Set Up Your Account Information This information should be supplied by your Internet service provider. 1. Press to display the Main menu. 2. Press a, b, c or d to highlight "Settings", then press to select. 3. Press a or b to highlight "Internet Settings", then press to - Sharp GX30 | User Guide - Page 179
time the power is turned on, your phone always tries to connect to the preferred network. If your phone is not connected to the network, highlight "Automatic", then press to select. 178 Settings To Set the Network Manually Perform the following if you wish to connect to the networks other than the - Sharp GX30 | User Guide - Page 180
then press . 7. Enter the network code, then press . 8. Enter a new network name and press . Editing the Preferred List To Change the Position of a Network in the Preferred List 1. Perform steps 1 to 3 - Sharp GX30 | User Guide - Page 181
enabled you are asked to enter the PIN code each time the phone is switched on. Your PIN code is stored on the SIM card and you should have been made aware of the code when you purchased the SIM card. Contact your service provider for further details. 1. Perform steps 1 to 3 in "Opening the Security - Sharp GX30 | User Guide - Page 182
handset code, then press . 6. Enter the new handset code again, then press . If you enter a code different from the code which you entered in step 5, the screen returns to step 4. Enter the correct code again. Changing PIN2 Code (M 9-8-3) PIN2 code is used to protect certain functions in the phone - Sharp GX30 | User Guide - Page 183
place restrictions on incoming and outgoing calls. To activate Call Barring you will need the call barring password, which is available from your service provider. 1. Perform steps 1 to 3 in "Opening the Security Screen" on page 180. 2. Press a or b to highlight "Call Barring", then press to select - Sharp GX30 | User Guide - Page 184
steps 1 to 3 in "Opening the Security Screen" on page 180. 2. Press a or b to highlight "Fixed Dialling No.", then press to select. 3. Enter a PIN2 code, then press . 4. Press a or b to highlight "Settings", then press to select. 5. Press a or b to highlight "On", then press to select. If you select - Sharp GX30 | User Guide - Page 185
adding a name and a phone number, see "Add New Contact" on page 39. 8. Press C [Save] to save. To Search a Registered Name 1. Perform steps 1 to 3 in "Opening the Security Screen" on page 180. 2. Press a or b to highlight "Fixed Dialling No.", then press to select. 3. Enter a PIN2 code, then press - Sharp GX30 | User Guide - Page 186
steps 1 and 3 in "Opening the Security Screen" on page 180. 2. Press a or b to highlight "Fixed Dialling No.", then press to select. 3. Enter a PIN2 code, then press . 4. Press a or b to highlight "Edit Dial List", then press to select. 5. Press a or b to highlight a name you wish to delete, then - Sharp GX30 | User Guide - Page 187
menu. 2. Press a, b, c or d to highlight "Settings", then press to select. 3. Press a or b to highlight "Master Reset", then press to select. 4. Enter your handset code, then press . 5. Press A [Yes]. To cancel resetting, press C [No] in step 5. All settings are reset. Note • If you enter a wrong - Sharp GX30 | User Guide - Page 188
Explorer 5.01 or later **Service Pack 3 Interface: Infrared port or USB port CD-ROM drive GSM/GPRS Modem You can use GX30 as a GSM/GPRS modem to instructions on the CD-ROM accompanying your phone. For details on software support, refer to the following site: http://www.sharp-mobile.com Handset - Sharp GX30 | User Guide - Page 189
that you make or answer calls when you are using GX30 as a GSM/GPRS modem. The operation may be interrupted Handset Manager • Some large files may not be able to be transmitted from the PC to the phone. • When connecting your phone to a PC, you need to select the connection method for PC Software - Sharp GX30 | User Guide - Page 190
Troubleshooting Problem The phone does not turn on. PIN code or PIN2 code is rejected. The SIM card becomes locked. The display is difficult to read. Solution • Make sure the battery is properly inserted and charged. • Make sure you have entered the correct code (4 to 8 digits). • Your SIM card/ - Sharp GX30 | User Guide - Page 191
and configuration may be missing or incorrect or the network does not support it. Check your service provider's access point number. Contact your service provider to confirm the correct settings. 190 Troubleshooting Problem Limited memory available. Call is terminated unexpectedly. No entries are - Sharp GX30 | User Guide - Page 192
mobile phones at gasoline stations, chemical plants and at all sites where a risk of explosion exists. Caring for your phone • Do not allow children to use your phone without supervision. • Do not open or attempt to repair your phone yourself. The product can only be repaired by authorised service - Sharp GX30 | User Guide - Page 193
any liability for damage caused by the use of other chargers, batteries or accessories. • Network configuration and phone usage will affect talk-time and stand-by time. Using the games or camera will hasten battery consumption. • When the battery charging alert is displayed on the screen, charge the - Sharp GX30 | User Guide - Page 194
whilst data on the card is being edited. Do not turn off the handset or device containing the memory card whilst data on the card is being one approved by Sharp for your mobile phone. Using unauthorised or modified aerials may damage the mobile phone. Moreover, since the mobile phone may violate the - Sharp GX30 | User Guide - Page 195
data may be lost or corrupted under various circumstances. • Before connecting the phone with a PC or a peripheral unit, read the operation manual for the other unit carefully. • If the phone's battery has been removed for some time, or the phone has been reset, the unit's clock and calendar may be - Sharp GX30 | User Guide - Page 196
connecting your phone. • Only allow qualified service maintenance personnel to install the vehicle accessories. The manufacturer disclaims any liability for damage which may result as a consequence of improper use or use contrary to the instructions contained herein. SAR Your Sharp mobile phone has - Sharp GX30 | User Guide - Page 197
Key Answer 141 Applications 116 Alarm 119 Calculator 122 Calendar 116 Phone Help 134 SIM Application 116 Voice Recorder 123 Area Info 85 Enabling/Disabling 85 B Battery 11 Charging 15 Disposal 14 Inserting 11 Removing 13 Battery level indicator 15 Bookmarks 88 Accessing bookmarked pages 88 Adding - Sharp GX30 | User Guide - Page 198
38 Deleting 45 Dialling 43 Editing 44 Finding 43 Memory status 48 Sending messages 49 Storing input number 41 Swapping location number of the phone number 50 Viewing groups 45 D Data Counter 147 Resetting 147 Delivery report Confirming 74 Dial tone Muting 31 Digital camera Adjusting the brightness - Sharp GX30 | User Guide - Page 199
External connector 11 F Flash light 10 G Games & More 98 Backlight 112 Checking information 99 Copying/Pasting notes 133 Creating your original ringtone 125 Editing 132 Musical scale/rest 127 Mobile light 10, 15 Multimedia Message 65 Adding recipients 67 Check the sender and receiver phone number - Sharp GX30 | User Guide - Page 200
179 Editing preferred list 179 Selecting a network automatically 178 P PC connection GSM/GPRS modem 187 Handset Manager 187 Software installation 187 System requirements 187 Phone settings 149 Assigning pictures 156 Backlight 153 Brightness of backlight 154 Changing language 149 Display saving 155 - Sharp GX30 | User Guide - Page 201
Changing handset code 181 Changing PIN code 180 Changing PIN2 code 181 Enabling/Disabling PIN code 180 Fixed Dialling No. 183 Handset Lock 181 Send key 9 Settings 149 Call settings 162 Date & Time 149 Diverts 165 Internet 172 Master Reset 186 MMS 174 Network settings 178 PC Software 171 Phone - Sharp GX30 | User Guide - Page 202
Video clips 104 Changing file name 106 Checking information 105 Deleting files 107 Downloading 104 Playing back 105 Sending messages 106 Viewfinder switch key 9 Vodafone live! 86 Browser menu 87 Exiting WAP browser 86 Navigating WAP page 87 Viewing WAP browser 86 Voice mail key 9 Voice Recorder 123
-
 1
1 -
 2
2 -
 3
3 -
 4
4 -
 5
5 -
 6
6 -
 7
7 -
8
-
9
-
10
-
11
-
12
-
13
-
14
-
15
-
16
-
17
-
18
-
19
-
20
-
21
-
22
-
23
-
24
-
25
-
26
-
27
-
28
-
29
-
30
-
31
-
32
-
33
-
34
-
35
-
36
-
37
-
38
-
39
-
40
-
41
-
42
-
43
-
44
-
45
-
46
-
47
-
48
-
49
-
50
-
51
-
52
-
53
-
54
-
55
-
56
-
57
-
58
-
59
-
60
-
61
-
62
-
63
-
64
-
65
-
66
-
67
-
68
-
69
-
70
-
71
-
72
-
73
-
74
-
75
-
76
-
77
-
78
-
79
-
80
-
81
-
82
-
83
-
84
-
85
-
86
-
87
-
88
-
89
-
90
-
91
-
92
-
93
-
94
-
95
-
96
-
97
-
98
-
99
-
100
-
101
-
102
-
103
-
104
-
105
-
106
-
107
-
108
-
109
-
110
-
111
-
112
-
113
-
114
-
115
-
116
-
117
-
118
-
119
-
120
-
121
-
122
-
123
-
124
-
125
-
126
-
127
-
128
-
129
-
130
-
131
-
132
-
133
-
134
-
135
-
136
-
137
-
138
-
139
-
140
-
141
-
142
-
143
-
144
-
145
-
146
-
147
-
148
-
149
-
150
-
151
-
152
-
153
-
154
-
155
-
156
-
157
-
158
-
159
-
160
-
161
-
162
-
163
-
164
-
165
-
166
-
167
-
168
-
169
-
170
-
171
-
172
-
173
-
174
-
175
-
176
-
177
-
178
-
179
-
180
-
181
-
182
-
183
-
184
-
185
-
186
-
187
-
188
-
189
-
190
-
191
-
192
-
193
-
194
-
195
-
196
-
197
-
198
-
199
-
200
-
201
-
202
 |
 |

Declaration of Conformity
Hereby, Sharp Telecommunications of Europe Ltd,
declares that this GX30 is in compliance with the essential
requirements and other relevant provisions of Directive
1999/5/EC.
A copy of the original declaration of conformity can be
found at the following Internet address: