Singer 14J250 Stylist II Serger Instruction Manual - Page 17
Cutting Width Gauge, Thread Cutter, Changing Presser Feet, Changing Needle
 |
View all Singer 14J250 Stylist II Serger manuals
Add to My Manuals
Save this manual to your list of manuals |
Page 17 highlights
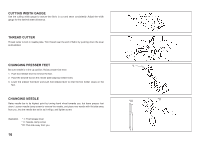
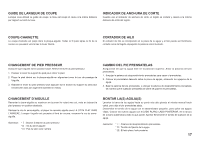
CUTTING WIDTH GAUGE Use the cutting width gauge to assure the fabric is cut and sewn consistently. Adjust the width gauge for the desired seam allowance. THREAD CUTTER Thread cutter is built in needle plate. Trim thread near the end of fabric by pushing down the lever as illustrated. CHANGING PRESSER FEET Be sure needle is in the up position. Raise presser foot lever. 1. Push foot release lever to remove the foot. 2. Place the desired foot on the needle plate aligning needle holes. 3. Lower the presser foot lever and push foot release lever so that the foot holder snaps on the foot. CHANGING NEEDLE Raise needle bar to its highest point by turning hand wheel towards you, but leave presser foot down. Loosen needle clamp screw to remove the needle, and place new needle with flat side away from you, into the needle bar as far as it will go, and tighten screw. Illustration * I : Foot release lever * II : Needle clamp screw * III : Flat side away from you. 16 *I *III *II
-
 1
1 -
2
-
3
-
4
-
5
-
6
-
7
-
8
-
9
-
10
-
11
-
 12
12 -
 13
13 -
 14
14 -
 15
15 -
 16
16 -
 17
17 -
 18
18 -
 19
19 -
 20
20 -
 21
21 -
 22
22 -
23
-
24
-
25
-
26
-
27
-
28
-
29
-
30
-
31
-
32
-
33
-
34
-
35
-
36
-
37
-
38
-
39
-
40
-
41
-
42
-
43
-
44
-
45
-
46
-
47
-
48
-
49
-
50
-
51
-
52
-
53
-
54
-
55
-
56
-
57
-
58
-
59
-
60
-
61
-
62
-
63
-
64
-
65
-
66
-
67
 |
 |
