Sony Ericsson W580i User Guide - Page 39
Camera album printing, Pictures and video clips, manager, Camera album, To blog, Publish, Contacts
 |
UPC - 095673840312
View all Sony Ericsson W580i manuals
Add to My Manuals
Save this manual to your list of manuals |
Page 39 highlights
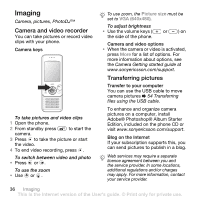
To send camera pictures to a blog 1 From standby select Menu } File manager } Camera album. 2 Scroll to a picture and select View. 3 Select More } Send } To blog. 4 Add title and text. 5 Select OK } Publish. To visit a blog address in a contact 1 From standby select Menu } Contacts. 2 Highlight a contact, select More } Open contact. 3 Scroll to a Web address and select Go to. Camera album printing You can print camera album pictures in your phone via the USB cable connected to a PictBridge™ compatible printer. You can also save pictures to a Memory Stick Micro™ (M2™) and print them later, if your printer supports this. For more information, see the Getting started guide with additional information at www.sonyericsson.com/support. To view your camera pictures 1 From standby select Menu } File manager } Camera album. 2 To view the full picture select View. Pictures and video clips You can view, add, edit, or delete pictures in the file manager. File types supported are, GIF, JPEG, WBMP, BMP, PNG and SVG-Tiny. Using pictures You can add a picture to a contact. Pictures can be stored in phone memory or on the memory stick. To view and use pictures 1 From standby select Menu } File manager } Pictures or Camera album. 2 Select a picture: • View to look at the picture. • More } Use as to use the picture. 3 Select an option. To display pictures in a slide show 1 From standby select Menu } File manager } Pictures. 2 Scroll to a picture and select View } More } Slide show. To send a picture 1 From standby select Menu } File manager } Pictures. 2 Scroll to a picture and select More } Send. 3 Select an option. Imaging 37 This is the Internet version of the User's guide. © Print only for private use.
-
 1
1 -
2
-
3
-
4
-
5
-
6
-
7
-
8
-
9
-
10
-
11
-
12
-
13
-
14
-
15
-
16
-
17
-
18
-
19
-
20
-
21
-
22
-
23
-
24
-
25
-
26
-
27
-
28
-
29
-
30
-
31
-
32
-
33
-
 34
34 -
 35
35 -
 36
36 -
 37
37 -
 38
38 -
 39
39 -
 40
40 -
 41
41 -
 42
42 -
 43
43 -
 44
44 -
45
-
46
-
47
-
48
-
49
-
50
-
51
-
52
-
53
-
54
-
55
-
56
-
57
-
58
-
59
-
60
-
61
-
62
-
63
-
64
-
65
-
66
-
67
-
68
-
69
-
70
-
71
-
72
-
73
-
74
-
75
-
76
-
77
-
78
-
79
-
80
 |
 |