Sony CCD-TRV238E User Manual - Page 24
Recording in mirror mode, Superimposing the date and time on pictures (TRV238E/438E)
 |
View all Sony CCD-TRV238E manuals
Add to My Manuals
Save this manual to your list of manuals |
Page 24 highlights
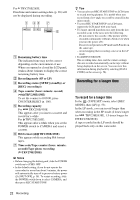
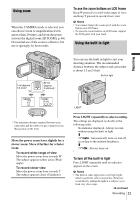
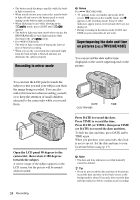
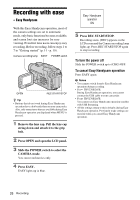
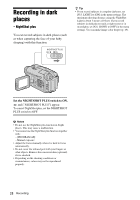
• The battery pack discharges quickly while the built- in light is turned on. • When you do not use your camcorder, turn the built- in light off and remove the battery pack to avoid turning on the built-in light accidentally. • When flickering occurs while shooting in the mode, press LIGHT until appears. • The built-in light may turn on/off when you use the [PROGRAM AE] or back light function while shooting in the mode. • For TRV270E/285E: The built-in light is turned off during the interval time of Interval recording. • When you use the conversion lens (optional), light from the built-in light is blocked and may not illuminate the subject properly. Recording in mirror mode b Notes For TRV238E/438E: • appears in the viewfinder and on the LCD screen. Xz appears in the standby mode, and z appears in the recording mode. Some of other indicators appear mirror-reversed and others are not displayed. • During recording in the mirror mode, DATE and TIME on your camcorder do not work. Superimposing the date and time on pictures ( TRV238E/438E) You can record the date and/or time displayed on the screen superimposed on the picture. You can turn the LCD panel towards the subject so that you and your subject can share the image being recorded. You can also utilize this function when recording yourself, or to keep the attention of small children attracted to the camcorder while you record them. DATE TIME CCD-TRV438E Open the LCD panel 90 degrees to the camcorder, then rotate it 180 degrees towards the subject. A mirror-image of the subject appears on the LCD screen, but the picture will be normal when recorded. Press DATE to record the date. Press TIME to record the time. Press DATE (or TIME), then press TIME (or DATE) to record the date and time. To hide the date and time, press DATE and/or TIME again. When you purchase your camcorder, the clock is not set up yet. Set the date and time to your local time before using (p. 17). b Note • The date and time indicators recorded manually cannot be deleted. z Tip • If you do not record the date and time in the picture, record the date and time in the black screen as the background for about 10 seconds, then erase the date and time indicators before starting actual recording. 24 Recording
-
 1
1 -
2
-
3
-
4
-
5
-
6
-
7
-
8
-
9
-
10
-
11
-
12
-
13
-
14
-
15
-
16
-
17
-
18
-
 19
19 -
 20
20 -
 21
21 -
 22
22 -
 23
23 -
 24
24 -
 25
25 -
 26
26 -
 27
27 -
 28
28 -
 29
29 -
30
-
31
-
32
-
33
-
34
-
35
-
36
-
37
-
38
-
39
-
40
-
41
-
42
-
43
-
44
-
45
-
46
-
47
-
48
-
49
-
50
-
51
-
52
-
53
-
54
-
55
-
56
-
57
-
58
-
59
-
60
-
61
-
62
-
63
-
64
-
65
-
66
-
67
-
68
-
69
-
70
-
71
-
72
-
73
-
74
-
75
-
76
-
77
-
78
-
79
-
80
-
81
-
82
-
83
-
84
-
85
-
86
-
87
-
88
-
89
-
90
-
91
-
92
-
93
-
94
-
95
-
96
-
97
-
98
-
99
-
100
-
101
-
102
-
103
-
104
-
105
-
106
-
107
-
108
-
109
-
110
-
111
-
112
-
113
-
114
-
115
-
116
 |
 |
