Sony CCD-TRV238E User Manual - Page 67
Recording pictures from a VCR (TRV285E), Dubbing selected scenes from a tape – Digital program
 |
View all Sony CCD-TRV238E manuals
Add to My Manuals
Save this manual to your list of manuals |
Page 67 highlights
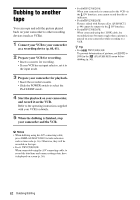
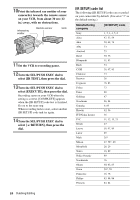
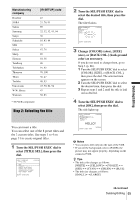
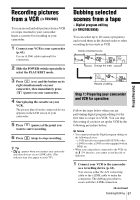
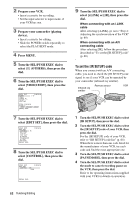
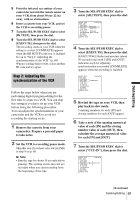
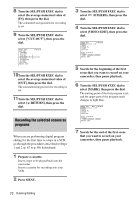
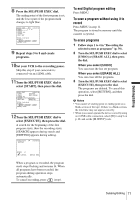
Recording pictures from a VCR ( TRV285E) You can record and edit pictures from a VCR on a tape inserted in your camcorder. Insert a cassette for recording in your camcorder. 1 Connect your VCR to your camcorder (p. 61). Use an i.LINK cable (optional) for connection. 2 Slide the POWER switch repeatedly to select the PLAY/EDIT mode. 3 Press (rec) and the button on its right simultaneously on your camcorder, then immediately press (pause) on your camcorder. 4 Start playing the cassette on your VCR. The picture played on the connected device appears on the LCD screen of your camcorder. 5 Press (pause) at the point you want to start recording. 6 Press (stop) to stop recording. z Tip • appears when you connect your camcorder and other devices via an i.LINK cable. (This indicator may also appear on your TV.) Dubbing selected scenes from a tape - Digital program editing ( TRV270E/285E) You can select up to 20 scenes (programs) and record them in the desired order to other recording device such as VCR. Delete unwanted scene Change the order Results of editing Step 1: Preparing your camcorder and VCR for operation Follow the steps below when you are performing digital program editing for the first time to a tape in a VCR. You can skip this setting if you have set up the VCR by the following procedure before. b Notes • You cannot perform the Digital program editing on the following devices: - a VCR that does not support [IR SETUP] codes - a DVD recorder, a DVD recorder equipped with an HDD, etc • When your camcorder is connected to the VCR via the DV Interface, you cannot record the title or indicators. 1 Connect your VCR to the camcorder as a recording device (p. 61). You can use either the A/V connecting cable or the i.LINK cable to make the connection. The dubbing procedure is easier with the i.LINK connection. ,continued Dubbing/Editing 67 Dubbing/Editing
-
 1
1 -
2
-
3
-
4
-
5
-
6
-
7
-
8
-
9
-
10
-
11
-
12
-
13
-
14
-
15
-
16
-
17
-
18
-
19
-
20
-
21
-
22
-
23
-
24
-
25
-
26
-
27
-
28
-
29
-
30
-
31
-
32
-
33
-
34
-
35
-
36
-
37
-
38
-
39
-
40
-
41
-
42
-
43
-
44
-
45
-
46
-
47
-
48
-
49
-
50
-
51
-
52
-
53
-
54
-
55
-
56
-
57
-
58
-
59
-
60
-
61
-
 62
62 -
 63
63 -
 64
64 -
 65
65 -
 66
66 -
 67
67 -
 68
68 -
 69
69 -
 70
70 -
 71
71 -
 72
72 -
73
-
74
-
75
-
76
-
77
-
78
-
79
-
80
-
81
-
82
-
83
-
84
-
85
-
86
-
87
-
88
-
89
-
90
-
91
-
92
-
93
-
94
-
95
-
96
-
97
-
98
-
99
-
100
-
101
-
102
-
103
-
104
-
105
-
106
-
107
-
108
-
109
-
110
-
111
-
112
-
113
-
114
-
115
-
116
 |
 |