Sony DCR-DVD201 Operating Instructions - Page 18
Showing the remaining battery time – BATTERY INFO, Connecting to a wall outlet, Notes - power cord
 |
UPC - 027242644557
View all Sony DCR-DVD201 manuals
Add to My Manuals
Save this manual to your list of manuals |
Page 18 highlights
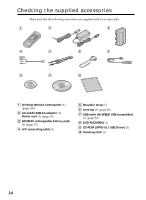
Step 1 Preparing the power source Showing the remaining battery time - BATTERY INFO 1 Open the LCD screen. 2 Press DISPLAY/BATT INFO. The remaining battery time appears for a while on the LCD display. BATTERY INFO BATTERY CHARGE LEVEL 0% 50% 100% BATTERY INFO BATTERY CHARGE LEVEL 0% 50% 100% REC TIME AVAILABLE LCD SCREEN : 96 min VIEWFINDER : 108 min REC TIME AVAILABLE LCD SCREEN : 120 min VIEWFINDER : 135 min During charging Fully charged Notes •BATTERY INFO does not appear when the power of the camcorder is ON. •The remaining battery time may not be indicated in the following cases: - The battery pack is not installed correctly. - The battery pack is damaged. - The battery pack is empty. •The number displayed as Battery Info is the approximate recording time. •While the remaining battery time is being calculated, "CALCULATING BATTERY INFO..." is displayed. •It may take some time to display the remaining battery time after DISPLAY/BATT INFO is pressed. Connecting to a wall outlet When you use your camcorder for a long time, it is recommended that you power it from a wall outlet using the AC adaptor. 1 Open the DC IN jack cover, then connect the AC adaptor supplied with your camcorder to the DC IN jack on your camcorder with the plug's v mark facing up. 2 Connect the power cord to the AC adaptor. 3 Connect the power cord to a wall outlet. See page 16 for details. Notes •The AC adaptor can supply power even if the battery pack is attached to your camcorder. •The DC IN jack has "source priority". This means that the battery pack cannot supply any power if the AC adaptor is connected to the DC IN jack, even when the power cord is not plugged into a wall outlet. •Your camcorder is not disconnected from the AC power source (house current) as long as it is connected to the wall outlet, even if your camcorder itself has been turned off. 18
-
 1
1 -
2
-
3
-
4
-
5
-
6
-
7
-
8
-
9
-
10
-
11
-
12
-
 13
13 -
 14
14 -
 15
15 -
 16
16 -
 17
17 -
 18
18 -
 19
19 -
 20
20 -
 21
21 -
 22
22 -
 23
23 -
24
-
25
-
26
-
27
-
28
-
29
-
30
-
31
-
32
-
33
-
34
-
35
-
36
-
37
-
38
-
39
-
40
-
41
-
42
-
43
-
44
-
45
-
46
-
47
-
48
-
49
-
50
-
51
-
52
-
53
-
54
-
55
-
56
-
57
-
58
-
59
-
60
-
61
-
62
-
63
-
64
-
65
-
66
-
67
-
68
-
69
-
70
-
71
-
72
-
73
-
74
-
75
-
76
-
77
-
78
-
79
-
80
-
81
-
82
-
83
-
84
-
85
-
86
-
87
-
88
-
89
-
90
-
91
-
92
-
93
-
94
-
95
-
96
-
97
-
98
-
99
-
100
-
101
-
102
-
103
-
104
-
105
-
106
-
107
-
108
-
109
-
110
-
111
-
112
-
113
-
114
-
115
-
116
-
117
-
118
-
119
-
120
-
121
-
122
-
123
-
124
-
125
-
126
-
127
-
128
-
129
-
130
-
131
-
132
-
133
-
134
-
135
-
136
-
137
-
138
-
139
-
140
-
141
-
142
-
143
-
144
-
145
-
146
-
147
-
148
 |
 |
