Sony DCR-DVD201 Operating Instructions - Page 30
After recording, Press START/STOP
 |
UPC - 027242644557
View all Sony DCR-DVD201 manuals
Add to My Manuals
Save this manual to your list of manuals |
Page 30 highlights
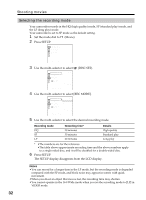
Shooting movies 7 Press START/STOP (z). Your camcorder starts recording. [REC] appears on the LCD display. The camera recording lamp located on the front of your camcorder lights up. To stop recording, press START/STOP again. REC 0:00:01 -R VIDEO You can operate start/stop with the REC START/STOP button on the LCD screen. This is useful when you shoot movies from a low angle. After recording 1 Remove the disc (page 27). 2 Turn the power off by pressing the POWER button for a few seconds again. 3 Close the LCD screen. 4 Remove the battery pack or disconnect the AC adaptor. Notes •Make sure that the lens cap strap is not caught into the disc cover when you insert or remove a disc. •Do not touch the built-in microphone during recording. •When the ACCESS lamp lights on, data is being recorded on the disc. Take note of the following when data is being recorded, or the data or the disc may be damaged. - Do not apply shock or shake the camcorder. - Do not turn the power off. - Do not remove the battery pack or disconnect the AC adaptor. - Do not open the disc cover. •The writing time to the disc for recording may vary depending on the recording mode (page 32). •There may be time difference between the point when you press START/STOP and the actual point that the recording starts/stops. •Make sure the POWER/CHG lamp is off when you remove the power source. Tip If you leave your camcorder powered by the battery pack for five minutes, your camcorder automatically turns off. This is to save battery power and to prevent battery wear. Turn the power on again by pressing the POWER button for a few seconds. You can cancel the automatic power-off by setting the (SETUP MENU) - [A. SHUT OFF] menu item to [NEVER] in the SETUP display. 30
-
 1
1 -
2
-
3
-
4
-
5
-
6
-
7
-
8
-
9
-
10
-
11
-
12
-
13
-
14
-
15
-
16
-
17
-
18
-
19
-
20
-
21
-
22
-
23
-
24
-
 25
25 -
 26
26 -
 27
27 -
 28
28 -
 29
29 -
 30
30 -
 31
31 -
 32
32 -
 33
33 -
 34
34 -
 35
35 -
36
-
37
-
38
-
39
-
40
-
41
-
42
-
43
-
44
-
45
-
46
-
47
-
48
-
49
-
50
-
51
-
52
-
53
-
54
-
55
-
56
-
57
-
58
-
59
-
60
-
61
-
62
-
63
-
64
-
65
-
66
-
67
-
68
-
69
-
70
-
71
-
72
-
73
-
74
-
75
-
76
-
77
-
78
-
79
-
80
-
81
-
82
-
83
-
84
-
85
-
86
-
87
-
88
-
89
-
90
-
91
-
92
-
93
-
94
-
95
-
96
-
97
-
98
-
99
-
100
-
101
-
102
-
103
-
104
-
105
-
106
-
107
-
108
-
109
-
110
-
111
-
112
-
113
-
114
-
115
-
116
-
117
-
118
-
119
-
120
-
121
-
122
-
123
-
124
-
125
-
126
-
127
-
128
-
129
-
130
-
131
-
132
-
133
-
134
-
135
-
136
-
137
-
138
-
139
-
140
-
141
-
142
-
143
-
144
-
145
-
146
-
147
-
148
 |
 |
