Sony DCR-DVD201 Operating Instructions - Page 42
Press SETUP., Use the multi-selector to select [BURST].
 |
UPC - 027242644557
View all Sony DCR-DVD201 manuals
Add to My Manuals
Save this manual to your list of manuals |
Page 42 highlights
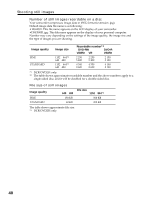
Shooting still images 4 Use the multi-selector to select [BURST]. CAMERA SET SELFTIMER BURST QUALITY IMAGESIZE N. S. LIGHT RETURN OFF NORMAL EXP BRKTG [ SETUP ] : END 5 Use the multi-selector to select [NORMAL] or [EXP BRKTG]. CAMERA SET SELFTIMER BURST QUALITY IMAGESIZE N. S. LIGHT RETURN NORMAL [ SETUP ] : END 6 Press SETUP. The SETUP display disappears from the LCD display. 7 Press PHOTO all the way down. Images are recorded continuously as the settings specified above. In the [NORMAL] settings, images are recorded continuously to the maximum number while pressing PHOTO. Notes •You may not be able to record continuous images up to the maximum number depending on the image size and the remaining capacity of the disc. •The flash unit (optional) is disabled during continuous shooting. • It takes longer to record continuous images to the disc compared to normal shooting. Shoot the next still image after the scroll bar indicator and the ACCESS lamp turns off. Tips •Shooting with the self-timer or the Remote Commander, images are automatically recorded up to the maximum number possible. •The effect of exposure bracketing may be difficult to recognize on the LCD display. It is recommended that you connect your camcorder to a TV or a computer to see its effect. 42
-
 1
1 -
2
-
3
-
4
-
5
-
6
-
7
-
8
-
9
-
10
-
11
-
12
-
13
-
14
-
15
-
16
-
17
-
18
-
19
-
20
-
21
-
22
-
23
-
24
-
25
-
26
-
27
-
28
-
29
-
30
-
31
-
32
-
33
-
34
-
35
-
36
-
 37
37 -
 38
38 -
 39
39 -
 40
40 -
 41
41 -
 42
42 -
 43
43 -
 44
44 -
 45
45 -
 46
46 -
 47
47 -
48
-
49
-
50
-
51
-
52
-
53
-
54
-
55
-
56
-
57
-
58
-
59
-
60
-
61
-
62
-
63
-
64
-
65
-
66
-
67
-
68
-
69
-
70
-
71
-
72
-
73
-
74
-
75
-
76
-
77
-
78
-
79
-
80
-
81
-
82
-
83
-
84
-
85
-
86
-
87
-
88
-
89
-
90
-
91
-
92
-
93
-
94
-
95
-
96
-
97
-
98
-
99
-
100
-
101
-
102
-
103
-
104
-
105
-
106
-
107
-
108
-
109
-
110
-
111
-
112
-
113
-
114
-
115
-
116
-
117
-
118
-
119
-
120
-
121
-
122
-
123
-
124
-
125
-
126
-
127
-
128
-
129
-
130
-
131
-
132
-
133
-
134
-
135
-
136
-
137
-
138
-
139
-
140
-
141
-
142
-
143
-
144
-
145
-
146
-
147
-
148
 |
 |
