Sony DCR-DVD650 Operating Guide - Page 70
Finalizing a disc, To select a DVD menu style
 |
UPC - 027242763111
View all Sony DCR-DVD650 manuals
Add to My Manuals
Save this manual to your list of manuals |
Page 70 highlights
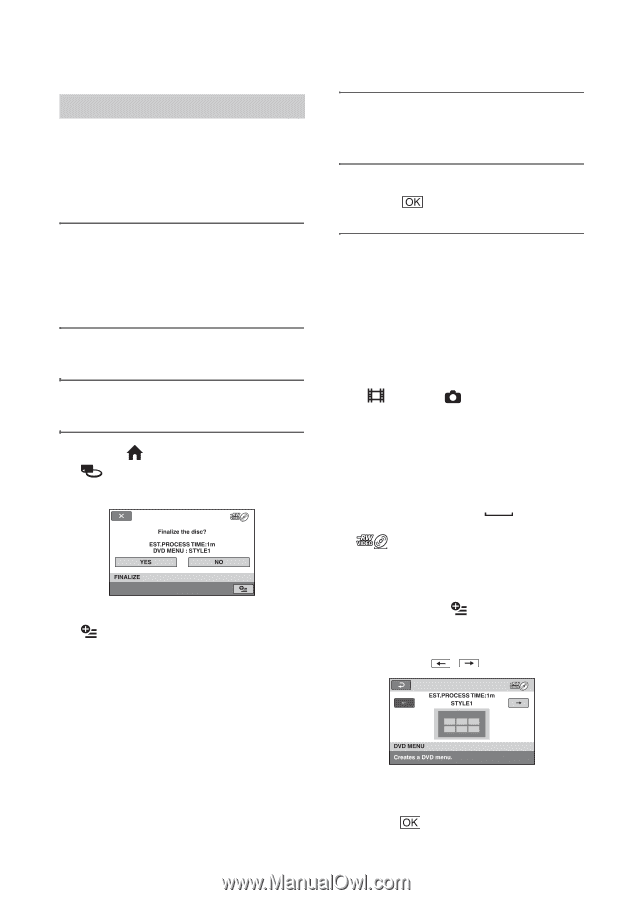
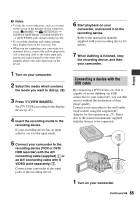
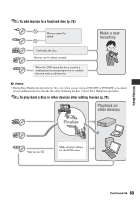
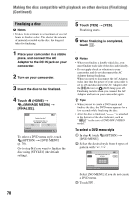
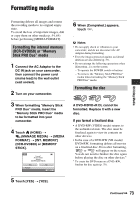
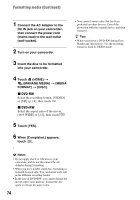
Making the disc compatible with playback on other devices (Finalizing) (Continued) Finalizing a disc b Notes • It takes from a minute to a maximum of several hours to finalize a disc. The shorter the amount of material recorded on the disc, the longer it takes for finalizing. 1 Place your camcorder in a stable place, and connect the AC Adaptor to the DC IN jack on your camcorder. 2 Turn on your camcorder. 3 Insert the disc to be finalized. 4 Touch (HOME) t (MANAGE MEDIA) t [FINALIZE]. To select a DVD menu style, touch (OPTION) t [DVD MENU] (p. 70). Go to step 5 if you want to finalize the disc using [STYLE1] (the default setting). 5 Touch [YES] t [YES]. Finalizing starts. 6 When finalizing is completed, touch . b Notes • When you finalize a double-sided disc, you must finalize each side of the disc individually. • Do not apply shock or vibration to your camcorder, and do not disconnect the AC Adaptor during finalizing. When you need to disconnect the AC Adaptor, make sure that the power of your camcorder is set to off and disconnect the AC Adaptor after the (Movie) or (Still) lamp goes off. Finalizing restarts when you connect the AC Adaptor and turn on your camcorder again. z Tips • When you set to create a DVD menu and finalize the disc, the DVD menu appears for a few seconds while finalizing the disc. • After the disc is finalized, " " is attached at the bottom of the disc indicator, such as " " in the case of DVD-RW (VIDEO mode). To select a DVD menu style 1 In step 4, touch (OPTION) t [DVD MENU]. 2 Select the desired style from 4 types of pattern with / . Select [NO MENU] if you do not create a DVD menu. 3 Touch . 70
-
 1
1 -
2
-
3
-
4
-
5
-
6
-
7
-
8
-
9
-
10
-
11
-
12
-
13
-
14
-
15
-
16
-
17
-
18
-
19
-
20
-
21
-
22
-
23
-
24
-
25
-
26
-
27
-
28
-
29
-
30
-
31
-
32
-
33
-
34
-
35
-
36
-
37
-
38
-
39
-
40
-
41
-
42
-
43
-
44
-
45
-
46
-
47
-
48
-
49
-
50
-
51
-
52
-
53
-
54
-
55
-
56
-
57
-
58
-
59
-
60
-
61
-
62
-
63
-
64
-
 65
65 -
 66
66 -
 67
67 -
 68
68 -
 69
69 -
 70
70 -
 71
71 -
 72
72 -
 73
73 -
 74
74 -
 75
75 -
76
-
77
-
78
-
79
-
80
-
81
-
82
-
83
-
84
-
85
-
86
-
87
-
88
-
89
-
90
-
91
-
92
-
93
-
94
-
95
-
96
-
97
-
98
-
99
-
100
-
101
-
102
-
103
-
104
-
105
-
106
-
107
-
108
-
109
-
110
-
111
-
112
-
113
-
114
-
115
-
116
-
117
-
118
-
119
-
120
-
121
-
122
-
123
-
124
-
125
-
126
-
127
-
128
-
129
-
130
-
131
-
132
-
133
-
134
-
135
-
136
-
137
-
138
-
139
-
140
-
141
-
142
-
143
-
144
-
145
-
146
-
147
-
148
-
149
-
150
-
151
-
152
-
153
-
154
-
155
-
156
-
157
-
158
-
159
 |
 |