Sony KDF-55XS955 Operating Instructions (Large File - 14.9 MB) - Page 22
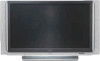
LCD Projection TV Front Panel and Connectors, Front Panel - blinking lights
 |
View all Sony KDF-55XS955 manuals
Add to My Manuals
Save this manual to your list of manuals |
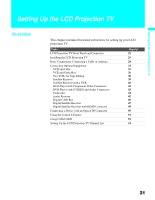
Page 22 highlights
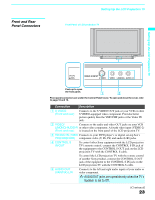
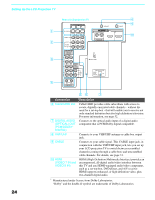
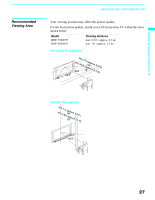
Setting Up the LCD Projection TV LCD Projection TV Front Panel and Connectors Front Panel 22 STD/DUO POWER/STANDBY LAMP TIMER POWER STD/DUO POWER/STANDBY LAMP TIMER POWER CHANNEL 3 VOLUME 3 # TV/VIDEO 7 8 9 12 3 4 56 Item Description 1 Memory Stick indicator When the Memory Stick indicator is lit, indicates that the Memory Stick is being read. (Do not remove the Memory Stick when the indicator is lit.) 2 Memory Stick slot For inserting Memory Stick media to view on your LCD projection TV. For details, See "Inserting and Removing a Memory Stick" on page 78. 3 LAMP LED Lights up in red when the lamp for the light source has burned out. For details, see "Replacing the Lamp" on page 16. 4 TIMER LED When lit, indicates one of the timers is set. When the timer is set, this LED will remain lit even if the TV set is turned off. For details, see page 122. 5 POWER/ STANDBY LED Lights up in green when the TV set is turned on. When in standby mode, the LED lights up in red. The LED does not light up when the main power is turned off. If the LED blinks continuously, this may indicate the display unit needs servicing (see "Contacting Sony" on page 115). 6 POWER Press to turn on/off the LCD projection TV. The POWER button has a built-in Infrared (IR) Receiver that receives IR signals from the remote control. 7 CHANNEL +/- Press to scan through channels. 8 VOLUME +/- Press to adjust the volume. 9 TV/VIDEO Press to select between the TV's tuner and other video equipment inputs.
-
 1
1 -
2
-
3
-
4
-
5
-
6
-
7
-
8
-
9
-
10
-
11
-
12
-
13
-
14
-
15
-
16
-
 17
17 -
 18
18 -
 19
19 -
 20
20 -
 21
21 -
 22
22 -
 23
23 -
 24
24 -
 25
25 -
 26
26 -
 27
27 -
28
-
29
-
30
-
31
-
32
-
33
-
34
-
35
-
36
-
37
-
38
-
39
-
40
-
41
-
42
-
43
-
44
-
45
-
46
-
47
-
48
-
49
-
50
-
51
-
52
-
53
-
54
-
55
-
56
-
57
-
58
-
59
-
60
-
61
-
62
-
63
-
64
-
65
-
66
-
67
-
68
-
69
-
70
-
71
-
72
-
73
-
74
-
75
-
76
-
77
-
78
-
79
-
80
-
81
-
82
-
83
-
84
-
85
-
86
-
87
-
88
-
89
-
90
-
91
-
92
-
93
-
94
-
95
-
96
-
97
-
98
-
99
-
100
-
101
-
102
-
103
-
104
-
105
-
106
-
107
-
108
-
109
-
110
-
111
-
112
-
113
-
114
-
115
-
116
-
117
-
118
-
119
-
120
-
121
-
122
-
123
-
124
-
125
-
126
-
127
-
128
-
129
 |
 |
