Sony KE-42TS2U Operating Instructions - Page 13
Connecting an Audio Receiver - no volume up control
 |
View all Sony KE-42TS2U manuals
Add to My Manuals
Save this manual to your list of manuals |
Page 13 highlights
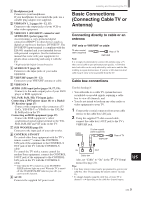
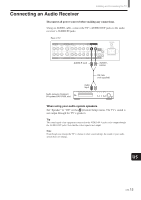
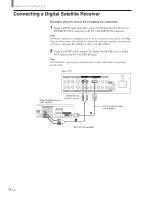
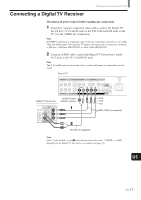
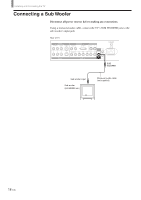
Connecting an Audio Receiver Installing and Connecting the TV Disconnect all power sources before making any connections. Using an AUDIO cable, connect the TV's AUDIO OUT jacks to the audio receiver's AUDIO IN jacks. Rear of TV VIDEO IN 1 R AUDIO L VIDEO S VIDEO VIDEO IN 2 COMPONENT VIDEO IN 1 AUDIO OUT R AUDIO L Y PB PR R L R AUDIO L Y/G PB/B PR/R HD CONTROL S IN VD OUT COMPONENT VIDEO IN 2 / RGB IN SUB WOOFER VHF/UHF AC IN AUDIO-R (red) AUDIO-L (white) Audio reciever (Compact AV system DAV-C990, etc) Audio input RK-74A (not supplied) When using your audio system speakers Set "Speaker" to "Off" on the (Custom Setup) menu. The TV's sound is not output through the TV's speakers. Tip The sound signal of an equipment connected to the VIDEO IN 4 jacks is also output through the AUDIO OUT jacks. Note that the video signal is not output. Note Even though you change the TV's volume or other sound settings, the sound of your audio system does not change. US (US) 13
-
 1
1 -
2
-
3
-
4
-
5
-
6
-
7
-
 8
8 -
 9
9 -
 10
10 -
 11
11 -
 12
12 -
 13
13 -
 14
14 -
 15
15 -
 16
16 -
 17
17 -
 18
18 -
19
-
20
-
21
-
22
-
23
-
24
-
25
-
26
-
27
-
28
-
29
-
30
-
31
-
32
-
33
-
34
-
35
-
36
-
37
-
38
-
39
-
40
-
41
-
42
-
43
-
44
-
45
-
46
-
47
-
48
-
49
-
50
-
51
-
52
-
53
-
54
-
55
-
56
-
57
-
58
-
59
-
60
-
61
-
62
-
63
-
64
-
65
-
66
-
67
-
68
-
69
-
70
-
71
-
72
-
73
-
74
-
75
-
76
-
77
-
78
-
79
-
80
-
81
-
82
-
83
-
84
-
85
-
86
-
87
-
88
-
89
-
90
-
91
-
92
-
93
-
94
-
95
-
96
-
97
-
98
-
99
-
100
-
101
-
102
-
103
-
104
-
105
-
106
-
107
-
108
-
109
-
110
-
111
-
112
-
113
-
114
-
115
-
116
-
117
-
118
-
119
-
120
-
121
-
122
-
123
-
124
-
125
-
126
-
127
-
128
-
129
-
130
-
131
-
132
-
133
-
134
-
135
-
136
-
137
-
138
-
139
-
140
-
141
-
142
-
143
-
144
-
145
-
146
-
147
-
148
-
149
-
150
-
151
-
152
-
153
-
154
-
155
-
156
-
157
-
158
-
159
-
160
-
161
-
162
-
163
-
164
-
165
-
166
-
167
-
168
-
169
-
170
-
171
-
172
-
173
-
174
-
175
-
176
-
177
-
178
-
179
-
180
-
181
-
182
-
183
-
184
-
185
-
186
-
187
-
188
 |
 |
