Sony MZ-NH900 Operating Instructions - Page 14
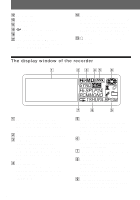
The display window of the recorder - md
 |
View all Sony MZ-NH900 manuals
Add to My Manuals
Save this manual to your list of manuals |
Page 14 highlights
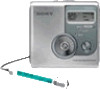
L OPEN switch M Display window N T MARK button O USB cable connecting jack P LINE IN (OPT) jack Q MIC (PLUG IN POWER) jack There is a tactile dot beside the MIC (PLUG IN POWER) jack. R HOLD switch Slide the switch in the direction of the arrow to disable the buttons on the recorder. To prevent the buttons from being accidentally operated when you carry the recorder, use this function. S i (headphones/earphones)/LINE OUT jack The display window of the recorder 1 2 3 45 6 A Character information display Displays the disc and track names, date, error messages, track numbers, etc. B SYNC (synchro-recording) indication C Hi-MD/MD indication "Hi-MD" lights up when the operation mode of the recorder is in Hi-MD mode and "MD" lights up when the operation mode is in MD mode. D REC indication Lights up during recording or file transfers from the computer. When flashing, the recorder is in record standby mode. 14 7 8 9 E Battery indication Shows the approximate remaining battery power. If the batteries are weak, the indication becomes empty and starts flashing. F Disc indication Shows that the disc is rotating for recording or playing. G Track mode (PCM, Hi-SP, Hi-LP, SP, LP2, LP4, MONO) indication H Sub play mode/Repeat play indications Shows the selected Sub play mode (single-track play, shuffle play, etc.) or Repeat play. I Main play mode indications Shows the selected main play mode (group play, program play, etc.).
-
 1
1 -
2
-
3
-
4
-
5
-
6
-
7
-
8
-
 9
9 -
 10
10 -
 11
11 -
 12
12 -
 13
13 -
 14
14 -
 15
15 -
 16
16 -
 17
17 -
 18
18 -
 19
19 -
20
-
21
-
22
-
23
-
24
-
25
-
26
-
27
-
28
-
29
-
30
-
31
-
32
-
33
-
34
-
35
-
36
-
37
-
38
-
39
-
40
-
41
-
42
-
43
-
44
-
45
-
46
-
47
-
48
-
49
-
50
-
51
-
52
-
53
-
54
-
55
-
56
-
57
-
58
-
59
-
60
-
61
-
62
-
63
-
64
-
65
-
66
-
67
-
68
-
69
-
70
-
71
-
72
-
73
-
74
-
75
-
76
-
77
-
78
-
79
-
80
-
81
-
82
-
83
-
84
-
85
-
86
-
87
-
88
-
89
-
90
-
91
-
92
-
93
-
94
-
95
-
96
-
97
-
98
-
99
-
100
-
101
-
102
-
103
-
104
-
105
-
106
-
107
-
108
-
109
-
110
-
111
-
112
-
113
-
114
-
115
-
116
-
117
-
118
-
119
-
120
-
121
-
122
-
123
-
124
-
125
-
126
-
127
-
128
-
129
-
130
-
131
-
132
-
133
-
134
-
135
-
136
 |
 |