Sony MZ-NH900 Operating Instructions - Page 19
For models supplied with the, AC plug adaptor, When to charge the, rechargeable battery or, replace - hi md recorder
 |
View all Sony MZ-NH900 manuals
Add to My Manuals
Save this manual to your list of manuals |
Page 19 highlights
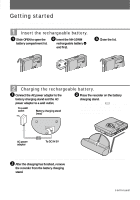
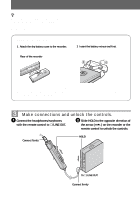
z You can also charge the rechargeable battery by connecting the AC power adaptor directly to the recorder. Connect the AC power adaptor to DC IN 3V on the recorder, and then press x • CANCEL/ CHG while the recorder is stopped. For models supplied with the AC plug adaptor If the AC power adaptor does not fit the wall outlet, use the AC plug adaptor. Notes • Make sure to remove the recorder from the battery charging stand when operating the recorder. • Make sure not to operate the recorder while changing the rechargeable battery even if the recorder is connected to AC power adaptor. The operation may stop. • "Charging" and e may not appear in the display immediately after you place the recorder on the battery charging stand. The indication will, however, begin flashing after a few minutes and charging will begin. • Because of the battery's characteristics, the capacity of the rechargeable battery may be smaller than normal when it is used for the first time or after a long period of disuse. In this case, charge and discharge the battery several times. The normal battery life will be restored. • Charge the rechargeable battery at a temperature of +5° C (+41° F) to +35° C (+95° F). The charging time may vary according to the surrounding temperature. • It is preferable to use the recorder on house current when recording or editing. When powering the recorder with batteries, make sure to use a fully charged rechargeable battery or a new alkaline dry battery. • Stop the recorder before replacing the battery. • When using a 1GB Hi-MD disc, the continuous recording time may be shortened if you repeatedly make short recordings. When to charge the rechargeable battery or replace the dry battery You can check the battery condition on the display window of the recorder or the remote control. Battery power decreasing m Weak battery m The battery is drained. "LOW BATTERY" flashes in the display on the recorder ("LOW BATT" on the remote control), and the power goes off. The battery level indicator is approximate. It may be more or less than the indication depending on the operating condition or the operating environment. 19
-
 1
1 -
2
-
3
-
4
-
5
-
6
-
7
-
8
-
9
-
10
-
11
-
12
-
13
-
 14
14 -
 15
15 -
 16
16 -
 17
17 -
 18
18 -
 19
19 -
 20
20 -
 21
21 -
 22
22 -
 23
23 -
 24
24 -
25
-
26
-
27
-
28
-
29
-
30
-
31
-
32
-
33
-
34
-
35
-
36
-
37
-
38
-
39
-
40
-
41
-
42
-
43
-
44
-
45
-
46
-
47
-
48
-
49
-
50
-
51
-
52
-
53
-
54
-
55
-
56
-
57
-
58
-
59
-
60
-
61
-
62
-
63
-
64
-
65
-
66
-
67
-
68
-
69
-
70
-
71
-
72
-
73
-
74
-
75
-
76
-
77
-
78
-
79
-
80
-
81
-
82
-
83
-
84
-
85
-
86
-
87
-
88
-
89
-
90
-
91
-
92
-
93
-
94
-
95
-
96
-
97
-
98
-
99
-
100
-
101
-
102
-
103
-
104
-
105
-
106
-
107
-
108
-
109
-
110
-
111
-
112
-
113
-
114
-
115
-
116
-
117
-
118
-
119
-
120
-
121
-
122
-
123
-
124
-
125
-
126
-
127
-
128
-
129
-
130
-
131
-
132
-
133
-
134
-
135
-
136
 |
 |