Sony MZ-NH900 Operating Instructions - Page 76
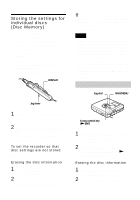
Storing the settings for, individual discs, Disc Memory
 |
View all Sony MZ-NH900 manuals
Add to My Manuals
Save this manual to your list of manuals |
Page 76 highlights
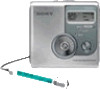
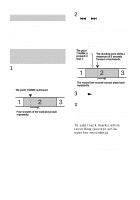
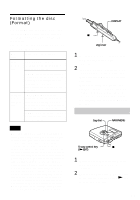
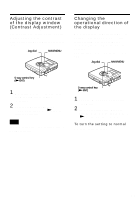
Storing the settings for individual discs (Disc Memory) The recorder is factory set to automatically store settings for each disc. The recorder automatically stores the settings for a disc and retrieves them whenever the disc is inserted. The following setting can be stored: • Program play • Bookmark • "Custom1" and "Custom2" settings of 6-Band Equalizer You can check the setting as follows. DISPLAY Jog lever 1 Remove the disc from the recorder, enter the menu and select "Option" "Disc Mem". 2 Slide the jog lever repeatedly until "On" appears in the display, and then press the jog lever to enter the selection. To set the recorder so that disc settings are not stored Select "Off" in step 2. Erasing the disc information 1 Insert the disc whose information is to be erased and verify its contents. 2 Select "1MemErase" in step 2. The disc information is erased. 76 z When "Disc Mem" is set to "On", "Disc Mem" ("Disc Memory" on the recorder) appears whenever a disc for which settings have been stored is inserted. Notes • Settings for up to 64 discs can be stored. Any settings stored afterwards will replace the settings with the lowest frequency of use among the 64. The numbers of discs that can be stored depend on the numbers of tracks recorded on the discs. More tracks recorded per disc means fewer discs can be stored. • If you try to erase the disc information of a disc that have never been stored, "NoDiscMem" ("NO DISC MEMORY" on the recorder) appears in the display for a few seconds. On the recorder Jog dial NAVI/MENU 5-way control key (NENT) 1 Remove the disc from the recorder, enter the menu and select "Option" "Disc Mem". 2 Turn the jog dial until "On" appears in the display, and then press NENT to enter the selection. Erasing the disc information 1 Insert the disc whose information is to be erased and verify its contents. 2 Select "1MemErase" in step 2.
-
 1
1 -
2
-
3
-
4
-
5
-
6
-
7
-
8
-
9
-
10
-
11
-
12
-
13
-
14
-
15
-
16
-
17
-
18
-
19
-
20
-
21
-
22
-
23
-
24
-
25
-
26
-
27
-
28
-
29
-
30
-
31
-
32
-
33
-
34
-
35
-
36
-
37
-
38
-
39
-
40
-
41
-
42
-
43
-
44
-
45
-
46
-
47
-
48
-
49
-
50
-
51
-
52
-
53
-
54
-
55
-
56
-
57
-
58
-
59
-
60
-
61
-
62
-
63
-
64
-
65
-
66
-
67
-
68
-
69
-
70
-
 71
71 -
 72
72 -
 73
73 -
 74
74 -
 75
75 -
 76
76 -
 77
77 -
 78
78 -
 79
79 -
 80
80 -
 81
81 -
82
-
83
-
84
-
85
-
86
-
87
-
88
-
89
-
90
-
91
-
92
-
93
-
94
-
95
-
96
-
97
-
98
-
99
-
100
-
101
-
102
-
103
-
104
-
105
-
106
-
107
-
108
-
109
-
110
-
111
-
112
-
113
-
114
-
115
-
116
-
117
-
118
-
119
-
120
-
121
-
122
-
123
-
124
-
125
-
126
-
127
-
128
-
129
-
130
-
131
-
132
-
133
-
134
-
135
-
136
 |
 |