Sony RM-VL900 Operating Instructions (primary manual) - Page 10
Checking if the code, number works - program
 |
View all Sony RM-VL900 manuals
Add to My Manuals
Save this manual to your list of manuals |
Page 10 highlights
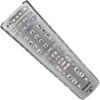
Setting the Code for Preset Audio and Visual Components (continued) Checking if the code number works 1 Press the corresponding Component Select button for the component you have set up. The Component button lights up when you press it, and turns off when you release it. 2 Power on the component with its power switch. If the Commander does not seem to be working Try repeating the setup procedures using the other codes listed for your components, or try setting the code number using the Search function (page 11). Note on the VOL+/- and MUTING buttons When you operate a visual component, the TV button lights up to indicate that the Commander is controlling or muting the TV's volume. When you operate an audio component, the AMP button lights up to indicate that the Commander is controlling or muting the amplifier's volume. 3 Aim the Commander at the component and press POWER. The selected Component button lights up when you press a function button, and turns off when you release it. The component should power off. It is recommended that you first set the TV and AMP codes before setting up any other components. Note on buttons that have already "learned" remote control signals If another signal has already been programmed on that button using the Learning function (page 15), that "learned" signal will work even after you set the component code number. To use it as a preset function button, first erase its "learned" signal (page 19). 4 If you have succeeded, check that the Commander is operating the other functions of your component, such as channel and volume control. See page 50 for details. 10
-
 1
1 -
2
-
3
-
4
-
 5
5 -
 6
6 -
 7
7 -
 8
8 -
 9
9 -
 10
10 -
 11
11 -
 12
12 -
 13
13 -
 14
14 -
 15
15 -
16
-
17
-
18
-
19
-
20
-
21
-
22
-
23
-
24
-
25
-
26
-
27
-
28
-
29
-
30
-
31
-
32
-
33
-
34
-
35
-
36
-
37
-
38
-
39
-
40
-
41
-
42
-
43
-
44
-
45
-
46
-
47
-
48
-
49
-
50
-
51
-
52
-
53
-
54
-
55
-
56
 |
 |
