Sony SLV-D380P Instruction Manual - Page 40
To use the Auto Tape Speed function, To watch a DVD after setting the timer
 |
UPC - 027242708945
View all Sony SLV-D380P manuals
Add to My Manuals
Save this manual to your list of manuals |
Page 40 highlights
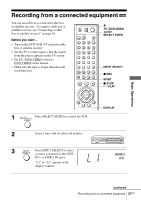
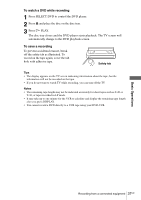
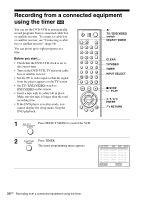
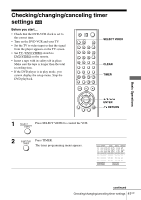
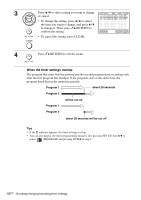
To use the Auto Tape Speed function When you are recording a program in the Auto mode and the remaining tape becomes shorter than the recording time, the tape speed is automatically changed to EP mode. Note that some noise will appear on the picture when the tape speed is changed. If you want to keep the tape speed, select SP. To operate this function, set "Tape Length" in "VIDEO FUNCTION SETUP" menu correctly (page 86). To watch a DVD after setting the timer 1 Press SELECT DVD to control the DVD player. 2 Press Z and place the disc on the disc tray. 3 Press H PLAY. The disc tray closes and the DVD player starts playback. The TV screen will automatically change to the DVD playback screen. Tips • If the indicator appears, the timer settings overlap. To check, change or cancel the timer setting, see "Checking/changing/canceling timer settings" on page 41. • If the indicator appears, this means that the VCR is currently recording this program. • You can also do the following tasks while the VCR is recording: - Reset the counter (page 33). - Display tape information on the TV screen (page 36). • You can also display the timer programming menu by first pressing SET UP, then V/v to select (PROGRAM) and pressing ENTER in step 2. Note • The indicator flashes in the display window when you complete the timer setting with no tape inserted. 40US Recording from a connected equipment using the timer
-
 1
1 -
2
-
3
-
4
-
5
-
6
-
7
-
8
-
9
-
10
-
11
-
12
-
13
-
14
-
15
-
16
-
17
-
18
-
19
-
20
-
21
-
22
-
23
-
24
-
25
-
26
-
27
-
28
-
29
-
30
-
31
-
32
-
33
-
34
-
 35
35 -
 36
36 -
 37
37 -
 38
38 -
 39
39 -
 40
40 -
 41
41 -
 42
42 -
 43
43 -
 44
44 -
 45
45 -
46
-
47
-
48
-
49
-
50
-
51
-
52
-
53
-
54
-
55
-
56
-
57
-
58
-
59
-
60
-
61
-
62
-
63
-
64
-
65
-
66
-
67
-
68
-
69
-
70
-
71
-
72
-
73
-
74
-
75
-
76
-
77
-
78
-
79
-
80
-
81
-
82
-
83
-
84
-
85
-
86
-
87
-
88
-
89
-
90
-
91
-
92
-
93
-
94
-
95
-
96
-
97
-
98
-
99
-
100
-
101
-
102
-
103
-
104
-
105
-
106
-
107
-
108
-
109
-
110
-
111
-
112
-
113
-
114
-
115
-
116
 |
 |